Tutorials
Welcome
screen-scraper Quick Start Guide
Learn how to use screen-scraper in under 3 minutes.
Tutorials
In order to use screen-scraper we recommend that you have at least some programming experience with any language. You'll benefit from a basic understanding of web technologies such as HTML, Javascript and HTTP but you will also learn as you go along. You can expect about 30 minutes for each tutorial.
See also:
First, download and install any one of the three editions of screen-scraper.
The Basics
Tutorial 1: Hello World Basics of using screen-scraper.
Tutorial 2: Scraping a Shopping Site Scraping search results that span multiple pages, using extractor patterns, and logging in to a web site.
Tutorial 3: Extending Hello World The third tutorial builds off of the first, and covers interacting with screen-scraper from languages such as Active Server Pages, PHP, and Java as well as richer internal scripting.
Task Specific
The rest of the tutorials build off of Tutorial 2, and can be done in any order.
Tutorial 4: Scraping a Shopping Site from External Programs Invoking screen-scraper from Java, Active Server Pages, PHP, and .NET.
Tutorial 5: Saving Scraped Data to a Database
Tutorial 6: Generating an RSS/Atom Feed from a Product Search Creating an XML feed.
Tutorial 7: Scraping a Site Multiple Times Based on Search Terms
![]() If you'd like to print the tutorials for easier reading, you can use the "Printer-friendly version" link at the bottom of any page, or click here to get such a version for all of the tutorials.
If you'd like to print the tutorials for easier reading, you can use the "Printer-friendly version" link at the bottom of any page, or click here to get such a version for all of the tutorials.
Tutorial 1: Hello World!
Introduction
This tutorial will walk you step-by-step through a simple example of how to use screen-scraper.
We'll be extracting the words "Hello World" from a web page and writing them to a file. This is a common practice for such things as extracting stock quotes or product prices.
Take a peek at the final product by downloading and importing the scraping session below. If you want to learn how to use screen-scraper be sure to also follow through the tutorials.
| Download complete scraping session | Size |
|---|---|
| Hello World (Scraping Session).sss | 2.27 KB |
1: Proxy Server Setup
What is a Proxy Server?
A proxy server sits between a web browser and a web server, recording and passing information between each. Once configured, every time you click a link or submit a form your browser is sending a request to a target server. These requests are recorded by screen-scraper then relayed to the target web server. The web server will then send corresponding responses back. screen-scraper records these responses and passes them to your browser.

Proxy transactions
All requests and responses are referred to as Transactions. A single click can generate many different transactions. Only some of these transactions are actually useful. You will be learning how to take individual transactions and convert them into Scrapeable Files for use during your scraping session.
Start screen-scraper
To begin you will first need to open up screen-scraper:
On Unix/Linux or Mac OS X use the screen-scraper link that was created when you installed screen-scraper.
If you're running Windows, this is done by selecting the appropriate link from the Start menu.
Once screen-scraper has loaded you'll see the objects tree on the left (it likely only contains the Root Folder currently). Let's create our first object.
Creating a Proxy Session
A proxy session is a screen-scraper object that allows you to interact with the proxy server and its records. You'll generally use one each time you create a new scrape.
Create a proxy session now by clicking the (Add a new proxy session) icon.
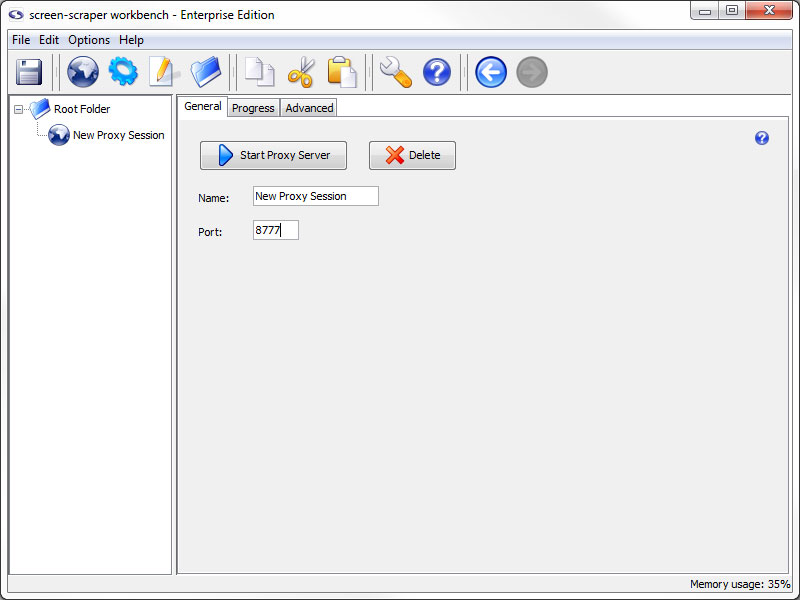
Configuring the Proxy Session
Give the proxy session the name Hello World. Leave the port at 8777.
Configure Browser to Use Proxy Session
If you have multiple web browsers installed on your computer we recommend using one of them to continue through the tutorial and the other to interact with the proxy server. For example, if you have Internet Explorer and Firefox installed you may want to view the tutorial pages using Firefox and use Internet Explorer with the proxy server.
Choose your browser:
Once configured your browser will send all requests through screen-scraper's proxy. This means all links you click or any forms you submit will be sent first to screen-scraper's proxy where it will be recorded. The proxy will then relay your request to the target server.
When the server responds to your request each response will first arrive at screen-scraper's proxy where it will be recorded. The proxy then sends the response to your browser.
If you're running Mac OS X, and are using screen-scraper Professional or Enterprise Edition, there's one more step you'll need to take: In screen-scraper, click the (settings) icon to bring up the Servers button in the panel on the left, then remove any text contained in the Hosts to allow to connect text box. Because of the way Mac OS X handles IP addresses, we do this so that screen-scraper will accept connections from your web browser.
Starting the Proxy Server
Click the Start Proxy Server button in your proxy session. Then, click on the Progress tab.
You're now ready to have screen-scraper record a few pages for you.
2: Proxy Server Record
Record HTTP Transaction
Return now to your web browser (the proxy server one) and go to the following URL:
http://api.screen-scraper.com/tutorial/basic_form.php
If you take a look at screen-scraper, you'll notice that it recorded this transaction in the HTTP Transactions table.
If you are experiencing issues with transactions being recorded as errors, these can often be the results of browser plug-ins/add-ons. We have found that Internet Explorer is especially prone to them and Opera is most stable/predictable as a browser to use when proxying a site.
If you didn't see your page show up in the HTTP Transactions table, or if your browser seems to have trouble, take a look at this FAQ for help.
Viewing Transaction Information
Clicking on the row in the table will load information related to the browser's request and response in the lower pane.
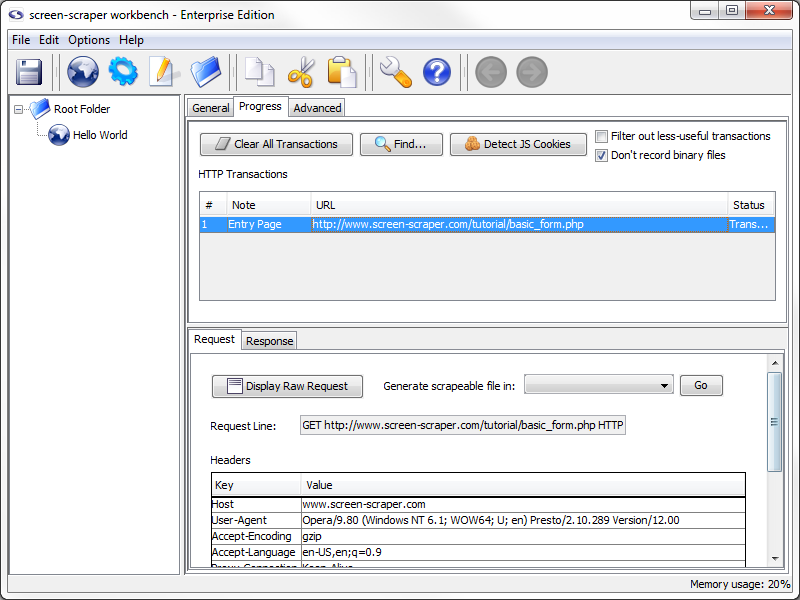
The lower pane shows the details of the HTTP request your browser made--the request line, any HTTP headers (including cookies), as well as POST data (if any was sent). You can view the corresponding response from the server by clicking on the Response tab.
Don't worry if a lot of what you're seeing doesn't make much sense; for the most part screen-scraper takes care of these kinds of details for you (such as keeping track of cookies).
To help keep track of our transactions let's provide a note for this one. To add a note, double click in the note section of the transaction. Let's add the note Entry Page to this transaction.
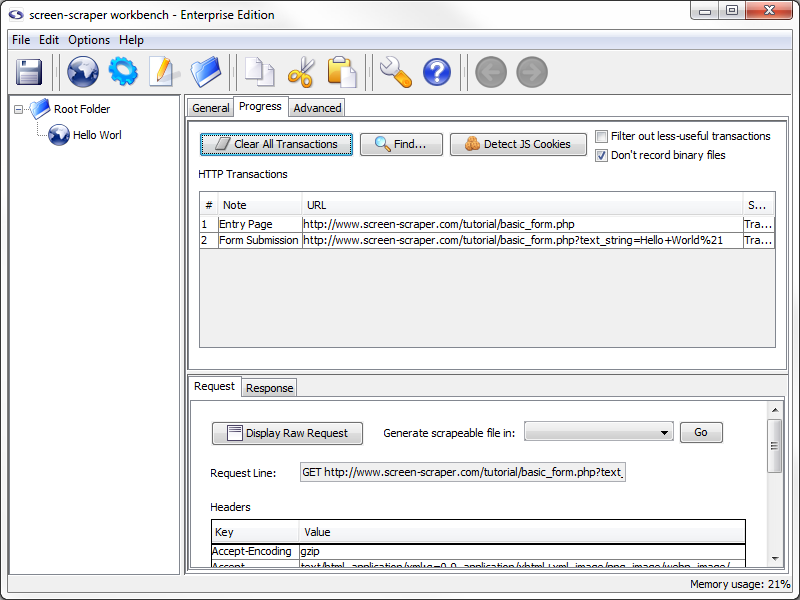
A Second Transaction
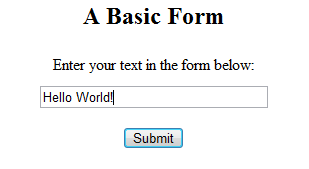
Returning to your web browser, type Hello world! into the text box and click the submit button. This will submit the form using the GET method, and display what you typed in on the page.
Add the note Form Submission to this transaction.
Stopping the Proxy Server & Reconfiguring the Browser
We now have all of the pages we need recorded. To turn the proxy server off, return to screen-scraper and click on the general tab. Click the Stop Proxy Server button.
You might want to also adjust your web browser so that it no longer uses screen-scraper as a proxy server.
3: Generate Scrapeable File
Creating the Scraping Session
To this point we have gathered information on how the pages we will be scraping work. Now we're ready to start creating the scrape. For all scrapes, we start by creating a scraping session. A scraping session is simply a container for all of the files and other objects that will allow us to extract data from a given web site.
Click the (Add a new scraping session) button to create a scraping session.
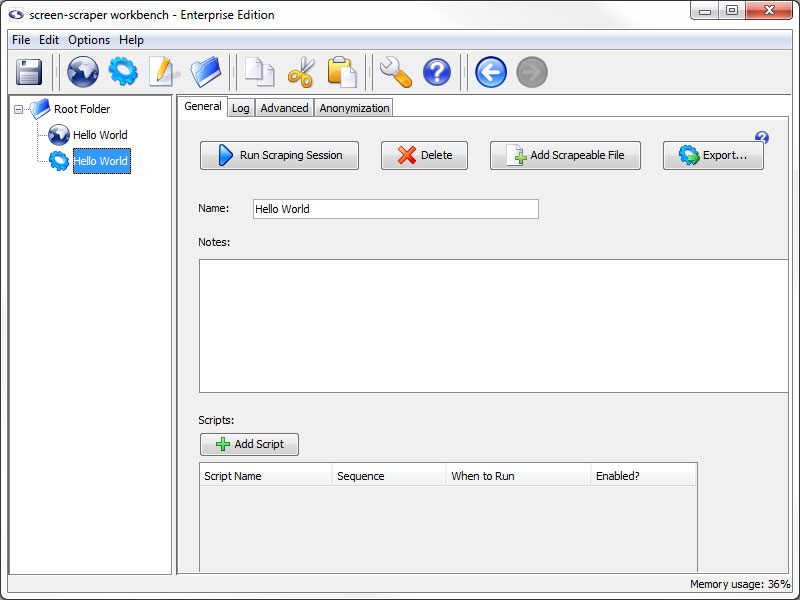
Rename scraping session to Hello World.
If you imported the scraping session at the beginning of the tutorial you'll want to name it something else, perhaps My Hello World.
Generating Scrapeable Files from Proxy Transactions
Now return to our Hello World proxy session by clicking on Hello World in the objects tree on the left. Click on the Progress tab to view our HTTP transactions from earlier.
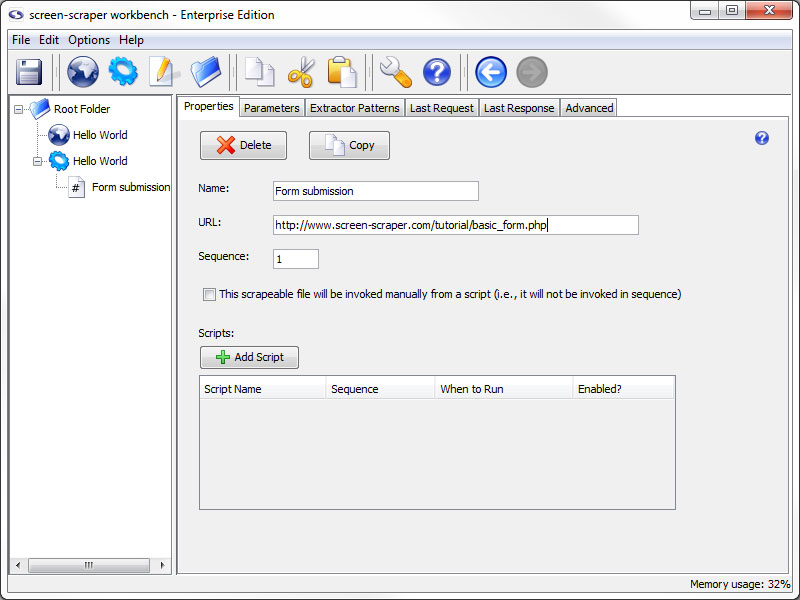
Any of the transactions in the table can be made into scrapeable files in our scrape. In this case, we are interested in the Form Submission transaction. Click on it so that its information loads in the Request tab below.
To create a scrapeable file from this transaction you just need to select the scraping session that you want the file to be created in. In the Generate scrapeable file in drop-down, select Hello World then click the Go button.
The new scrapeable file contains all the information in the HTTP transaction.
Review Recorded Data
Take a quick look at what the Proxy Server recorded. Let's go quickly through each of the tabs.
- Properties: Contains the base URL that was recorded.
- Parameters: Contains the data passed by our form submission.
- Extractor Patterns: Empty for now but here we will build our extractor patterns.
- Last Request: Contains the raw text of the request we made to the server.
- Last Response: Contains the raw text of the response made by the server.
Test Run
To start the scrape, click on the Hello World scraping session in the objects tree, then click the Run Scraping Session button.
The log should look something like this.
Running scraping session: Hello World
Processing scripts before scraping session begins.
Scraping file: "Form submission"
Form submission: Resolved URL: http://www.screen-scraper.com/tutorial/basic_form.php?text_string=Hello+world%21
Form submission: Sending request.
Processing scripts after scraping session has ended.
Scraping session "Hello World" finished.
Viewing the Scrapeable File Response
You can view the text of the file that was scraped by clicking on the Form submission scrapeable file in the objects tree, then on the Last Response tab. This will show the whole of the HTTP response that the server sent back to screen-scraper.
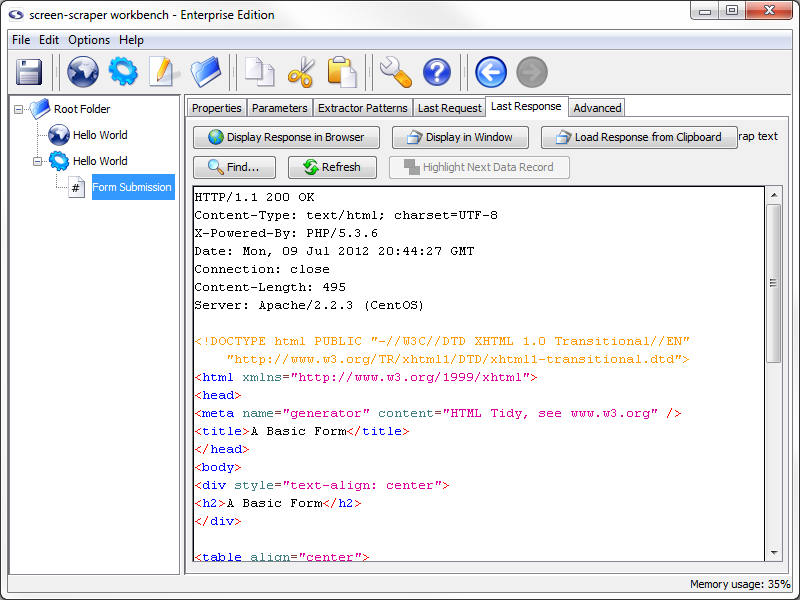
You can view what the page looks like when it is rendered by clicking the Display Response in Browser button. It's often helpful to view the last response for a scrapeable file after running a scraping session so that you can ensure that screen-scraper requested the right page.
A good principle of software design is to run code often as you make changes. Likewise, with screen-scraper it is a good idea to run your scraping session frequently and watch the log and last responses to ensure that things are working as you intend them to.
Saving Your Scrapes
Now would be a good time to save your work. Click the (Save) icon.
4: Create Extractor Pattern
This is probably the trickiest part of the tutorial, so if you've been skimming up to this point you'll probably want to read this page a little more carefully. Here we are going to discuss extractor patterns.
What is an Extractor Pattern?
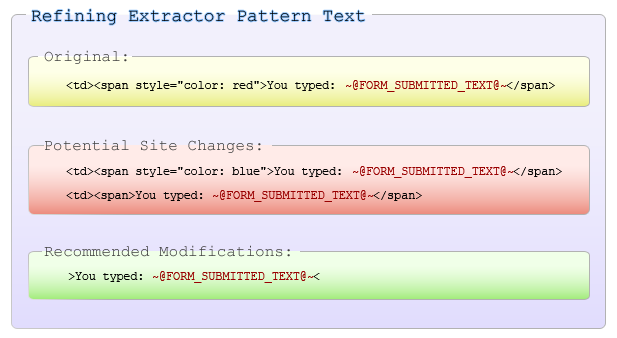
An extractor pattern is a block of text (usually HTML) that contains special tokens that will match the pieces of data you're interested in gathering. These tokens are text labels surrounded by the delimiters ~@ and @~.
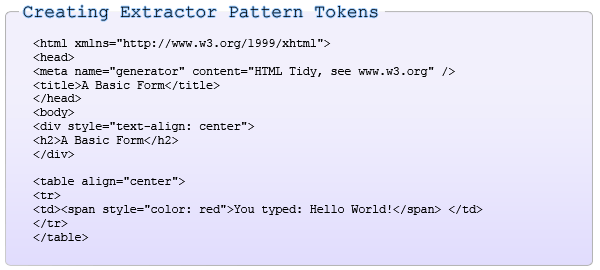
You can think of an extractor pattern like a stencil. A stencil is an image in cut-out form, often made of thin cardboard. To use a stencil you place it over a piece of paper, apply paint, then remove the stencil. The effect is the paint only remains where there were holes in the stencil. Analogously, you can think of placing an extractor pattern over the HTML of a web page. The tokens correspond to the holes where the paint would pass through. After an extractor pattern is applied it reveals only the portions of the web page where tokens were added.

Creating an Extractor Pattern (conceptually)
Let's consider this snippet of HTML that was taken from the page:
As we're interested in extracting the string "Hello world!" our extractor pattern would look like this:
We have added an extractor token with the name FORM_SUBMITTED_TEXT. In this form the pattern is very exact and so prone to breaking if the page were to experience a minor change like adding another attribute to the span tag, changing the style attribute to a class assignment, or changing the tag that is used. To avoid these simple problems we will simplify our pattern.
As you can guess this does not make the pattern unbreakable, just more resilient. If the label before the submitted text was changed it would no longer match and if the pattern added something after the submitted text (but within the same tag) then the token would match too much. That said, we have made it as stable as we can while making sure that it only matches what we want.
Creating an Extractor Pattern
You can have as many extractor patterns as you'd like in a given scrapeable file. screen-scraper will invoke each of them in sequence after requesting the scrapeable file.
The last response tab can be used to create extractor patterns using the HTML of the page. To view the HTML of the page, click on the Form submission scrapeable file, then on the Last Response tab. Now select the portion of the HTML that we want to use to create the extractor pattern:
If you are having trouble finding it you can use the Find button.
With the text selected, right click and select Generate extractor pattern from selected text from the menu that shows up. This will transition you to the Extractor Patterns tab of the scrapeable file and place the selected text in the Pattern text field.
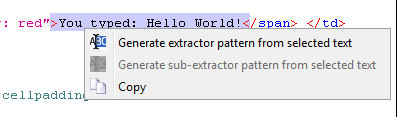
Now highlight the text that you want to be a token:
With the text selected, right click and select Generate extractor pattern token from selected text.

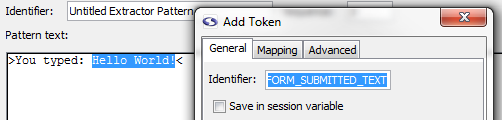
In the window that opens type FORM_SUBMITTED_TEXT in the Identifier textbox and close the window by clicking on the X in the upper right-hand corner. Don't worry settings are saved when the window closes.
You will notice that screen-scraper has automatically added the delimiters (~@ and @~) to the extractor token.

Give your extractor pattern the identifier

When creating an extractor pattern it is always preferable to use the text in the Last Response tab. When the page gets too long the text will be truncated. This will require you to view to the page source instead, this introduces possible issues. Be careful creating extractor patterns from the browser source as this will not be the exact form that screen-scraper will be using. Test the pattern early and often.

Testing the Extractor Pattern
Go ahead and give the extractor pattern a try by clicking on the Test Pattern button. This will open a window displaying the text that the extractor pattern extracted from the page.

Looks like our extractor pattern has matched the snippet of text we were after. The Test Pattern is another invaluable tool you'll use often to make sure you're getting the right data. It simply uses the HTML from the Last Response tab, and applies the extractor pattern to it.
When creating extractor patterns, always be sure you use the HTML from screen-scraper's Last Response tab, and not the HTML source in your web browser. Before screen-scraper applies an extractor pattern to an HTML page, it tidies up the HTML to facilitate extraction. This will generally cause the HTML to be slightly different from the HTML you'd get directly from your web browser.
Save Extractor Token values to Session Variable
Click the Save in session variable checkbox to store the extracted value ("Hello World!") represented by the FORM_SUBMITTED_TEXT Extractor Pattern Token.
Close the Edit Token window. Now when screen-scraper runs this scraping session and extracts the text for this extractor pattern it will save the text (e.g., "Hello world!") in a session variable so that we can do something with it later. Let's do something with it.
5: Add Script
How Scripts Work in screen-scraper
A screen-scraper script is a block of code that will get executed when a certain event occurs. For example, you might have a script that gets invoked at the beginning of a scraping session that initializes variables. Another script might get invoked each time a row in a list of search results is extracted from a site so that the information in that search result can be inserted into a database.
You can think of this as being analogous to event handling mechanisms in other programming languages. For example, in an HTML page you might associate a JavaScript method call with the onLoad event for the body tag. In Visual Basic you'll often create a sub-routine that gets invoked when a button is clicked. In the same way, screen-scraper scripts will get invoked when certain events occur related to requesting web pages and extracting data from them.
If you don't have much experience programming don't worry, generally scripts written in screen-scraper are short and simple. The script we'll be creating will simply write out the text we extract to a file.
Creating a Script
To create a new script, click on the (Add a new script) button. Give it the identifier Write extracted data to a file.
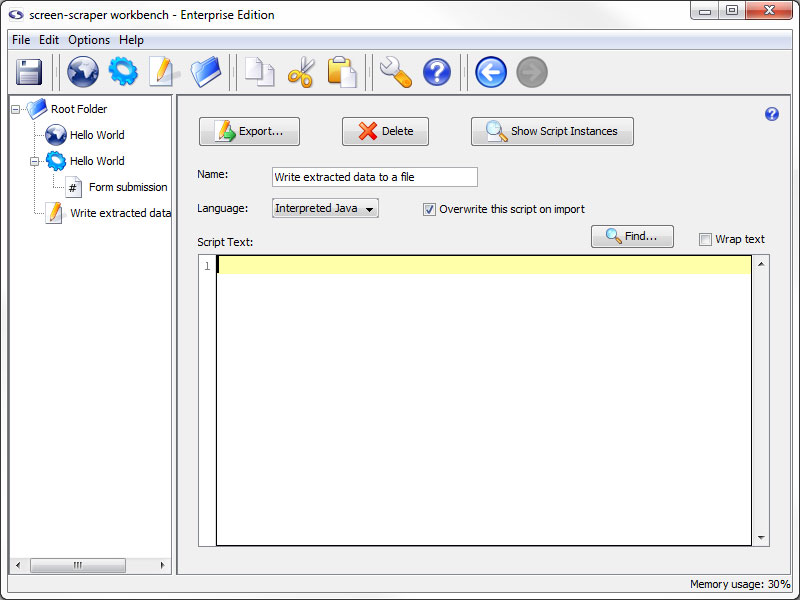
screen-scraper supports scripting in Interpreted Java, JavaScript, and Python when running on any operating system, and JScript, Perl, and VBScript when running on Windows (though these are turned off by default, see AllowUnstableWindowsFeatures documentation in screen-scraper settings). We will be using Java in this tutorial. Let's write our script.
6: Write Script
Using Interpreted Java
screen-scraper uses the BeanShell library to allow for scripting in Java. If you've done some programming in C or JavaScript you'll probably find BeanShell's syntax familiar.
Writing a Script
Let's get right to it. As the purpose of this tutorial is to get you familiar with screen-scraper and not to teach you Java, we will provide you with the code that you need for the script. Copy and paste the following text into the box labeled Script Text:
session.log( "Writing data to a file." ); // Tip: You can also use log.debug( message )
// Create a FileWriter object that we'll use to write out the text.
out = new FileWriter( "form_submitted_text.txt" );
// Write out the text.
out.write( session.getVariable( "FORM_SUBMITTED_TEXT" ) );
// Close the file.
out.close();
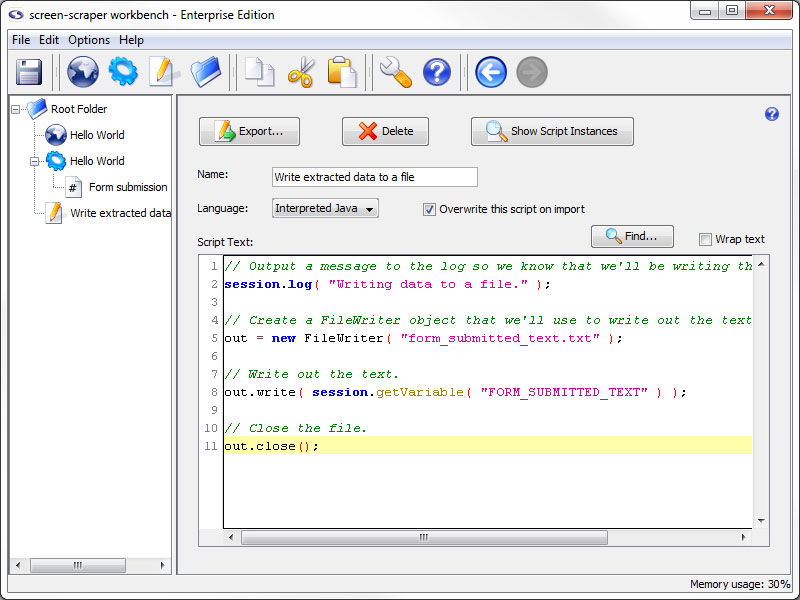
Hopefully it's obvious what's going on, based on the comments in the script. We simply create an object used to write out the text (a FileWriter), write out to it, then close up the file.
The file will be created in the installation directory of screen-scraper.
The session.getVariable( "FORM_SUBMITTED_TEXT" ) method call retrieves the value of the FORM_SUBMITTED_TEXT session variable. This method call is able to get the value because we indicated earlier that the value for the FORM_SUBMITTED_TEXT extractor token was to be saved in a session variable (i.e., when we checked the Save in session variable checkbox).
If you haven't done much programming, this is where things might seem a little confusing. If so, you may consider trying a basic tutorial on Java or JavaScript, which will hopefully introduce you to the basics of programming. You'll especially want to get an introduction to object-oriented programming.
7: Invoke Script
Adding Script Association/Trigger
A script is executed in screen-scraper by associating it with some event, such as before or after an extractor pattern is applied to the text of a web page. The script we've just written needs to be executed after screen-scraper has requested the web page and extracted the data we need from it.
Return to the extractor pattern we just created by clicking on the Form submission scrapeable file, then on the Extractor Patterns tab. In the lower section of your extractor pattern, click on the Add Script button.
Tell screen-scraper when to run the script by selecting Once if pattern matches.
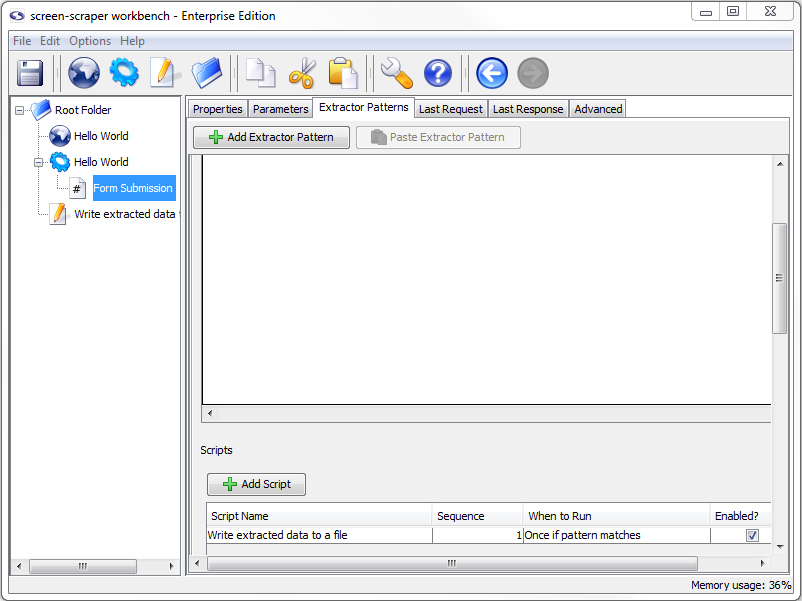
Our Write extracted data to a file script will be invoked after the first match is found to the Form data extractor pattern.
8: Run Scraping Session
Final Run
Now we have everything in place for our scrape. It knows what files to scrape, what data to extract, and what to do with the extracted data. Now it is time to make sure that it is working.
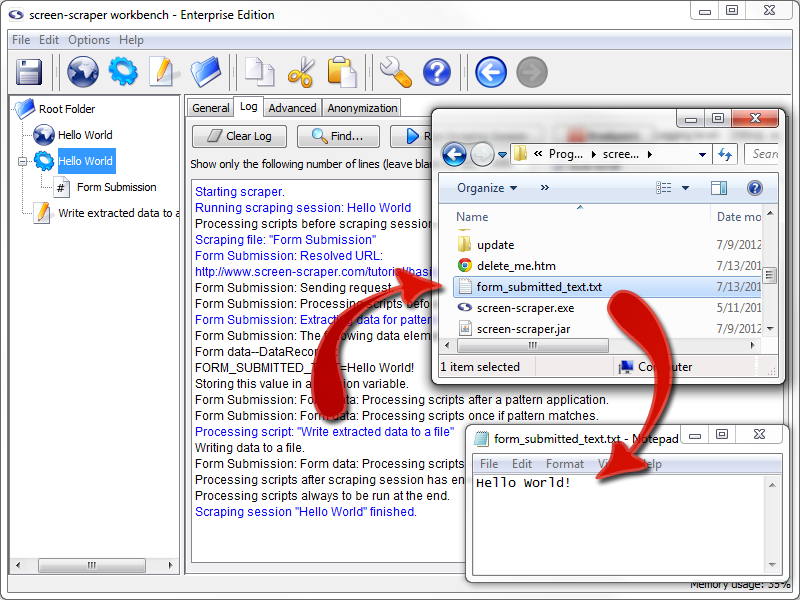
Just like with the test run, click on the Hello World scraping session in the objects tree. First, click on the Log tab. If there is existing text get rid of it by clicking the Clear Log button. Now click on the Run Scraping Session button.
After it finishes running, take a look at the contents of the form_submitted_text.txt file, which will be located in the screen-scraper installation directory (e.g., C:\Program Files\screen-scraper professional edition\). It should contain the text Hello world! in the document.
9: Review
Quick Summary
When learning to do something new it is important to see what you have done, and not just what you still don't know how to do. With that in mind take a moment to review the things that you have accomplished in this tutorial. To help in your reflection we have provided a list of the major steps from the tutorial. If you want to review information from any of the steps, you can click on the link to be returned back to that section of the tutorial.
- Create Proxy Session
- Configure Proxy Session
- Configure Browser to Use Proxy Session
- Run Proxy Server
- Record HTTP Transactions Using Proxy Session
- Create Scraping Session
- Generate Scrapeable Files from Proxy Transactions
- Create Extractor Pattern
- Save Extractor Token values to Session Variable
- Create Script
- Write Script
- Add Script Association
- Run Scrape
10: Where to Go From Here
Suggestions
First off, Congratulations! You now have the basic core knowledge you need to scrape screens with screen-scraper. While this was a very simple example of a scraping session, we covered most of the main principles you need to start your own project.
More Training/Tutorials
If you have the time, we'd highly recommend continuing on to Tutorial 2: Scraping an E-commerce Site. Don't worry, it just one step up. In it we will look at iterating through pages as well as logging in to a site. You could also go through Tutorial 3: Extending Hello World, in which you will learn how to interact with screen-scraper using external scripts like ASP, Java, and PHP (requires that you have a server on which to run the scripts).
Otherwise, you may want to consider reading through some of the existing documentation as you work on your own project.
Still a Little Lost?
If you don't feel comfortable with the process, we invite you to recreate the scrape using the tutorial only for reference. This can be done using only the screen-shots or review outline while you work on it. If you are still struggling you can search our forums for others like yourself and ask specific questions to the screen-scraper community.
Tutorial 2: Shopping Site
Overview
In this tutorial we'll be scraping search results from a basic e-commerce site. We'll also demonstrate logging in to a web site.
If you haven't already gone through Tutorial 1 we'd recommend that you do so before continuing with this one.
You'r welcome to view the final scraping session and output by downloading the two files below. Import the scraping session into screen-scraper.
| Attachment | Size |
|---|---|
| Shopping Site (Scraping Session).sss | 11.36 KB |
| dvds.txt (output) | 897 bytes |
1: Process Review
Screen Scraping Process
As you'll remember from the previous tutorial, extracting information from web sites using screen-scraper typically involves four main steps:
- Use the proxy server to determine the exact files that need to be requested in order to get the information you're after.
- Create a scraping session with scrapeable files that define the sequence of pages screen-scraper will request.
- Generate extractor patterns to define the exact information you need screen-scraper to grab from each page.
- Write small scripts or programming code to invoke screen-scraper and/or work with the data it extracts.

![]()
2: Record Search Results
Create Proxy Server
As in the first tutorial, we'll be recording a browser session using the proxy server. Remember that the proxy session records all of the HTTP requests and responses that take place between your browser and the target server.
Create a new proxy session now by clicking the New Proxy Session button and name it Shopping Site.
Configure Proxy Server
At this point start up the proxy server by clicking the Start Proxy Server button, then configure your web browser as you did in the first tutorial (if needed use our documentation on configuring your browser).
In your web browser (after configuring it to use the proxy server) go to this URL: http://www.screen-scraper.com/shop/.
Remember that you may want to use one browser with the proxy server and one to view the tutorial.
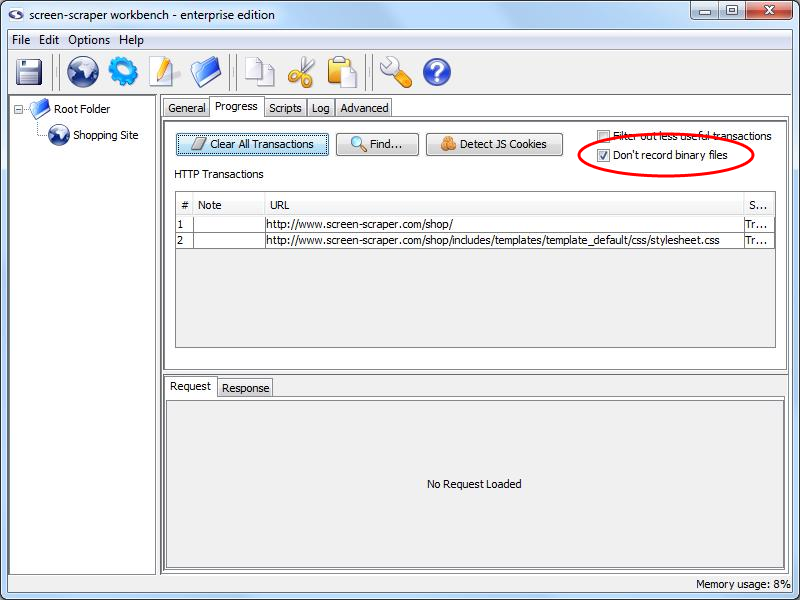
Make sure to check Don't record binary files.
Record Pages
Search Results Page
We'll be doing a search in the shopping web site for the term "dvd" in the product catalog. Do this by typing dvd into the search box located in the upper-right corner of the home page, then click the Search button. You'll see screen-scraper work for a bit, then, once it finishes, you should see one new row in the HTTP Transactions table.
Add a note, Home page to the appropriate transaction by double-clicking in the notes field and typing it.
Add a note, Search results to the appropriate transaction by double-clicking in the notes field and typing it.
Next Page
We'll want to traverse all of the search results, so, in your web browser, click the Next >> link.
Add a note, Next page.
Details Page
Later on we'll be scraping the details pages, so let's record one of those now. Click on the link for Speed to view the details on this DVD.
Add a note, Details page.
Stop Proxy Session
These are the only pages we're interested in at this point, so go ahead and stop the proxy session by clicking the Stop Proxy Server button on the General tab. You'll also want to re-configure your browser so that it's no longer using screen-scraper as a proxy server.
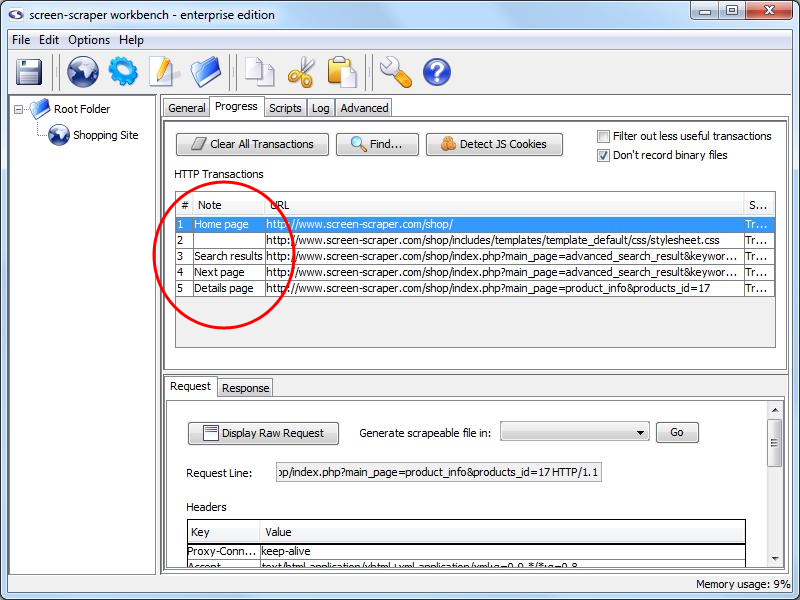
Note column in HTTP Transactions table.
3: Creating the Scrape
Create the Scraping Session
Create a scraping session by clicking the (Add a new scraping session) button.
In the Name field enter Shopping Site (if you already downloaded and imported the scraping session at the first of this tutorial you'll want to name your scraping session something else, perhaps "My Shopping Site").
A scraping session is simply a container for all of the files and other objects that will allow us to extract data from a given web site.
Add Scrapeable Files
![]()
We'll now be adding scrapeable files to our scraping session. You'll remember from the first tutorial that a scrapeable file represents a web page you'd like screen-scraper to request.
Add the first scrapeable file to the scraping session by clicking the Shopping Site proxy session in the objects tree, then on the Progress tab. Find the Next page note in the HTTP Transactions table, the URL should look something like:
This URL corresponds to the second page in the search results. We'll use this file because it should contain all of the parameters in the URL we need to request any of the search results pages (including the first).
After clicking on this row in the table, information corresponding to the file will appear in the lower pane. Add the file to the Shopping Site scraping session by selecting it in the Generate scrapeable file in drop-down list, and clicking the Go button.
After the scrapeable file appears under the scraping session rename it to "Search results".
Scrapeable File Parameters
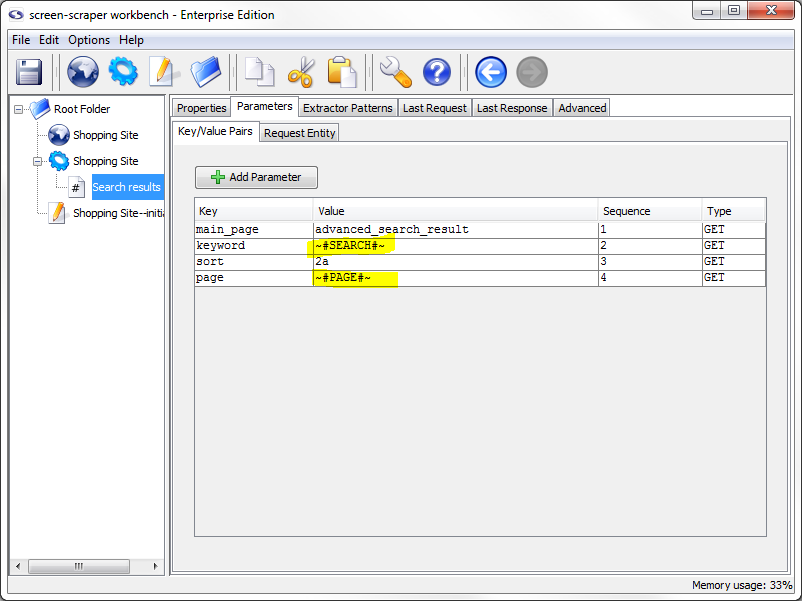
Next, click on the Parameters tab.

When we generate a scrapeable in this way screen-scraper pulls out the parameters from the URL and puts them under the Parameters tab for us. Because these are GET parameters (as opposed to POST parameters), when the scrapeable file is invoked by screen-scraper in a running scraping session, the parameters will get appended again to the URL. Let's take a closer look at each of the parameters that were embedded in the URL:
- main_page: advanced_search_result
- keyword: dvd
- sort: 2a
- page: 2
The only two that we're likely interested in are keyword and page. We can guess that keyword refers to the text we typed into the search box initially. The page parameter refers to what page we're on in the search results. We can guess that if we were to replace the 2 in the page parameter of the URL it would bring up the first page in the search results. Try this by bringing up the following page in your web browser:
Looks like our theory was correct. You should see the first page of search results. It's also important to note that the keyword and page parameters are those that will need to be dynamic.
4: Initialization Script
What is an Initialization Script
It's a common practice to run a script at the very beginning of a scraping session that can initialize variables and such. It is especially useful in a site that iterates over multiple pages, like our little shopping site.
Creating the Script
Generate the script either by clicking the (Add a new script) button or by selecting New Script from the .
In the Name field type Shopping Site--initialize session.
You'll remember from the first tutorial that screen-scraper scripts get invoked when certain events occur. We'll be invoking this script before the scraping session begins but first let's write the script.
Writing the Script
Once again, this tutorial is not to teach Java so we will provide you with the script. Please copy and paste it into the Script Text field in your script.
session.setVariable( "SEARCH", "dvd" );
session.setVariable( "PAGE", "1" );

Ensure that Interpreted Java is selected in the Language.
In the script, we set two session variables on our current scraping session. We start the PAGE variable at 1 so that the first search results page will get requested first.
Using Session Variables in Scrapeable File Parameters
Before trying out this script let's modify the parameters for our scrapeable file so that they make use of the session variables. Click on the Search results scrapeable file, then on the Parameters tab.
Change the value of the keyword parameter from dvd to ~#SEARCH#~, and change the value of the page parameter from 2 to ~#PAGE#~.
If you remember from the first tutorial we used the delimiters ~@ and @~ to select information out of an extractor pattern and we also saved the selected information into session variables. The delimiters ~# and #~ do almost exactly the opposite; they take session variables and place them into our files instead of taking them out.
The ~#SEARCH#~ and ~#PAGE#~ tokens will be replaced at runtime with the values of the corresponding session variables. As such, the first URL will be as follows:
That is, screen-scraper will take all of our GET parameters, append them to the end of the URL, then replace any embedded session variables (surrounded by the ~# #~ markers) with their corresponding values.
Alternative Method
We could achieve the same effect by deleting all of the parameters from the Parameters tab, and replacing the text in the URL field with the whole GET URL:
Breaking out the parameters under the Parameters simply makes them easier to manage, which is why we have taken that approach.
Associating the Script
We'll now need to associate our script with our scraping session so that it gets invoked before the scraping session begins.
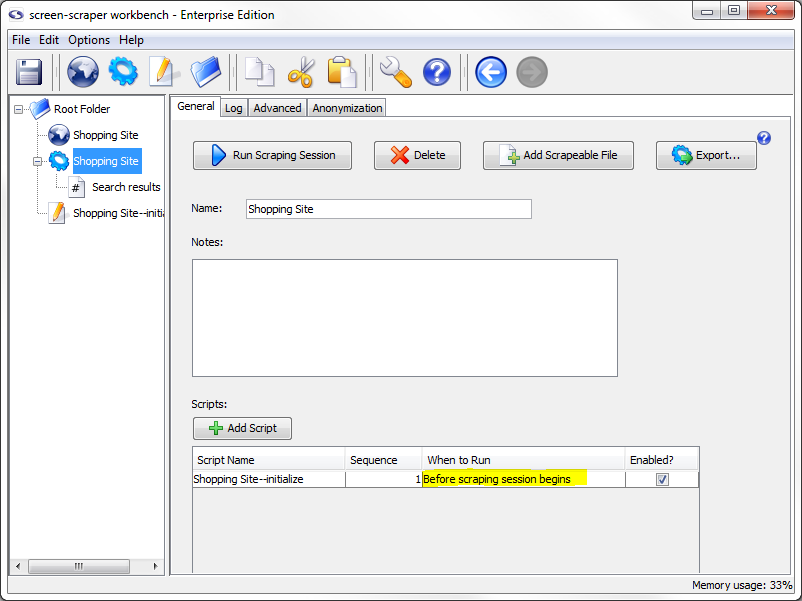
To do that, click on the Shopping Site scraping session in the objects tree, then on the General tab.
In the Scripts section, towards the bottom of the pane, click the Add Script button to add a script.
In the Script Name column select Shopping Site--initialize session. Then, in the When to Run column select Before scraping session begins (if not already selected), and make sure that the Enabled checkbox is checked. This will cause our script to get executed at the very beginning of the scraping session so that the two session variables get set.
Test Run
All right, we're ready to try it all out. This scraping session will, once finished, generate a longer log than the one that the first tutorial created, so it may be a good idea to increase the number of lines screen-scraper will display in its log. To do that, click on the scraping session in the objects tree, then on the Log tab. In the text box labeled Show only the following number of lines enter the number 1000.
As you might guess, if you simply remove the number from the box then it will allow the logs to grow as much as it needs to to keep all of the information for the scrape. Really long files will slow down the scrape, so if it starts to get too long it is best to limit the size of the log.
Run the scraping session by selecting it in the objects tree, then clicking the Run Scraping Session button. This will cause the Log tab to be activated, allowing you to watch the scraping session progress.
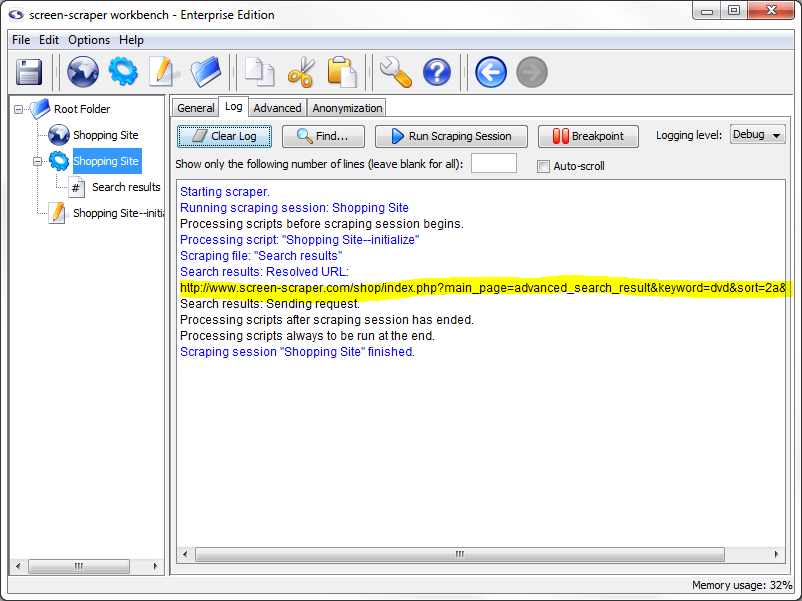
You'll notice that the URL of the requested file is the one given above. You can also verify that the correct URL was requested by clicking on the Search results scrapeable file, then on the Last Response tab, then on the Display Response in Browser button. The page should resemble the one you saw in your web browser.
Remember that it's a good idea to run scraping sessions often as you make changes, and watch the log and last responses to ensure that things are working as you expect them to. You'll also want to save your work frequently. Do that now by hitting the (Save) button.
5: Link Extractor Patterns
Warning!
This particular part of the tutorial is one that covers important principles that often seem confusing to people at first. If you've been speeding through the tutorial up to this point, it would probably be a good idea to slow down a bit and read more carefully.
Extractor Pattern Review
We're now going to create a couple of extractor patterns to extract information for the next and the product details links.
Remember that an extractor pattern is a block of text (usually HTML) that contains special tokens that will match pieces of data you're interested in gathering.
When creating extractor patterns it is recommend that you always use the HTML from the Last Response tab in screen-scraper. By default, after screen-scraper requests a page it tidies the HTML found in it. This causes it to differ slightly from the HTML that you would get by viewing the source in your web browser.
Identifying the Details URL
Click on the Search results scrapeable file in the objects tree, then on the Last Response tab. The textarea contains HTML because we just ran the scraping session.
If you are not seeing any HTML then re-run the scraping session so that the scrapeable file will have a last response.
We're going to extract a portion of each of the product details links so that we can subsequently request each details page and extract information from them. The first details link corresponds to the A Bug's Life DVD.
To find the text, you can click the Find button, then type A Bug's Life into the Find what textbox, and click the Find button. Let's start by looking at all of the table row (<tr> tag). You might not be able to easily see all of the text so we have extracted it and placed it here for you to examine:
<td align="center" class="productListing-data"> <a href="http://www.screen-scraper.com/shop/index.php?main_page=product_info&products_id=8"><img src="images/dvd/a_bugs_life.gif" border="0" alt="A Bug's Life" title=" A Bug's Life " width="100" height="80" /></a> </td>
<td class="productListing-data"> <a href="http://www.screen-scraper.com/shop/index.php?main_page=product_info&products_id=8">A Bug's Life</a> </td>
<td align="right" class="productListing-data"> $35.99 </td>
<td align="center" class="productListing-data"><a href="http://www.screen-scraper.com/shop/index.php?main_page=advanced_search_result&keyword=dvd&sort=2a&page=1&action=buy_now&products_id=8"><img src="includes/templates/template_default/buttons/english/button_buy_now.gif" border="0" alt="Buy Now" title=" Buy Now " width="60" height="30" /></a> </td>
</tr>
This may seem like a bit of a mess, but if we look closely we can pick out the table cell that the details link is in:
Breaking it down a bit more we get the URL:
You might notice that the typical & symbols in the URL have been replaced with &. Don't be alarmed, it's just part of the tidying process screen-scraper applies to the HTML.
If we examine the parameters in the URL, we can guess that the important one is products_id, which likely identifies the product whose details we're interested in. We'll start by assuming that the products_id is the only one we'll need to extract.
Creating the Product Details Link Extractor Pattern
At this point, click on the Search results scrapeable file in the objects tree, then click on the Extractor Patterns tab. We'll create an extractor pattern to grab out the product ID and DVD title for each link. It will look like the one shown below:
Create the extractor pattern by clicking on the Add Extractor Pattern button, then copying and pasting the text above into the Pattern text box.
Give the extractor pattern the name Product details link. Remember that extractor tokens (delineated by the ~@ @~ markers) indicate data points we're interested in gathering. In this case, we want to extract the ID of the product (embedded in the URL), and the title of the product.
PRODUCTID Token Properties
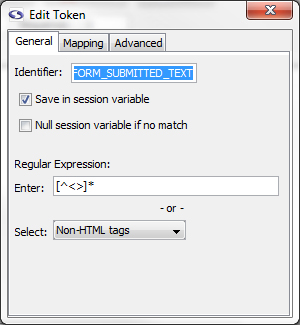
Double-click the PRODUCTID token (or select the text between the ~@ @~ delimiters, right-click it and select Edit token), and, in the box that appears, click the Save in session variable checkbox. Under the Regular Expression section, select URL GET parameter. You'll notice that when you do that the text [^&"]* shows up in the text box just above the drop-down list. This is the regular expression that we'll be using. You could also edit it manually, but generally that won't be needed.
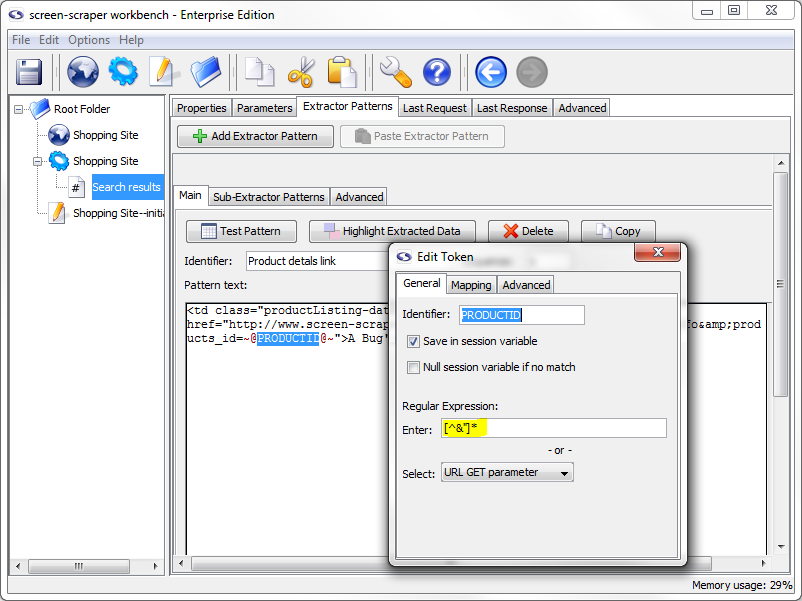
PRODUCTID Properties Set
Quick Explanation
Let's slow down at this point and go over what we just did to the PRODUCTID extractor token.
In the first tutorial we checked the Save in session variable box telling screen-scraper to preserve the value for us so that we could use it at a later point. This time we also selected a regular expression for it to use. This will filter out the results that don't meet the expectations of the token.
If you're not very familiar with regular expressions, don't worry. In the vast majority of cases you can simply use the regular expressions found in that drop-down list.
By indicating the URL GET parameter regular expression we're saying that we want the token to match any character except a double-quote or an ampersand (i.e., the " and & characters). You'll notice in our extractor pattern that a double-quote character just follows our PRODUCTID extractor token. By using a regular expression we limit what the token will match so that we can ensure we get only what we want. You might think of it as putting a little fence around the token. We want it to match any characters underneath the PRODUCTID extractor token, up to (but not including) the double-quote character.
You will, most of the time, want to designate a regular expression for extractor tokens. It will help ensure that you only retrieve the desired information.
In most cases you'll want to designate a regular expression for extractor tokens. Using regular expressions also makes extractor patterns more resilient to changes in the web site. That is, if the web site makes minor changes to its HTML (e.g., altering a font style or color) and you've been using regular expressions your extractor patterns are more likely to still match. Also, by using regular expressions we can often decrease the amount of HTML we need to use in our extractor patterns. That is, by using regular expressions we indicate more precisely what the data will look like that our tokens will match. By doing this, we can often reduce the amount of HTML we include at the beginning and end of our extractor patterns. In general, if you can reduce the amount of HTML in your extractor patterns, and increase the number of regular expressions you use in tokens, your extractor patterns will be more resilient to changes that get made in the HTML of the pages.
Now close the Edit Token box (which saves our settings automatically).
PRODUCT_TITLE Token Properties
Now let's alter the settings for the PRODUCT_TITLE token. We're not interested in saving the value for this token in a session variable, but we include it since it will differ for each section of HTML we want to match.
Double-click the PRODUCT_TITLE extractor token to bring up the Edit token dialogue box and, under the Regular expression section, select Non-HTML tags. If you take a look at the characters on the left and right sides of our PRODUCT_TITLE extractor token, you will see that they are less than (<) and greater than (>) symbols. By using this regular expression we tell the extractor token not to include either symbol. This way we create a boundary for the token so that we can ensure it matches only what we want it to.
Why even include an extractor token for data we don't want to save? By using extractor tokens for data we don't necessarily want to save, we make the extractor pattern more resilient to changes in the HTML. These extra tokens can help "future proof" our extractor patterns against changes the site owners might make down the road. There are also often situations (such as the present one) where data points adjacent to data we want to extract will differ for each pattern match. Here we only want the product ID, but we also include the product title because of its proximity to the data we want to extract, and because its value will differ each time the extractor pattern matches.
If that strikes you as a little bit confusing, don't worry. As you get more experience using screen-scraper you'll see why they're important. For now just take our word for it that you'll generally want to use regular expressions with extractor pattern tokens, and that it's often a good idea to use extractor tokens to match data points you don't necessarily want to save. As you get more experience it will become more apparent when to use extractor tokens for data you don't want to save.
Extractor Pattern Test
Let's give our new extractor pattern a try. Click the Test Pattern button. You should see a window come up that shows the extracted data.
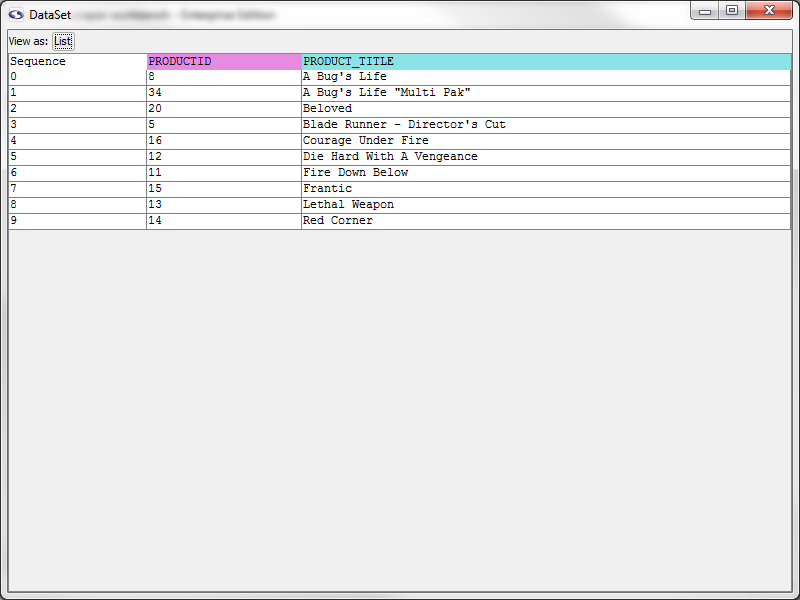
Data Set for Product details link Pattern
Again, let's slow down a moment and review what this window contains. When an extractor pattern matches, it produces a DataSet. You can think of a DataSet like a spreadsheet--it contains rows, columns, and cells. Each row in a DataSet is called a DataRecord. A DataRecord can be thought of as being analogous to a row in a spreadsheet. In this particular case our DataSet has three columns. Two of them should be familiar--they correspond to the PRODUCT_TITLE and PRODUCTID extractor tokens. The Sequence column indicates the order in which each row was extracted. You'll notice that the sequence is zero-based, meaning the first DataRecord in the DataSet is referenced with an index of 0. You'll also notice that the DataSet has 10 records--one for each product found in the search results page.
Later, when we start talking more about DataSets and DataRecords, just remember the spreadsheet analogy: a DataSet is like the entire spreadsheet, and a DataRecord is like a single row in the spreadsheet.
Another good habit to get into is applying your extractor patterns frequently to ensure they correctly match the text you want extracted.
Go ahead and close the DataSet window now.
Creating the Next Link Extractor Pattern
Back in the last Response tab, search for the text "Next". Around the area you'll find HTML for the link:
Fortunately, because of our work with the initialize script, we are already familiar with the URL and know that the only parameters we need to worry about are keyword and page.
Create a new extractor pattern, call it Next link, and use the following extractor pattern to grab the values of those parameters out:
PAGE Token Properties
As with the previous extractor pattern, double-click the PAGE token, and, in the box that appears, click Save in session variable checkbox.
Under the Regular Expression section, select Number from the Select drop-down list.
Close the "Edit Token" box to save your settings.
The Number regular expression ([\d,]+) simply indicates that we only want the PAGE token to match numbers (the regular expression essentially says, "match anything that contains either numbers or commas, and has at least one of either of those types of characters in it.").
KEYWORD Token Properties
Next, double-click the KEYWORD extractor pattern token to edit it. Under the Regular Expression section, select URL GET parameter from the Select drop-down list.
This indicates that the KEYWORD extractor pattern should match only characters that would be found in a GET parameter of a URL. You'll notice that we didn't check the box to save the KEYWORD extractor pattern token in a session variable. We already have that value in a session variable, so we don't need to bother with getting it again.
Extractor Pattern Test
Try out the extractor pattern by clicking the Test Pattern button. Excellent! We have two matches: one for each next link on the page (the top and bottom of the page).

Save
Now would be a good time to save your work. Do that by selecting Save from the or by clicking the (Save) icon.
Test Run
OK, let's try out the whole thing once more. Click on the Shopping Site scraping session in the objects tree, then on the Log tab. Click the Clear Log button, we're going to run it again and we don't want to get confused by the log text from the last run, then click the Run Scraping Session button to start it.
You should see a bit more text in the log this time, as opposed to last time. Take a minute to look through it to ensure you understand what's going on.
6: Page Scraping Script
Page Scraping Script Explanation
For each details link we're going to scrape the corresponding details page. This is a common scenario in screen-scraping: given a search results page, you need to extract details for each product, which means following each of the product details links. For each details page you'll likely want to extract out pieces of information corresponding to the products.
Details Scrapeable File
Let's start by creating a scrapeable file for the details page. We could create it from the proxy session; but, because it's pretty simple, let's just create it from scratch.
Click on the Shopping Site scraping session, then the General tab, then the Add Scrapeable File button.
Give the scrapeable file the name Details page, and the following URL:
You'll notice that this time we're leaving all of the parameters embedded in the URL. Sometimes with shorter URL's it's more convenient to take this approach rather than breaking them out under the Parameters tab.
As before, when the scraping session runs, the PRODUCTID token will be replaced by the value of the PRODUCTID session variable.
At this point, click the This scrapeable file will be invoked manually from a script checkbox. If we didn't do this, screen-scraper would invoke this scrapeable file in sequence (after the search results page), which we don't want. Instead, we're going to tell screen-scraper to invoke this scrapeable file from a script.
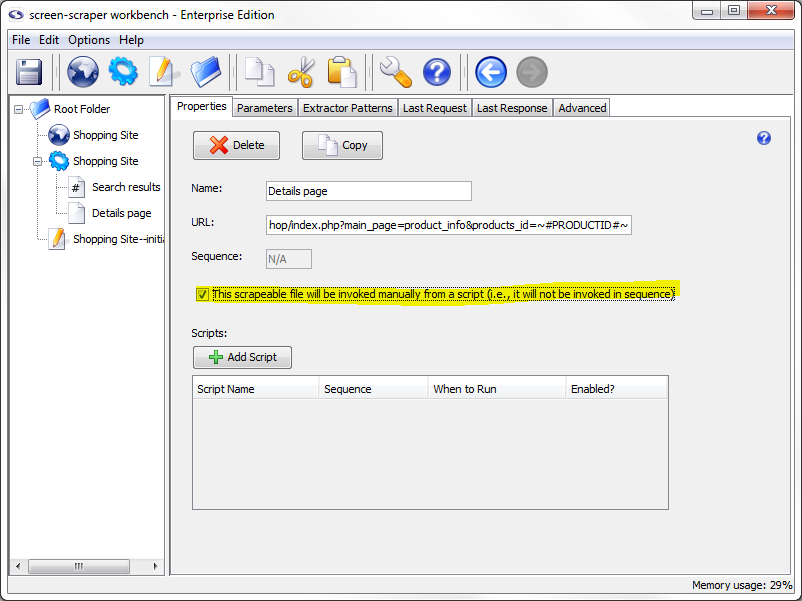
You might have noticed that by checking the This scrapeable file will be invoked manually from a script checkbox the symbol of the scrapeable file changed from (sequenced scrapeable file) to (non-sequenced scrapeable file. This change will cause the non-sequenced file to move to the bottom of the scrapeable files and be sorted alphabetically with other non-sequenced scrapeable files.
Write Script
First, create a new script and call it Scrape details page, then enter the following code in the Script Text
session.scrapeFile( "Details page" );
Adding Details Script Association
OK, this is where we need to take a moment to think: for each product ID our Product details link extractor pattern extracts, we want to scrape the product details page using the corresponding PRODUCTID. So the script needs to run after each time the pattern matches.
To add the association, go to the Product details link extractor pattern by clicking the Search results scrapeable file, then the Extractor Patterns tab. Notice the Scripts section under the extractor pattern. Click the Add Script button to add a script association. In the Script Name column, if it isn't already selected, select our Scrape details page script and under the When to Run column, select After each pattern match.
Let's walk through that a bit more slowly. After the search results page is requested the Product details link will be applied to the HTML in the page. Remember that this particular extractor pattern will match 10 times: once for each product details link. Each time it matches it will grab a different product ID and save the value of that product ID into the PRODUCTID session variable. The Scrape details page script will get invoked after each of these matches, and each time the PRODUCTID session variable will hold a different product ID. As such, when the Details page gets scraped the URL will get a different product. For example, the first time the extractor pattern matches the PRODUCTID session variable will hold "8", and the URL will be:
But, the next time, the product ID will be 34 and the URL will be:
If it helps, think again about the spreadsheet analogy. You can imagine screen-scraper walking through each row in the spreadsheet. It encounters a row, saves any needed data in session variables (the product ID, in this case), then invokes the Scrape details page script. Because it just matched a specific product ID, and saved its value in a session variable, when the Details page scrapeable file gets invoked by the script, the current product ID in the PRODUCTID session variable will be used. Once it's finished invoking the Details page scrapeable file, it will go on to the next row (or DataRecord) in the spreadsheet (or DataSet). Again, it will save the product ID in a session variable, then execute the Scrape details page script, which in turn invokes the Details page scrapeable file. Because we indicated that the script should be invoked After each pattern match, this will occur 10 times--once for each search result. If we had designated After pattern is applied, the script would only have been executed once: after it traversed the spreadsheet and reached the very end.
This is another area that people new to screen-scraper find confusing, so it's probably worth it to slow down a bit and ensure you understand what's going on.
Test Run
Now would be a good time to try out the whole scraping session again. Do what you did before by clearing out the log for the scraping session, then clicking the Run Scraping Session button. You'll see each details page getting requested one-by-one. Note especially each URL, which will have a different product ID at the end of each. If you'd prefer not to wait for the entire session to run you can click the Stop Scraping Session button.
As before, it would be a good idea to go through the log carefully to ensure that you understand what it's doing.
Scrape Search Results Script
At this point we still need to deal with the next page link. We already have an extractor pattern to grab out the page number of the next page. Let's create a script to scrape the search results page again for each next link.
Generate a new script and call it Scrape search results. Enter the following in the Script Text field:
session.scrapeFile( "Search results" );
Notice that we have only one line of code, short and simple, which will scrape the Search results scrapeable file when it is invoked.
Add Scrape Search Results Script Association
Return to the Next link extractor pattern and click the Add Script button to add a script association. Select the Scrape search results script.
This time there's something slightly different we'll need to do under the When to Run column. If you remember our extractor pattern matched twice (you can see this on the previous page). The problem is that we only want to follow the Next link once (that is, we don't want to scrape the second page twice). This is easily dealt with by selecting Once if pattern matches under the When to run column.
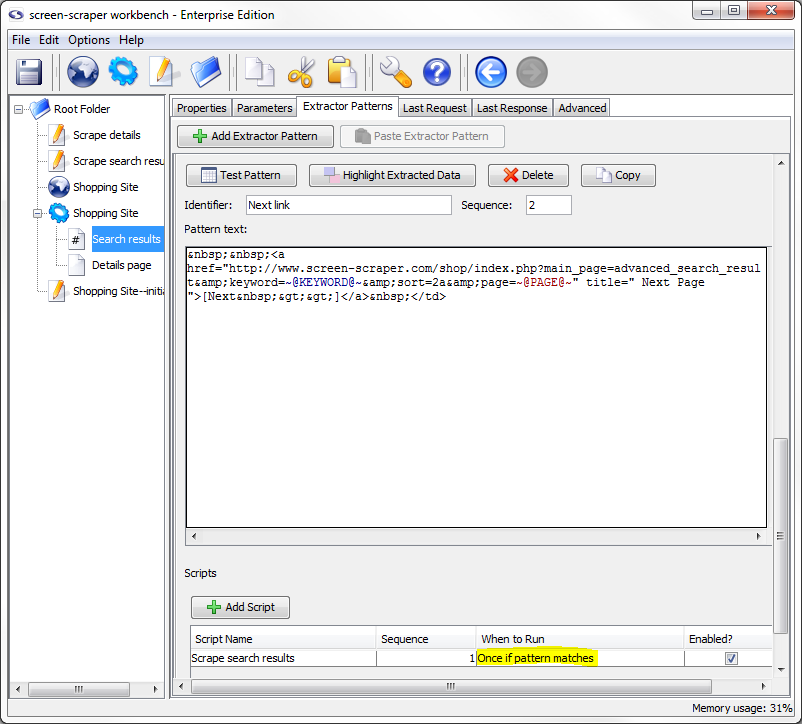
In other words, the script will only get invoked once and only if the extractor pattern has a match. Selecting Once if pattern matches under the When to run column guarantees that the script will get invoked once and only once regardless of the number of matches it finds. So, even though we have two matches for the Next link extractor pattern, the Scrape search results script will only be invoked once, which means that the Search results will only be scraped once.
Test Run
OK, run the scraping session once more. Clear the scraping session log, then click the Run Scraping Session button. If you let it run for a while you'll notice that it will request each details page for the products found on the first search results page, request the second search results page, then request each of the details pages for that page.
7: Extract Product Details
Warning!
At this point we're able to scrape the details pages for each of the products. We're now ready to extract the information we're really interested in: data about each DVD. To do this we're going to use sub-extractor patterns. Again, this is a point in the tutorial where you may want to slow down a bit. Sub-extractor patterns is another important concept that can be a bit confusing at first.
Sub-Extractor Pattern Explanation
Sub-extractor patterns allow us to define a small region within a larger HTML page from which we'll extract individual snippets of information. This helps to eliminate most of the HTML text we're not interested in, allowing us to be more precise about the data we'd like to extract. It also makes our extractor patterns more resilient to future changes in the HTML page, as they allow us to reduce the amount of HTML we need to include.
If you let the scraping session run through to completion the last URL in the scraping session log will be the one listed here:
If that's not the exact one you have, don't worry; it won't make a difference for our extractor patterns.
We'll need to examine the HTML for a details page in order to generate the extractor patterns. Do this by clicking on the Details page scrapeable file in the objects tree, then on the Last Response tab. You'll remember that screen-scraper records the HTML for the last time each page was requested.
To visualize what we will be doing, bring up the URL above in your web browser. Notice the DVD title, price, model, shipping weight, and manufacturer; these are the pieces of information that we are interested in gathering.
It should be apparent in examining the page that most of the elements on it aren't of interest to us. For example, we don't care about the header, footer, or any of the boxes along the sides of the page.
Creating the DATARECORD Extractor Pattern
We'll first use our extractor pattern to define a region that basically surrounds the elements we're interested in.
Scroll down until you see a few lines of HTML code where the DVD title is surround by h1 tags.
<td colspan="2" class="pageHeading" valign="top">
<h1>You've Got Mail</h1>
Highlight the block of HTML from the opening <tr> tag down to the word Quantity.
<td align="center" class="cartBox"> Quantity
Your selection should look something like this.
<td colspan="2" class="pageHeading" valign="top">
<h1>You've Got Mail</h1>
</td>
</tr>
<tr>
<td align="center" valign="top" class="smallText" rowspan="2">
<script language="javascript" type="text/javascript">
<!--
document.write('<a href="javascript:popupWindow(\'http://www.screen-scraper.com/shop/index.php?main_page=popup_image&pID=7\')"><img src="images/dvd/youve_got_mail.gif" border="0" alt="You\'ve Got Mail" title=" You\'ve Got Mail " width="100" height="80" hspace="5" vspace="5" /><br />larger image<\/a>');
//-->
</script>
<noscript><a href="http://www.screen-scraper.com/shop/index.php?main_page=images/dvd/youve_got_mail.gif" target="_blank"><img src="images/dvd/youve_got_mail.gif" border="0" alt="You've Got Mail" title=" You've Got Mail " width="100" height="80" hspace="5" vspace="5" /><br />
larger image</a></noscript> </td>
<td class="main" align="center" valign="top">Model: DVD-YGEM</td>
</tr>
<tr>
<td class="main" align="center"></td>
</tr>
<tr>
<td align="center" class="pageHeading">$34.99</td>
<td class="main" align="center">Shipping Weight: 7.00 lbs.</td>
</tr>
<tr>
<td> </td>
<td class="main" align="center">9 Units in Stock</td>
</tr>
<tr>
<td class="main" align="center">Manufactured by: Warner</td>
<td align="center">
<table border="0" width="150px" cellspacing="2" cellpadding="2">
<tr>
<td align="center" class="cartBox"> Quantity
Now, right-click on the highlighted text and choose Generate extractor pattern from selected text. You'll be automatically taken to the Extractor Patterns tab.
In the Pattern Text field highlight from just after...
class="pageHeading"
...to just before the word "Quantity".
class="cartBox">
Right-click on your selection and choose Generate extractor pattern token from selected text. In the window that opens type DATARECORD in the Identifier textbox and close the window by clicking on the X in the upper right-hand corner. Don't worry settings are saved when the window closes.
Notice that we simply replaced most of the middle portion of the large block of HTML with a DATARECORD token. If you look at the text before and after ~@DATARECORD@~ you can see that it is the same text that could be found at the beginning and end of the large HTML block.
The basic idea here is to include only as much HTML around the sub-region as necessary to uniquely identify it in the page. Any of the HTML covered by the DATARECORD token will be picked up by screen-scraper, and will define our sub-region that we'll be extracting the individual pieces of data from.
Now click the Test Pattern button. In the window that appears, copy the text from the DATARECORD column and paste it into your favorite text editor.
The easiest way to select all of the text in that box is to triple-click it, use the keyboard to copy the text (Ctrl-C in Windows and Linux), then paste it into your text editor. The text should look like this:
This is the HTML we're after, but it's all in one large block. This occurs because screen-scraper strips out unnecessary white space when extracting information in order to make the extraction process more efficient. This can make sifting through the HTML a little more difficult, but the search feature should make this relatively straightforward.
Adding Sub-Extractor Patterns
For creating the sub-extractor patterns, you are welcome to use the code snippit in your text editor or the HTML found directly in the Last Response tab (just be sure that you're only grabbing portions of the page that would be covered by the DATARECORD extractor token).
First off, we're interested in the DVD title. In your text editor do a search for the first word in the title of the DVD whose page you're viewing (e.g., if you're viewing the HTML for the last DVD in the search results you'll search for You've, since the movie is "You've Got Mail"). This should highlight the first word in the title. In order to extract this piece of information we'll use a small sub-extractor pattern:
Once again, we include only as much HTML around the piece of data that we're interested in as is necessary. If we do this just right we'll still be able to extract information even if the web site itself makes minor changes.
TITLE Sub-Extractor Pattern
To add a sub-extractor pattern, on our PRODUCTS extractor pattern, click the Sub-Extractor Patterns tab, then the Add Sub-Extractor Pattern button.
In the text box that appears paste the text for the sub-extractor pattern we've included above. Edit the TITLE extractor token by double-clicking it and, under the Regular Expression section, select Non-HTML tags from the drop-down list (as a side note, this is probably the most common regular expression you'll use). Click on the Test Pattern to try it out. You should see a DataSet with a single row and columns for the DATARECORD and TITLE tokens.

DataSet for Title Sub-Extractor Pattern
You might have a different TITLE if you stopped your scraping session at different point of time. This doesn't mean you are doing wrong. Just make sure that a title does show up. If not then you have an error in one of your extractor patterns.
Other Sub-Extractor Patterns
Create the following sub-extractor patterns for the remaining data elements we want to extract (note that each box should be a separate sub-extractor pattern):
For each token in the sub-extractor patterns give it the Non-HTML tags regular expression, same as you did with the TITLE extractor token.
As sub-extractor patterns match data, they aggregate the pieces into a single data record. That means that for each extractor token only one value can exist.
A sub-extractor pattern cannot match multiple times. It will take only its first match and all other potential matches will be discarded.
When our PRODUCTS extractor pattern is applied along with its sub-extractor patterns, a single data record is created. This can be seen by clicking on the Test Pattern button:

Final DataSet for PRODUCTS extractor pattern
Test Run
If you'd like, at this point try running the scraping session again by clearing the log and hitting the Run Scraping Session button. If you examine the log while the session runs you'll see that it extracts out details for each of the DVDs.
8: Saving the Data
Processing Collected Information
Once screen-scraper extracts data there are a number of things that can be done with it. For example, you might be invoking screen-scraper from an external script (e.g., ASP, PHP, Java, etc.), which, after telling screen-scraper to extract data for a given search string, might display the results to the user. In our case we'll simply write the data out to a text file. To do this, we'll once again write a script.
Create a new script, call it Write data to a file, and use the following Interpreted Java code snippit:
try
{
session.log( "Writing data to a file." );
// Open up the file to be appended to.
out = new FileWriter( "dvds.txt", true );
// Write out the data to the file.
out.write( dataRecord.get( "TITLE" ) + "\t" );
out.write( dataRecord.get( "PRICE" ) + "\t" );
out.write( dataRecord.get( "MODEL" ) + "\t" );
out.write( dataRecord.get( "SHIPPING_WEIGHT" ) + "\t" );
out.write( dataRecord.get( "MANUFACTURED_BY" ) );
out.write( "\n" );
// Close up the file.
out.close();
}
catch( Exception e )
{
session.log( "An error occurred while writing the data to a file: " + e.getMessage() );
}
This script simply takes the contents of the current data record (which for us will be the data record that constitutes a single DVD) and appends it to a dvds.txt text file.
If you're familiar with Java, hopefully the scripts make sense. There is one important point worth noting, though. You'll notice that each script makes use of a DataRecord object (referenced as the dataRecord variable in the scripts). This object refers to the current DataRecord as the script is executed.
Return to the spreadsheet example. When the script gets invoked, a specific DataRecord (or row in the spreadsheet) will be current. This DataRecord automatically becomes a variable you can use in your script. The dataRecord object has a get method, which allows you to retrieve the value for a key it contains (i.e., you're referencing a specific cell in the spreadsheet). Again, you can read more about objects available to scripts and their scope in our documentation: Using Scripts and API.
Script Association
Click on the Details page scrapeable file, then on the Extractor Patterns tab. Below the extractor pattern click the Add Script button to add an association. In the Script Name column, select Write data to a file and in the When to Run column select After each pattern match (even though there will only be one match per page). For each DVD, we'll execute the script that will write the information out to a file.
To clarify a bit further, because we're invoking the script After each pattern match, the dataRecord variable will be in scope. In other words, for each row in the spreadsheet (which happens to be a single row in this case) screen-scraper will execute the Write data to a file script. Each time it gets invoked a DataRecord will be current (again, think of it walking through each row in the spreadsheet). As such, we have access to the current row in the spreadsheet by way of the dataRecord variable.
Had we indicated that the script was to be invoked After pattern is applied, the dataRecord would not be in scope. Again using the spreadsheet analogy, scripts that get invoked After pattern is applied would run after screen-scraper had walked through all of the rows in the spreadsheet, so no DataRecord would be in scope (i.e., it's at the end of the spreadsheet: after the very last row). See the Variable scope section in our documentation for more detail on which variables are in scope depending on when a given script is run.
Final Test
Run the scraping session one last time. If you check the directory where screen-scraper is installed you'll notice a dvds.txt file that will grow as the DVD detail pages get scraped.
Alternative for Professional and Enterprise Users
As an alternative to the above script you could use the following code:
The writeToFile method is an advanced feature and will write the whole of a DataSet (the spreadsheet) to a file. If you want to specify the order in which the columns are written you will have to use the first method as writeToFile saves them in the same order that is shown when testing the extractor patterns.
If you would like information on saving extracted data to a database please consult our FAQ on the topic.
9: Logging In
How Logging In Works
Oftentimes it's necessary to log in to a web site before extracting the information you're interested in. This is generally quite a bit easier than it might seem. Typically this simply involves creating a scrapeable file to handle the login that will get invoked before any of the other pages. The shopping site we're scraping from doesn't require us to log in before performing searches, but for the sake of this tutorial we'll set it up as if it did.
Before we look at the page that handles the actual login, we need to have screen-scraper request the home page for the shopping site. This is necessary because it allows for a few initial cookies to be set before we attempt to log in. If you're familiar with web programming, we're requesting the home page so that the server can create a session for us (tracked by the cookies) prior to our attempting a login. By having screen-scraper request the home page, those cookies will get set, and screen-scraper will then automatically track them for us.
Homepage Scrapeable File
Create a scrapeable file for the home page by clicking on the Shopping Site scraping session in the objects tree, then on the Add Scrapeable File button.
Give the new scrapeable file the name Home, set its sequence to 1, and give it the URL http://www.screen-scraper.com/shop/.
Recording Login Request
Login HTTP requests are usually POST requests, which makes it trickier to tell what parameters are being passed to the server (i.e., the parameters won't appear in the URL). The proxy server can make viewing the parameters easier, so let's make use of it.
Open your web browser to the shopping login page:
In screen-scraper click on the Shopping Site proxy session, then the Start Proxy Server button (found on the General tab).
Now that the proxy server is running, click on the Progress tab. Remove any HTTP transactions that are already there by clicking the Clear All Transactions button then configure your web browser to use screen-scraper as a proxy server as you did earlier.
Site Login
Using your web browser, log into the site. This can be done by typing [email protected] in the E-Mail Address field and testing in the Password field, then clicking the login button.
Once the page loads, return to the General tab and click the Stop Proxy Server button to stop recording. Re-configure your web browser so that it no longer uses screen-scraper as a proxy server.
If you paid close attention to screen-scraper as it was working you may have noticed that two rows were added to the HTTP Transactions table (it's actually possible that three were added; if so, just delete the last one by highlighting it and hitting the Delete key on your keyboard). Click on the first row in the table. The URL should begin with:
This is the actual login POST request. If you scroll down in the lower section and look in the POST data text box you'll see the email address and password we entered in earlier. You'll also notice that x and y parameters were passed in (these simply represent the coordinates where you clicked the login button).
If you click on the Response tab, once again in the lower section, you'll notice that the Status Line field shows a response code of 302 Found.
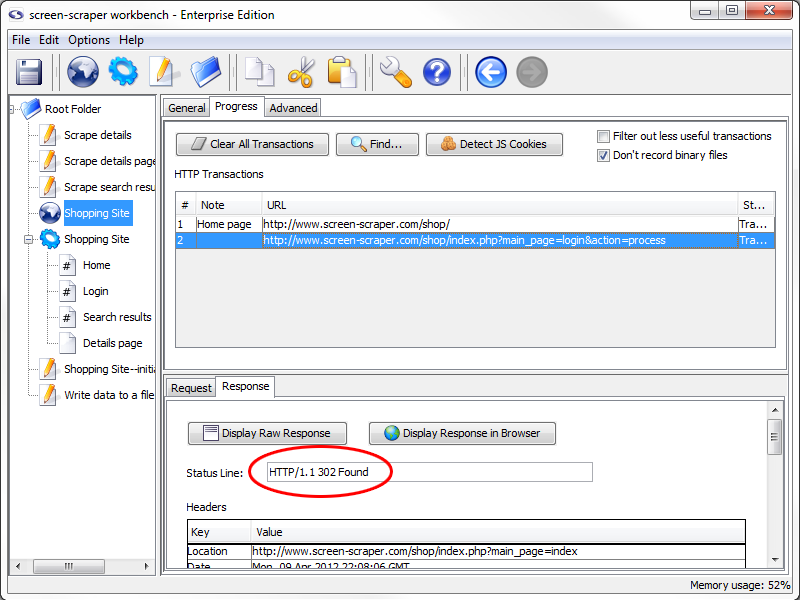
This is a redirect response, which indicates that the browser should be directed to a different URL. When this response was issued by the server your browser faithfully followed to the second URL and screen-scraper recorded the new HTTP Transaction.
Login Scrapeable File
At this point we'll want to copy the login POST request to our scraping session. We only need the login transaction from the table (the one with the POST data) and not the request representing the redirect, since screen-scraper will automatically follow redirects for us.
Copy the HTTP transaction to your scraping session by clicking on the login request (the one corresponding to the POST request). Ensure that the Shopping Site scraping session is selected in the drop-down list, then click the Go button.
After the new scrapeable file is created under the scraping session, rename it Login. Also, set its sequence to 2. It should be requested right after the Home scrapeable file. screen-scraper automatically tracks cookies, just like a web browser, so by requesting it near the beginning any subsequent pages that are protected by the login will be accessible.
Click the Parameters tab in our Login scrapeable file. You'll notice that screen-scraper automatically extracted out the various POST parameters and added them to the scrapeable file.
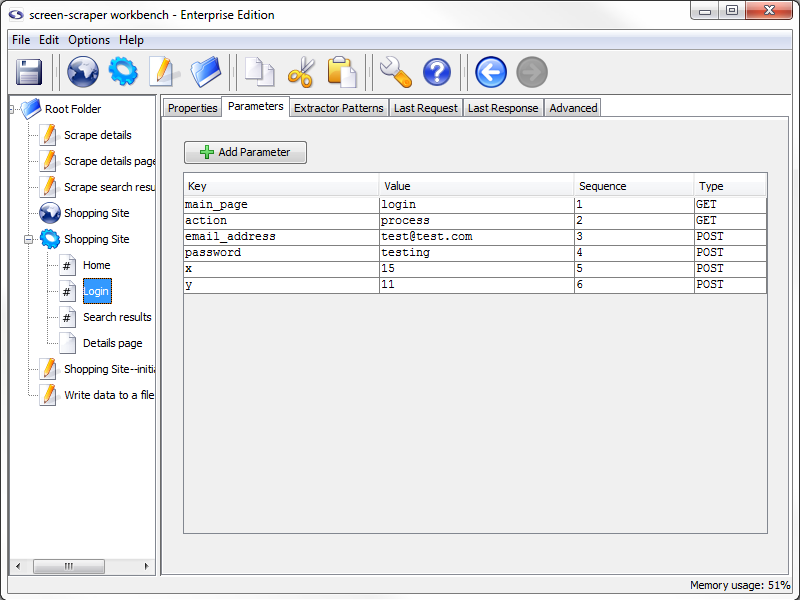
If you're familiar with URL encoding, you'll also notice that screen-scraper decoded the email_address parameter to [email protected]. screen-scraper automatically URL encodes parameters found under the Parameters tab before passing them up to the server.
Run with Login
At this point feel free to run the scraping session again. Because our site doesn't require logging in before searching can take place it won't make much difference, but you'll at least be able to see the login page being requested in the log for the scraping session.
10: Review
Quick Summary
When learning to do something new it is important to see what you have done, and not just what you still don't know how to do. With that in mind take a moment to review the things that you have accomplished in this tutorial. To help in your reflection we have provided a list of the major steps from the tutorial. If you want to review information from any of the steps, you can click on the link to be returned back to that section of the tutorial.
- Configure Proxy Server
- Record Page Transactions
- Create Scraping Session
- Add Scrapeable Files
- Inspect Scrapeable File Parameters
- Create Initialization Script
- Use Session Variables in Scrapeable File Parameters
- Add Script Association
- Create Details URL Extractor Pattern
- Add Regular Expressions to Extractor Tokens
- Use Extractor patterns to make pattern more stable
- Get next page link from extractor pattern
- Invoke Scrapeable File Manually From Script (Details page)
- Iterate through pages using next link
- Use sub-extractor patterns to extract product details
- Write Data to Tab-delimited File
- Login to Site
11: Where to Go From Here
Suggestions
Once again, we want to start by saying Congratulations! You have made it through a tutorial and are progressing in your abilities to extract information from the web. At this point you should have the basics under your belt to scrape most web sites from the workbench.
More Training/Tutorials
From here you could continue on with any subsequent tutorial that seems relevant to your project or curiosities. They all build off of the first two tutorials. The differences between them can be summed up as pertaining either to how the scrape is started or how the extracted information is processed. In some cases they will required that you have a Professional or Enterprise edition of screen-scraper.
You may want to consider reading through some of the existing documentation to get more familiar with the product. Either way, probably the best way to learn screen-scraper is to use it. Try it on one of your own projects!
Still a Little Lost?
If you don't feel comfortable with the process, we invite you to recreate the scrape using the tutorial only for reference. This can be done using only the screen-shots or review outline while you work on it. If you are still struggling you can search our forums for others like yourself and ask specific questions to the screen-scraper community.
Tutorial 3: Extending Hello World
Overview
This tutorial continues where Tutorial 1: Hello World left off and covers aspects of interacting with screen-scraper from external languages, like Active Server Pages, PHP, ColdFusion and Java.
Tutorial Requirements
Completed scraping session from Tutorial 1 is available here: Hello World (Scraping Session).sss
Any version of screen-scraper will work with this tutorial; however, in order to interact with screen-scraper using something other than the command line requires either a Professional or Enterprise edition of screen-scraper.
Finished Project
If you'd like to see the final version of the scraping session you'll be creating in this tutorial you can download it below.
| Attachment | Size |
|---|---|
| Hello World (Scraping Session).sss | 3.30 KB |
1: Initialization Script
The Extension
A significant limitation of our first Hello World was that we could only scrape the text from our first request. That is, we were always scraping the text "Hello world!", which really isn't that useful. We'll now adjust our setup so that we can designate the text to be submitted in the form.
Initialization Script
First, we're going to set a session variable that will hold the text we'd like submitted in the form.
Session variables are used by screen-scraper to transfer information between scripts, scrapeable files, and other objects. Session variables are generally set from within scripts, but can also be automatically set within extractor patterns as well as passed in from external applications.
We'll now set up a script to set a session variable before our scraping session runs. Create a new script as you've done before, and call it Initialize scraping session. Copy the code below into the Script Text field in the script:
// session variable so we can reference it later.
session.setVariable( "TEXT_TO_SUBMIT", "Hi everybody!" );
Hopefully the script seems pretty straightforward. It sets a session variable named TEXT_TO_SUBMIT, and gives it the value Hi everybody! (spoken, of course, in your best Dr. Nick voice).
Setting the session variable TEXT_TO_SUBMIT will allow us to access that value in other scripts and scrapeable files while our Hello World scraping session is running.
We will, later in this tutorial, replace this script with a call from our external script. So, it might help to think of this as a debug script. We place it in or code so that we can run it from the workbench, but remove it later so the it doesn't interfere with our external scripts.
Adding Script Association
We'll now need to associate our script with our scraping session so that it gets invoked before the scraping session begins.
To do that, click on the Hello World scraping session in the objects tree on the left, then (in the section towards the bottom of the window) click the Add Script button to add the association. In the Script Name column select Initialize scraping session. The When to Run column should show Before scraping session begins, and the Enabled checkbox should be checked. This will cause our script to get executed at the very beginning of the scraping session so that the TEXT_TO_SUBMIT session variable can get set.
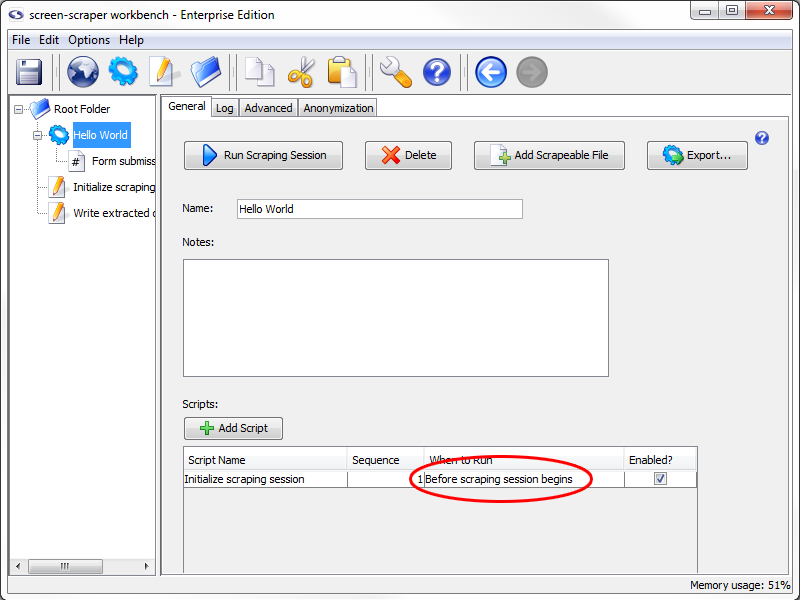
Scrapeable File Updates
Just as we use special tokens in extractor patterns to designate values we'd like to extract, we use special tokens to insert values of session variables into the URLs or parameters (GET, POST, or BASIC authentication) of scrapeable files. We'll do this now by embedding it into one of the parameters of our only scrapeable file. Expand the Hello World scraping session in the objects tree, then select the Form submission scrapeable file. Click on the Parameters tab. In the Value column for our text_string parameter replace the text Hello world! with the text ~#TEXT_TO_SUBMIT#~
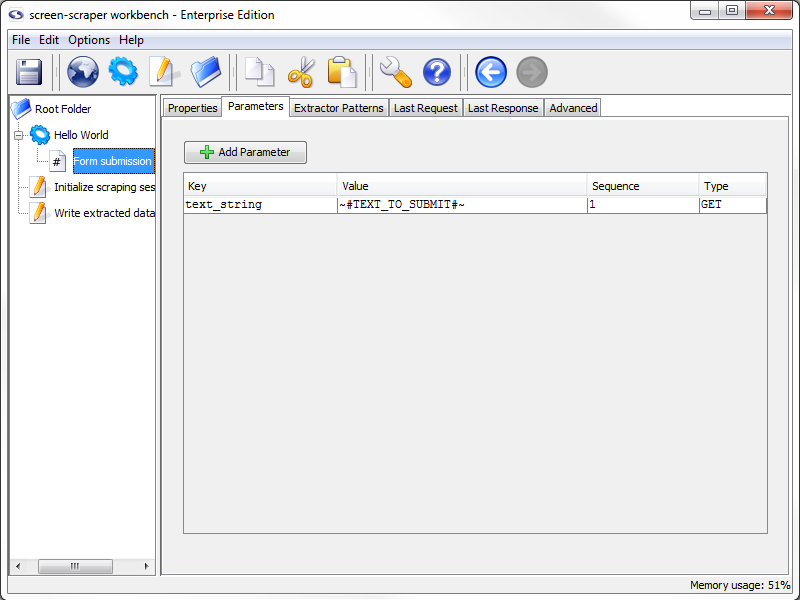
The ~# and #~ delimiters are used to designate a session variable whose value should be inserted into that location when the scrapeable file gets executed. When the scrapeable file gets invoked, screen-scraper will construct the URL by including the text_string parameter in it. In other words, the URL for our scrapeable file will become:
Test Run
We're going to run our scraping session, but before doing that clear out the scraping session log by selecting the Hello World scraping session in the objects tree, clicking on the Log tab, then on the Clear Log button. Start up the scraping session by clicking the Run Scraping Session button. Once the scrape has run, you should get the log similar to the one in figure below.
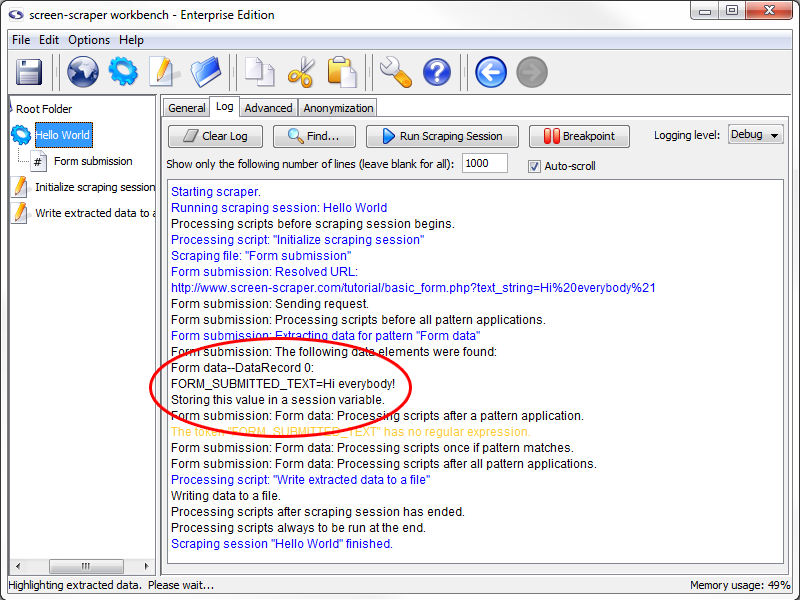
If you look at the contents of the form_submitted_text.txt file (in the screen-scraper installation directory) you'll notice the text Hi everybody!. If you still have the file from before you might need to look for the new text.
Remember that it's a good idea to run scraping sessions often as you make changes, and watch the log and last responses to ensure that things are working as you expect them to.
2: Scrape Updates
Preparing the Scraping Session
Within screen-scraper, you'll want to disable the Initialize scraping session script; otherwise, the value we pass in will get overwritten when the script is executed.
Disable the script by clicking on the Hello World scraping session, then on the General tab, then un-check the Enabled check box for the script.
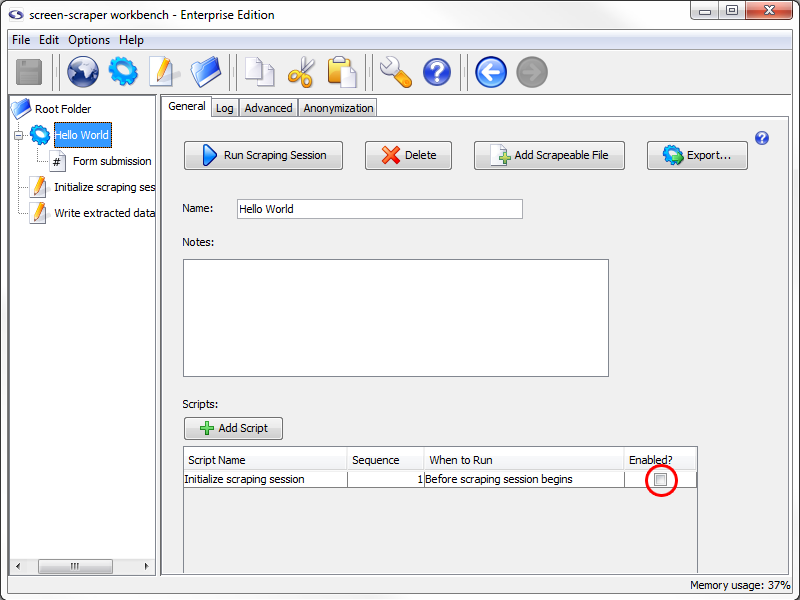
Logging
Each time you run a scraping session externally screen-scraper will generate a log file corresponding to that scraping session in the log folder found inside the directory where you installed screen-scraper. This can be invaluable for debugging, so you'll want to take a look at it if you run into trouble.
You can turn server logging off by unchecking the Generate log files check box under the Servers section of the settings dialog box.
3: External Application
Invoking screen-scraper Externally
If you've decided to use the basic edition of screen-scraper your only option for invoking screen-scraper externally is to use the command line (invoking screen-scraper from the command line is also available in the Professional and Enterprise Editions). If you are using a Professional or Enterprise edition of screen-scraper and have access to a server that supports ASP, PHP, ColdFusion, or Java you can continue the tutorial by selecting which language you desire to use at the bottom of the page.
The rest of this page is particular to completing the tutorial using a server language. If you are using a Basic Edition of screen-scraper you are welcome to read on but you will not be able to complete the tasks.
Oftentimes you'll want to use a language or platform external to screen-scraper to scrape data. screen-scraper can be controlled externally using Java, PHP, Ruby, Python, .NET, ColdFusion, any COM-friendly language (such as Active Server Pages or Visual Basic), or any language that supports SOAP. In this next part of the tutorial we'll give examples in PHP, Java, ColdFusion, and Active Server Pages.
Running the screen-scraper Server
In order to interact with screen-scraper externally it needs to be running as a server. When running as a server screen-scraper acts much like a database server does. That is, it listens for requests from external sources, services those requests, and sends back responses. For example, when you issue a SQL statement to a database from an ASP script your script opens up a socket to the database, sends the request over it, then receives the database's response back over the socket. Once this transaction has been completed the socket will be closed, but the database will continue to listen for other requests. screen-scraper works in a similar way.
At this point we'd recommend reading over the documentation page that discusses running screen-scraper as a server, and gives details on how to start and stop it according to the platform you're running on. Follow the link below, then return back to this page when you're finished:
Before we start writing code to interact with screen-scraper externally we need to configure a few things. Depending on the language you'd like to program in, please follow one of the links below, which will give you an overview of interacting with screen-scraper using that language and guide you through any configuration that needs to take place. Once you're finished return back to this page.
3.1: Using ASP
Create the Script
The ASP script we'll be using will invoke our scraping session remotely, passing in a value for the TEXT_TO_SUBMIT session variable. Create a new ASP script on your computer, and paste the following code into it:
' Create a RemoteScrapingSession object.
Set objRemoteSession = Server.CreateObject("Screenscraper.RemoteScrapingSession")
' Generate a new "Hello World" scraping session.
Call objRemoteSession.Initialize("Hello World")
' Put the text to be submitted in the form into a session variable so we can reference it later.
Call objRemoteSession.SetVariable( "TEXT_TO_SUBMIT", "Hi everybody!" )
' Check for errors.
If objRemoteSession.isError Then
Response.Write( "Error: " & objRemoteSession.GetErrorMessage )
Else
' Tell the scraping session to scrape.
Call objRemoteSession.Scrape
' Write out the text that was scraped:
Response.Write( "Scraped text: " + objRemoteSession.GetVariable("FORM_SUBMITTED_TEXT") )
End If
' Disconnect from the server.
Call objRemoteSession.Disconnect
%>
Script Description
After creating our RemoteScrapingSession object we make a separate call to initialize it. This is required for ASP. Also, you'll notice that before calling the Scrape method we check for any errors that may have occurred up to this point.
If for some reason your ASP script can't connect to the server you'd want to know before you tried to tell it to scrape.
Finally, the script explicitly disconnects from the server so that it knows we're done.
Running the Script
OK, we're ready to give our script a try. Make sure that screen-scraper running in server mode. If you've succeeded in starting up the server go ahead and load your ASP script in a browser. After a short pause you should see Scraped text: Hi everybody! output to your browser.
If there was an error then a message indicating the problem that occurred will be displayed.
3.1: Using ColdFusion
Create the Scripts
We'll be creating two different scripts to interact with screen-scraper via ColdFusion. The first will be using ColdFusion tags, and the second will be using ColdFusion script. Each of these scripts will invoke our scraping session remotely and pass in a value for the TEXT_TO_SUBMIT session variable.
If you have not already configured ColdFusion to run with screen-scraper, now is a good time to setup ColdFusion.
Tags Method
Create a new ColdFusion script on your computer, and paste the following code into it:
<head>
<title>ColdFusion Tag Example</title>
</head>
<body>
<cfobject
action = "create"
type = "java"
class = "com.screenscraper.scraper.RemoteScrapingSession"
name = "RemoteScrapingSession">
<cfset remoteSession = RemoteScrapingSession.init("Hello World","localhost",8778)>
<cfset remoteSession.setVariable( "TEXT_TO_SUBMIT", "Hi everybody!" )>
<cfset remoteSession.scrape()>
<cfset test = remoteSession.getVariable("FORM_SUBMITTED_TEXT")>
<cfset remoteSession.disconnect()>
<cfoutput>
textReturned: #test#
</cfoutput>
</body>
</html>
Script Method
If you prefer using ColdFusion script to program, you can use the following code instead of the code we give above:
<head>
<title>ColdFusion Script Example</title>
</head>
<body>
<cfscript>
RemoteScrapingSession = CreateObject("java","com.screenscraper.scraper.RemoteScrapingSession");
remoteSession = RemoteScrapingSession.init("Hello World","localhost",8778);
remoteSession.setVariable( "TEXT_TO_SUBMIT", "Hi everybody!" );
remoteSession.scrape();
test = remoteSession.getVariable( "FORM_SUBMITTED_TEXT" );
remoteSession.disconnect();
</cfscript>
<cfoutput>
textReturned: #test#
</cfoutput>
</body>
</html>
Script Description
You can probably follow the logic but for clarity let's take a moment to look at it. This script creates a RemoteScrapingSession, initializes it to be connected to the Hello World scraping session, sets the TEXT_TO_SUBMIT session variable, then scrapes the page and explicitly disconnects.
Running the Script
OK, we're ready to give our ColdFusion script a try. Start screen-scraper running in server mode. If you've succeeded in starting up the server go ahead and access your ColdFusion script from your browser. After a short pause you should see textReturned: Hi everybody! appear.
3.1: Using Java
Create the Script
The Java class we'll be writing will simply substitute for the Initialize scraping session script we wrote previously. That is, our Java class will invoke our scraping session remotely and pass in a value for the TEXT_TO_SUBMIT session variable. Create a new Java class on your computer, and paste the following code into it:
public class HelloWorldRemoteScrapingSession
{
/**
* The entry point.
*/
public static void main( String args[] )
{
try
{
// Create a remoteSession to communicate with the server.
RemoteScrapingSession remoteSession = new RemoteScrapingSession( "Hello World" );
// Put the text to be submitted in the form into a session variable so we can reference it later.
remoteSession.setVariable( "TEXT_TO_SUBMIT", "Hi everybody!" );
// Tell the session to scrape.
remoteSession.scrape();
// Output the text that was scraped:
System.out.println( "Scraped text: " + remoteSession.getVariable( "FORM_SUBMITTED_TEXT" ) );
// Very important! Be sure to disconnect from the server.
remoteSession.disconnect();
}
catch( Exception e )
{
System.err.println( e.getMessage() );
}
}
}
Script Explanation
For the most part this Java code is virtually identical to our script. The one notable difference is that we need to explicitly disconnect from the server so that it knows we're done.
Running the Script
OK, we're ready to give our Java class a try. After you've successfully compiled the class (remember to include the "screen-scraper.jar" file in your classpath), start screen-scraper running as a server. If you've succeeded in starting up the server go ahead and run the Java class from a command prompt or console. After a short pause you should see the "Hi everybody!" message output.
3.1: Using PHP
Create the Script
The PHP script we'll be writing will invoke our scraping session remotely, passing in a value for the TEXT_TO_SUBMIT session variable. Create a new PHP script on your computer, and paste the following code into it:
/**
* Note that in order to run this script the file
* remote_scraping_session.php must be in the same
* directory.
*/
require('remote_scraping_session.php');
// Instantiate a remote scraping session.
$session = new RemoteScrapingSession;
// Initialize the "Hello World" session.
echo "Initializing the session.<br />";
flush();
$session->initialize("Hello World");
// Put the text to be submitted in the form into a session variable so we can reference it later.
$session->setVariable("TEXT_TO_SUBMIT", "Hi everybody!" );
// Check for errors.
if($session->isError() )
{
echo "An error occurred: " . $session->getErrorMessage() . "<br />";
exit();
}
// Tell the session to scrape.
echo "Scraping <br />";
flush();
$session->scrape();
// Write out the text that was scraped:<
echo "Scraped text: " . $session->getVariable("FORM_SUBMITTED_TEXT") . "<br />";
// Very important! Be sure to disconnect from the server.
$session->disconnect();
// Indicate that we're finished.
echo "Finished.";
?>
Script Description
After creating our RemoteScrapingSession object we make a separate call to initialize it for our specific scraping session. After calling the Scrape method we check for any errors that may have occurred up to this point.
If for some reason your PHP script can't connect to the server you'd want to know before you tried to tell it to scrape.
Finally, we explicitly disconnect from the server so that it knows we're done.
OK, we're ready to give our script a try. Start screen-scraper running as a server.
Make sure that the remote_scraping_session.php file has been copied to the same directory as your PHP script (the file can be found in screen-scraper's installation directory, misc/php.
If you've succeeded in starting up the server go ahead and load your PHP script in a browser. After a short pause you should see the following in the browser output:
Scraping
Scraped text: Hi+everybody%21
Finished.
3.1: Using the Command Line
Overview
If you've decided to use the basic edition of screen-scraper this is your only option for invoking screen-scraper externally (invoking screen-scraper from the command line is also available in the professional and enterprise editions).
You can find full documentation and examples on using the command line on our Invoking screen-scraper from the command line documentation.
Writing the External Script
In order to invoke screen-scraper from the command line, you'll need to create a batch file (in Windows) or a shell script (in Linux or Mac OS X) to invoke the scraping session.
If you have not disabled the Initialize scraping session script then please do so now. Instructions on how to do this can be found on the previous page.
Windows
If you're using Windows open a text editor (e.g., Notepad) and enter the following:
Save the batch file (call it hello_world.bat) in the folder where screen-scraper is installed (e.g., C:\Program Files\screen-scraper professional edition\).
If the version of screen-scraper you're running is prior to 4.5, and you're running Windows Vista, you will need to save your batch file to a location such as your Documents folder or your Desktop. Then, within Windows Explorer, manually transfer the file to the directory where screen-scraper is installed.
Linux
If you're running Linux, the shell script would look like this:
Save the shell script (call it hello_world.sh) in the folder where screen-scraper is installed (e.g., /usr/local/screen-scraper professional edition/).
Mac
For Mac OS X, you'd use this for the script:
Save the shell script (call it hello_world.sh) in the folder where screen-scraper is installed (e.g., /Users/username/screen-scraper professional edition/).
Running Script
Windows
Open a DOS prompt. The cmd can be opened by clicking on the Start menu, selecting the Run option (on the right), and typing cmd.
For Windows 7 just type command into the Start menu search then click on cmd.
Navigate to the screen-scraper installation directory using the cd command. It should resemble:
Once you are in the correct directory, run the file by simply typing its name into cmd:
You should see the text from screen-scraper's log appear in the DOS window.
Non-Windows Operating System
If you're running Linux or Mac OS X, you'll need to close the workbench before invoking your shell script.
Open Terminal and navigate to the screen-scraper installation directory using the cd command. One example is shown below:
Once you are in the correct directory, run the file:
Viewing the Results
As with the first tutorial and our test run, to see that the script has run open the form_submitted_text.txt file in the screen-scraper installation directory. You can also try editing the file and running it again to have it say something else. Have some fun!
4: Review
Quick Summary
When learning to do something new it is important to see what you have done, and not just what you still don't know how to do. With that in mind take a moment to review the things that you have accomplished in this tutorial. To help in your reflection we have provided a list of the major steps from the tutorial. If you want to review information from any of the steps, you can click on the link to be returned back to that section of the tutorial.
5: Where to Go From Here
Suggestions
Once again, we want to start by saying Congratulations! You have made it through a tutorial and are progressing in your abilities to extract information from the web. At this point you should have the basics under your belt to scrape most web sites from the workbench and manage those scrapes from an external script.
More Training/Tutorials
From here you could continue on with any other tutorial that seems relevant to your project or curiosities. The remaining all build off of the second tutorial. The differences between them can be summed up as pertaining either to how the scrape is started or how the extracted information is processed. In some cases they will required that you have a Professional or Enterprise edition of screen-scraper.
The fourth tutorial is similar to this tutorial but as the scrape is quite a bit longer the management script is also. It is a great next step if you want to continue learning about managing scrapes from external sources.
At this point you may want to consider reading through some of the existing documentation to get more familiar with the particulars of the product. Whatever you choose, the best way to learn screen-scraper is to use it. Try it on one of your own projects!
Still a Little Lost?
If you don't feel comfortable with the process, we invite you to recreate the scrape using the tutorial only for reference. This can be done using only the screen-shots or review outline while you work on it. If you are still struggling you can search our forums for others like yourself and ask specific questions to the screen-scraper community.
Tutorial 4: Scraping a Shopping Site from an External Program
Overview
This tutorial illustrates invoking screen-scraper from other programs in ways more complex than those presented in Tutorial 3. From our external program we'll be passing to screen-scraper search parameters, invoking the scraping process, getting the scraped data from screen-scraper, then iterating over the data, and outputting it within our application.
Before proceeding it would be a good idea to go through Tutorial 2, if you haven't done so already.
If you haven't gone through Tutorial 2, or don't still have the scraping session you created in it, you can download it and import it into screen-scraper.
Tutorial Requirements
This tutorial requires you to be using the Professional or Enterprise edition of screen-scraper. And it requires that you have access to a server (remote or local) that can run one of the external scripting languages that screen-scraper has drivers for: ASP, C#.NET, ColdFusion, Java, PHP, Python, or VB.NET.
Finished Project
If you'd like to see the final version of the scraping session you'll be creating in this tutorial you can download it below.
| Attachment | Size |
|---|---|
| Shopping Site (Scraping Session).sss | 11.63 KB |
1: Scrape Updates
Scrape Process
screen-scraper can be invoked from software applications written in most modern programming languages, including Java, Active Server Pages, PHP, .NET, and anything that supports SOAP. In this tutorial we'll give some examples of applications that do just that.
Our application will pass parameters to screen-scraper corresponding to login information as well as a key phrase for which to search. As in the third tutorial, we're going to pretend that the web site requires us to log in before we can search, for the sake of providing an example. Once we pass the parameters to screen-scraper we'll tell it to start scraping. screen-scraper will then run the scraping session using the parameters we gave it. Once it's done, we'll ask it for the extracted information, then output it for the user to see.
Updates
Before we begin we'll first need to make a couple of minor changes to the Shopping Site scraping session from the third tutorial. If you haven't already, start up screen-scraper.
Login Parameters
Under the Shopping Site scraping session click on the Login scrapeable file, then on the Parameters tab. We're going to alter the email_address and password POST parameters so that we can pass those parameters in rather than hard-coding them. For the email_address parameter change the value [email protected] to ~#EMAIL_ADDRESS#~, and change the testing value for the password parameter to ~#PASSWORD#~.
Remember tokens surrounded by the ~# #~ delimiters indicate that the value of a session variable should be inserted. For example, in our case we're going to create an EMAIL_ADDRESS session variable and give it the value [email protected] such that screen-scraper substitutes it in for the corresponding POST parameter at runtime.
Products Extractor Pattern
To simplify the process of giving an external script access to the extracted product details, we will save the data set into a session variable.
Click on the Details page scrapeable file. On the PRODUCTS extractor pattern, select the Advanced tab and check the box next to Automatically save the data set generated by this extractor pattern in a session variable.
Initialization Script
The code that we'll be writing in our external application will essentially take the place of the Shopping Site--initialize session script. Let's disable the association since it would otherwise overwrite the values we'll be passing in externally.
To do that click on the Shopping Site scraping session in the objects tree and un-check the Enabled checkbox for the Shopping Site--initialize session script.
Prepare screen-scraper for Application
Save your changes and exit screen-scraper. Also, so that the external scripts will be able to interact with screen-scraper, start screen-scraper running as a server.
2: External Script
Choose a Language
Where you go next depends on which programming language you're interested in. Select the the link below that corresponds the the language that you will be using.
2.1: Using ASP
Warning!
In order to invoke screen-scraper from ASP, screen-scraper needs to be running in server mode. If you'd like a refresher on how to start up screen-scraper in server mode go ahead and follow that link, then come back here.
Run the Script
Right-click and download the shopping.asp file, then save it to a directory where it will be web-accessible (i.e., within your IIS web dir).
Open up your web browser and go to the URL corresponding to the shopping.asp file (e.g, "http://localhost/screen-scraper/shopping.asp"). You'll see a simple search form. Type in a product keyword, such as bug, then hit the Go button. If all goes well the page will take a little while to load (it's waiting as screen-scraper extracts the data), then it will output the corresponding products.
Troubleshoot Problems (if any arise)
If that didn't go quite as you expected here are some things to check:
- Make sure screen-scraper is running as a server, and that nothing is blocking its ports (such as a firewall running on your machine).
- If you're running screen-scraper on a different machine than the one your ASP file resides on, make sure that screen-scraper is allowing connections from the ASP machine. In the screen-scraper workbench click on the (wrench) icon, then on the Servers button, and check that the Hosts to allow to connect includes the IP address (or perhaps just the first part of the IP address) of the ASP machine. You might also try blanking that property out entirely, which will allow connections from any host. When developing, this is usually the easiest approach.
- Check screen-scraper's log folder for a Shopping Site log file. If you find one it means that screen-scraper is at least receiving the request. Open the log file in a text editor to see if you find any error messages.
- If you still can't seem to get it to work feel free to post to our forum.
Understand the Script
Assuming the test worked, fire up your favorite ASP editor and open the shopping.asp file in it. The file is pretty heavily commented, so hopefully it makes sense what's going on. If not, try reviewing our COM documentation or posting to our forum.
View the Log
When you invoke screen-scraper as a server it creates log files corresponding to each run of your scraping sessions in its log folder. Take a look in that folder for your Shopping Site log and take a look through it. It should look similar to what you see when you run scraping sessions in the workbench.
2.1: Using C#.NET
Warning!
In order to invoke screen-scraper from C#.NET, screen-scraper needs to be running in server mode. If you'd like a refresher on how to start up screen-scraper in server mode go ahead and follow the link, then return here.
Run the Script
Right-click and download the shopping.cs file. Move it into the desired directory.
From your .NET environment compile and execute the shopping.cs file.
Troubleshoot Problems (if any arise)
If that didn't go quite as you expected here are some things to check:
- Make sure screen-scraper is running as a server, and that nothing is blocking its ports (such as a firewall running on your machine).
- If you're using Visual Studio 2008 or later, the project Target Framework will need to be set to .NET 3.5 or later. However, do not use any .NET client frameworks since they do not have the required libraries for your project to compile.
- If you're running screen-scraper on a different machine than the one your C# class resides on, make sure that screen-scraper is allowing connections from the C# machine. In the screen-scraper workbench click on the (wrench) icon, then on the Servers button, and check the Hosts to allow to connect includes the IP address (or perhaps just the first part of the IP address) of the C# machine. You might also try blanking that property out entirely, which will allow connections from any host. When developing, this is usually the easiest approach.
- Check screen-scraper's log folder for a Shopping Site log file. If you find one it means that screen-scraper is at least receiving the request. Open the log file in a text editor to see if you find any error messages.
- If you still can't seem to get it to work feel free to post to our forum.
Understand the Script
Assuming that test worked, take a closer look over the shopping.cs class. The file is pretty heavily commented, so hopefully it makes sense what's going on. If not, try reviewing our .NET documentation or posting to our forum.
View the Log
When you invoke screen-scraper as a server it creates log files corresponding to your scraping session in its log folder. Take a look in that folder for your Shopping Site log file and take a look through it. It should look similar to what you see when you run scraping sessions in the workbench.
2.1: Using Cold Fusion
Warning!
In order to invoke screen-scraper from ColdFusion, screen-scraper needs to be running in server mode. If you'd like a refresher on how to start up screen-scraper in server mode go ahead and follow the link, then return here.
Run the Script
Download the shopping.cfm file, then save it in a directory that will be accessible from your web server. Rename the file from shopping.cfm.txt to shopping.cfm.
Open up your web browser and go to the URL corresponding to the shopping.cfm file (e.g, "http://localhost/screen-scraper/shopping.cfm"). You'll see a simple search form. Type in a product keyword, such as bug, then hit the Go button. If all goes well the page will take a little while to load (it's waiting as screen-scraper extracts the data), then it will output the corresponding products.
Troubleshoot Problems (if any arise)
If that didn't go quite as you expected here are some things to check:
- Make sure screen-scraper is running as a server, and that nothing is blocking its ports (such as a firewall running on your machine).
- If you're running screen-scraper on a different machine than the one your ColdFusion file resides on, make sure that screen-scraper is allowing connections from the ColdFusion machine. In the screen-scraper workbench click on the (wrench) icon, then on the Servers button, and check the Hosts to allow to connect includes the IP address (or perhaps just the first part of the IP address) of the ColdFusion machine. You might also try blanking that property out entirely, which will allow connections from any host. When developing, this is usually the easiest approach.
- Ensure that the permissions on the shopping.cfm file are such that your web server can execute it.
- Check screen-scraper's log folder for a Shopping Site log file. If you find one it means that screen-scraper is at least receiving the request. Open the log file in a text editor to see if you find any error messages.
- If you still can't seem to get it to work feel free to post to our forum.
Understand the Script
Assuming that test worked, fire up your favorite ColdFusion editor and open the shopping.cfm file in it. The file is pretty heavily commented, so hopefully it makes sense what's going on. If not, try reviewing ColdFusion documentation or posting to our forum.
View the Log
When you invoke screen-scraper as a server it creates log files corresponding to your scraping session in its log folder. Take a look in that folder for your Shopping Site log file and take a look through it. It should look similar to what you see when you run scraping sessions in the workbench.
2.1: Using Java
Warning!
In order to invoke screen-scraper from Java, screen-scraper needs to be running in server mode. If you'd like a refresher on how to start up screen-scraper in server mode go ahead and follow the link, then return here.
Run the Script
Before we dig into the code let's review a few things related to invoking screen-scraper via Java. First, your Java code will need to have two jars in its classpath: screen-scraper.jar (found in the root screen-scraper install folder) and log4j.jar (found in screen-scraper's lib folder). For convenience we've packaged all of the files you'll need. Download the file and unzip it. You'll notice that we also include an Ant build file that you can use to compile and run the sample class.
If you're using Ant simply type ant run at a command prompt inside of the folder where the build.xml file is found.
Troubleshoot Problems (if any arise)
If that didn't go quite as you expected here are some things to check:
- Make sure screen-scraper is running as a server, and that nothing is blocking its ports (such as a firewall running on your machine).
- If you're running screen-scraper on a different machine than the one your Java class resides on, make sure that screen-scraper is allowing connections from the Java machine. In the screen-scraper workbench click on the (wrench) icon, then on the Servers button, and check the Hosts to allow to connect includes the IP address (or perhaps just the first part of the IP address) of the Java machine. You might also try blanking that property out entirely, which will allow connections from any host. When developing, this is usually the easiest approach.
- Check screen-scraper's log folder for a Shopping Site log file. If you find one it means that screen-scraper is at least receiving the request. Open the log file in a text editor to see if you find any error messages.
- If you still can't seem to get it to work feel free to post to our forum.
Understand the Script
Assuming that test worked, fire up your favorite Java editor and open the Shopping.java file in it. The file is pretty heavily commented, so hopefully it makes sense what's going on. If not, try reviewing our Java documentation or posting to our forum.
View the Log
When you invoke screen-scraper as a server it creates log files corresponding to your scraping session in its log folder. Take a look in that folder for your Shopping Site log file and take a look through it. It should look similar to what you see when you run scraping sessions in the workbench.
2.1: Using PHP
Warning!
In order to invoke screen-scraper from PHP, screen-scraper needs to be running in server mode. If you'd like a refresher on how to start up screen-scraper in server mode go ahead and follow that link, then come back here.
Run the Script
Your PHP code will need to refer to screen-scraper's PHP driver, called remote_scraping_session.php. You can find this file in the misc\php\ folder of your screen-scraper installation. You'll want to copy the file into the directory where you plan on putting the PHP file that will invoke screen-scraper.
Download the shopping.php file and then save it in the same directory where you copied the remote_scraping_session.php file. Rename the file from shopping.php.txt to shopping.php.
Open up your web browser and go to the URL corresponding to the shopping.php file (e.g, "http://localhost/screen-scraper/shopping.php"). You'll see a simple search form. Type in a product keyword, such as bug, then hit the Go button. If all goes well the page will take a little while to load (it's waiting as screen-scraper extracts the data), then it will output the corresponding products.
Troubleshoot Problems (if any arise)
If that didn't go quite as you expected here are some things to check:
- Make sure screen-scraper is running as a server, and that nothing is blocking its ports (such as a firewall running on your machine).
- If you're running screen-scraper on a different machine than the one your PHP file resides on, make sure that screen-scraper is allowing connections from the PHP machine. In the screen-scraper workbench click on the (wrench) icon, then on the Servers button, and check the Hosts to allow to connect includes the IP address (or perhaps just the first part of the IP address) of the PHP machine. You might also try blanking that property out entirely, which will allow connections from any host. When developing, this is usually the easiest approach.
- Ensure that the permissions on the shopping.php and remote_scraping_session.php files are such that your web server can execute them.
- Check screen-scraper's log folder for a Shopping Site log file. If you find one it means that screen-scraper is at least receiving the request. Open the log file in a text editor to see if you find any error messages.
- If you still can't seem to get it to work feel free to post to our forum.
Understand the Script
Assuming that test worked, fire up your favorite PHP editor and open the shopping.php file in it. The file is pretty heavily commented, so hopefully it makes sense what's going on. If not, try reviewing the PHP documentation or posting to our forum.
View the Log
When you invoke screen-scraper as a server it creates log files corresponding to your scraping session in its log folder. Take a look in that folder for your Shopping Site log file and take a look through it. It should look similar to what you see when you run scraping sessions in the workbench.
2.1: Using Python
Warning!
In order to invoke screen-scraper from Python, screen-scraper needs to be running in server mode. If you'd like a refresher on how to start up screen-scraper in server mode go ahead and follow the link, then return here.
Run the Script
Your Python code will need to refer to screen-scraper's Python driver, called remote_scraping_session.py. You can find this file in the misc\python\ folder of your screen-scraper installation. You'll want to put a copy of the file into the directory where you plan on putting the Python file that will invoke screen-scraper.
Download the shopping.py file, then save it in the same directory where you copied the remote_scraping_session.py file. Rename the file from shopping.py.txt to shopping.py.
Run the command python shopping.py in your console. You'll be asked which keyword to search. Type in a product keyword, such as bug, then press the Enter key. If all goes well the program will take a little while to load (it's waiting as screen-scraper extracts the data), then it will output the corresponding products.
Troubleshoot Problems (if any arise)
If that didn't go quite as you expected here are some things to check:
- Make sure screen-scraper is running as a server, and that nothing is blocking its ports (such as a firewall running on your machine).
- If you're running screen-scraper on a different machine than the one your Python file resides on, make sure that screen-scraper is allowing connections from the Python machine. In the screen-scraper workbench click on the (wrench) icon, then on the Servers button, and check the Hosts to allow to connect includes the IP address (or perhaps just the first part of the IP address) of the Python machine. You might also try blanking that property out entirely, which will allow connections from any host. When developing, this is usually the easiest approach.
- Ensure that the permissions on the shopping.py and remote_scraping_session.py files are such that you can execute them.
- Check screen-scraper's log folder for a Shopping Site log file. If you find one it means that screen-scraper is at least receiving the request. Open the log file in a text editor to see if you find any error messages.
- If you still can't seem to get it to work feel free to post to our forum.
Understand the Script
Assuming that test worked, fire up your favorite Python editor and open the shopping.py file in it. The file is pretty heavily commented, so hopefully it makes sense what's going on. If not, try reviewing the Python documentation or posting to our forum.
View the Log
When you invoke screen-scraper as a server it creates log files corresponding to your scraping session in its log folder. Take a look in that folder for your Shopping Site log file and take a look through it. It should look similar to what you see when you run scraping sessions in the workbench.
2.1: Using Ruby
Warning!
In order to invoke screen-scraper from Ruby, screen-scraper needs to be running in server mode. If you'd like a refresher on how to start up screen-scraper in server mode go ahead and follow that link, then come back here.
Run the Script
Your Ruby code will need to refer to screen-scraper's Ruby driver, called remote_scraping_session.rb. You can find this file in the misc\ruby\ folder of your screen-scraper installation. You'll want to copy that file into the directory where you plan on putting the Ruby file that will invoke screen-scraper.
Download the shopping.rb.txt file then save it in the same directory where you copied the remote_scraping_session.rb file. Rename the file from shopping.rb.txt to shopping.rb.
Run the command ruby shopping.rb in your console. You'll be asked which keyword to search. Type in a product keyword, such as bug, then press the Enter key. If all goes well the program will take a little while to load (it's waiting as screen-scraper extracts the data), then it will output the corresponding products.
Troubleshoot Problems (if any arise)
If that didn't go quite as you expected here are some things to check:
- Make sure screen-scraper is running as a server, and that nothing is blocking its ports (such as a firewall running on your machine).
- If you're running screen-scraper on a different machine than the one your Ruby file resides on, make sure that screen-scraper is allowing connections from the Ruby machine. In the screen-scraper workbench click on the (wrench) icon, then on the Servers button, and check the Hosts to allow to connect includes the IP address (or perhaps just the first part of the IP address) of the Ruby machine.
- Ensure that the permissions on the shopping.rb and remote_scraping_session.rb files are such that you can execute them.
- Check screen-scraper's log folder for a Shopping Site log file. If you find one it means that screen-scraper is at least receiving the request. Open the log file in a text editor to see if you find any error messages.
- If you still can't seem to get it to work feel free to post to our forum.
Understand the Script
Assuming that test worked, fire up your favorite Ruby editor and open the shopping.rb file in it. The file is pretty heavily commented, so hopefully it makes sense what's going on. If not, try reviewing the Ruby documentation, or posting to our forum.
View the Log
When you invoke screen-scraper as a server it creates log files corresponding to your scraping session in its log folder. Take a look in that folder for your "Shopping Site" log file and take a look through it. It should look similar to what you see when you run scraping sessions in the workbench.
2.1: Using VB.NET
Warning!
In order to invoke screen-scraper from VB.NET, screen-scraper needs to be running in server mode. If you'd like a refresher on how to start up screen-scraper in server mode go ahead and follow the link, then return here.
Run the Script
Download the shopping.vb file. Rename the file from shopping.vb.txt to shopping.vb. From your .NET environment compile and execute the file.
Troubleshoot Problems (if any arise)
If that didn't go quite as you expected here are some things to check:
- Make sure screen-scraper is running as a server, and that nothing is blocking its ports (such as a firewall running on your machine).
- If you're running screen-scraper on a different machine than the one your VB class resides on, make sure that screen-scraper is allowing connections from the VB machine. In the screen-scraper workbench click on the (wrench) icon, then on the Servers button, and check the Hosts to allow to connect includes the IP address (or perhaps just the first part of the IP address) of the VB machine. You might also try blanking that property out entirely, which will allow connections from any host. When developing, this is usually the easiest approach.
- Check screen-scraper's log folder for a Shopping Site log file. If you find one it means that screen-scraper is at least receiving the request. Open the log file in a text editor to see if you find any error messages.
- If you still can't seem to get it to work feel free to post to our forum.
Understand the Script
Assuming that test worked, take a closer look over the shopping.vb class. The file is pretty heavily commented, so hopefully it makes sense what's going on. If not, try reviewing our .NET documentation or posting to our forum.
View the Log
When you invoke screen-scraper as a server it creates log files corresponding to your scraping session in its log folder. Take a look in that folder for your Shopping Site log file and take a look through it. It should look similar to what you see when you run scraping sessions in the workbench.
3: Where to Go From Here
Suggestions
First off, Congratulations! You have made it through another tutorial and are progressing in your abilities to extract information from the web. The approach outlined in this tutorial works great for relatively small sets of data. When we extract records from the shopping site we're probably not going to extract more than 25 or so. When screen-scraper extracts the data it is saved in memory (remember we checked the Automatically save the data set generated by this extractor pattern in a session variable checkbox for the PRODUCTS extractor pattern, which is what causes this to happen), so it works fine because there aren't that many products.
More Training/Tutorials
Where to next? Well, what would happen if we needed to extract and save large numbers of records? The simple answer is that you need to save them out as they're extracted rather than having screen-scraper keep them in memory. Usually this means either inserting the scraped records into a database or writing them out to a text file.
Tutorial 2 already illustrated how to write the data out to a file but Tutorial 5 will walk your through saving scraped data to a database (if you interested in this you might also find this FAQ helpful).
Just remember that if you're writing the data out to a file you'll want to uncheck the box labeled Automatically save the data set generated by this extractor pattern in a session variable for the extractor pattern that pulls out the data you want to save. If it's checked it will cause screen-scraper to store all of the data in memory, which could cause it to run out of memory while it's running.
Tutorial 6 will use screen-scraper to create an XML Feed from the e-commerce site while Tutorial 7 will go through using a file of search terms to run the search scrape multiple times and write it to a file.
Still a Little Lost?
If you don't feel comfortable with the process, we invite you to recreate the scrape using the tutorial only for reference. This can be done using only the screen-shots while you work on it. If you are still struggling you can search our forums for others like yourself and ask specific questions to the screen-scraper community.
Tutorial 5: Saving Scraped Data to a Database
Overview
We continue on with our shopping site in this tutorial by inserting the data we scrape into a database. Generally once you've extracted data from a web site you want to save it out either to a file or a database. We already went over saving the data to a file in Tutorial 2, so here we'll cover inserting the information into a database.
If you haven't gone through Tutorial 2, or don't still have the scraping session you created in it, you can download it and import it into screen-scraper.
Tutorial Requirements
As we will not be inserting the data into a database, but rather sending it to an external script, all you need is a web server on which to run the PHP script. If you do not have access to a PHP server don't worry, you can run the script using the PHP script sitting on one of our servers to see how it will work. In other words, you don't really need anything except a few minutes and screen-scraper.
Finished Project
If you'd like to see the final version of the scraping session you'll be creating in this tutorial you can download it below.
| Attachment | Size |
|---|---|
| Shopping Site (Scraping Session).sss | 13.18 KB |
1: Tutorial Details
How it Works
There are a number of ways to insert scraped data into a database, of the ones outlined in this FAQ we will be using the last one: POST's extracted data to a local web-enabled script that accepts the data and inserts it into a database.
The Enterprise edition of screen-scraper has the ability to handle scraped data in real time. As of right now, this has been implemented in the Java and PHP drivers for screen-scraper. If you're running the Enterprise Edition, and want to interact with screen-scraper using either of those languages, read over the Handling Scraped Data in Real Time section of either our Invoking screen-scraper from Java or Invoking screen-scraper from PHP pages for details on this. This tutorial doesn't cover this approach, but it's quite a bit easier and cleaner to implement than the method that will be described here.
The basic idea in this tutorial is that we'll have a special scrapeable file that will POST data to a PHP file, which will handle inserting the data into a database. The flow of events will look like this:
- Extract the data from the site, saving each value (product title, price, etc.) in session variables.
- Invoke a Save product scrapeable file, which will POST the extracted data to a PHP file.
- The PHP file accepts and validates the data. If the data was incomplete it will return an error message and then attempt to insert the data into the database itself. If everything went well it will return a success message.
- In screen-scraper we use an extractor pattern to check the success/failure status of the error message.
2: Scrape Updates
Session Variables
We'll modify our existing scraping session a bit to get it ready to save the scraped data to our database. First, click on the Details page scrapeable file in the objects tree, then on the Extractor Patterns tab, then click the Sub-Extractor Patterns tab for our PRODUCTS extractor pattern.
We're going to update each of our extractor pattern tokens so that they save their extracted values in a session variable. Do this by double-clicking each of them (e.g., on TITLE) or right-clicking (control-clicking on Mac OS X) and selecting Edit token. In the Edit Token window click the Save in session variable check box, then close the window. Do this for each extractor token (TITLE, PRICE, etc.).
We save the values in session variables so that we can use them as POST parameters in the scrapeable file that will POSTS to our PHP file.
New Scrapeable File
Let's create that scrapeable file now. Click on the Shopping Site scrapeable file in the objects tree, then the Add Scrapeable File button, found on the General tab. Once the scrapeable file appears give it the name Save product. In the URL field enter:
This is an example of the completed file. We will discuss the file in more detail later.
Check the box labeled This scrapeable file will be invoked manually from a script so that it will not run in sequence.
Now add the required parameters. Click on the Parameters tab for the new scrapeable file, and give it five POST parameters:
| Key | Value |
|---|---|
| title | ~#TITLE#~ |
| price | ~#PRICE#~ |
| manufactured_by | ~#MANUFACTURED_BY#~ |
| model | ~#MODEL#~ |
| shipping_weight | ~#SHIPPING_WEIGHT#~ |

Remember that the ~# #~ delimiters indicate that the value of the corresponding session variable should be substituted in. For example, in our case the value of the TITLE session variable (e.g., "A Bug's Life") will be substituted in for the TITLE token. This value will be the one that gets submitted to the PHP file so that it can be inserted into the database.
New Script
Finally, we need to create a simple script that will invoke our new scrapeable file. Click on the (Add a new script) button. Give the script the name Save product, and give it the Script Text:
The script simply tells screen-scraper to invoke the Save product scrapeable file.
New Script Association
We need invoke the Save product scrapeable file for each product, so that they all get saved to the database. As such, we'll invoke the script after the Details page is requested. Do this by clicking on the Details page scrapeable file in the objects tree, on the Properties tab, and then on the Add Script button. In the Script Name column select Save product. Under the When to Run column select After file is scraped.
Test Run
Okay, we're done setting up screen-scraper, so we're ready give our scraping session a run. Before we invoke it, let's make one minor tweak so that the session doesn't take quite so long to run.
In the Shopping Site--initialize session script, change the value of the SEARCH session variable from dvd to bug.
This way we'll get the two "Bug's Life" DVD's rather than every DVD in the system.
Once you've done that click on the Shopping Site scraping session in the objects tree, then on the Run Scraping Session button.
Check the Results
Once the scraping session has run it's course click on the Save product scrapeable file, then on the Last Response tab. You should see something like this for the response:
<result>
<status>Success</status>
<product>
<title>A Bug\'s Life \"Multi Pak\"</title>
<price>35.99</price>
<manufactured_by>Warner</manufactured_by>
<model>DVD-ABUG</model>
<shipping_weight>7.00 lbs.</shipping_weight>
</product>
</result>
This indicates that the last product was successfully inserted.
3: The PHP File
The Scrapeable File
Hopefully this is obvious, but we could just as easily use a web script written in ASP, Cold Fusion, or anything else that can be accessed via HTTP. In this tutorial we use PHP as an example simply because it's one of the most commonly used languages. Don't worry if you're not familiar with PHP, though, most of what we'll be going through is simple pseudo-code.
The best part of this approach is that you can interact with your database using your favorite web scripting language.
How the Script Works
To understand the script we need to know what the page looks like normally. Open the file in you web browser: http://www.screen-scraper.com/support/tutorials/tutorial5/db/save_product.php. You will get a form similar to the figure below.
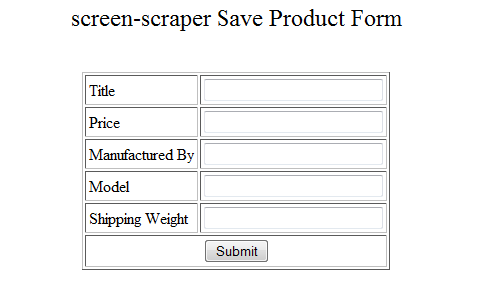
You'll notice that, when the PHP script is accessed directly (i.e., not via a POST request), it simply displays a form that you can use to insert products. Go ahead and try that now. Enter in some bogus information, then submit the form.
If you entered in at least a title and a price you should get a small XML document that resembles the one you saw in screen-scraper.
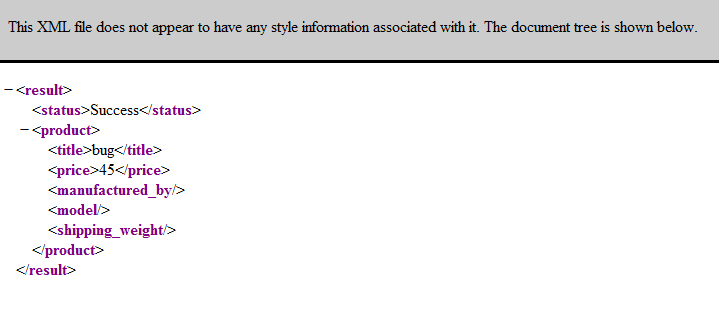
Go back to the form, leave the Price field blank, then re-submit the form. This time you get a message indicating that the data is incomplete.
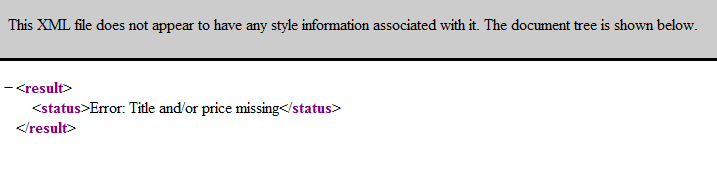
The Connection
When you submit the form you're taking exactly the same action that screen-scraper does when it invokes its Save product scrapeable file. The data is submitted to the PHP file via a POST request, validated, then inserted into the database.
The Code
We have used general terms to reference what is happening in the script so far. Now we would like to invite you to look over the code of the PHP file found in this zip file: http://community.screen-scraper.com/files/media/tutorials/tutorial5/db/save_product.php.zip. It's pretty heavily commented, so hopefully you can follow it even if you don't know PHP. Your code will obviously vary depending on the database you're using and any data validation you want to perform.
You might notice that we are not actually saving anything in this file. This is primarily to avoid the load of all the bogus information being stored. You can lookup how to interact with your desired database in the documentation of the scripting language that you choose.
The Error Message
Having your web application return some kind of status message allows you to handle error conditions and such within screen-scraper. In this case you would probably want to set up an extractor pattern for the Save product scrapeable file that might look something like this:
You could then write a script that does something special, like write an error log, in the case of an error.
4: Where to Go From Here
Suggestions
Once again, congratulations on completing the tutorial. The best way to proceed would probably be to try this on your own project. If you run into any glitches don't hesitate to post to our forum so that we can lend a hand.
You are as always welcome to continue through the Tutorials or to read the existing documentation.
Still a Little Lost?
If you don't feel comfortable with the process, we invite you to recreate the scrape using the tutorial only for reference. This can be done using only the screen-shots while you work on it. If you are still struggling you can search our forums for others like yourself and ask specific questions to the screen-scraper community.
Other documentation and examples
The SqlDataManager object simplifies your interactions with a JDBC-compliant SQL database.
Example of a traditional approach to working with MySQL databases.
Tutorial 6: Generating an RSS/Atom Feed from a Product Search
Overview
In this tutorial will go over configuring screen-scraper to generate an RSS or Atom feed based on extracted data. We will be using the Shopping Site scraping session we generated in Tutorial 2.
If you haven't already gone through Tutorial 2, we would encourage you to do so now. If you don't still have the scraping session you created in Tutorial 2, you can download it and import it into screen-scraper.
Tutorial Requirements
The methods used in this tutorial require that you use an Enterprise edition of screen-scraper.
Finished Project
If you'd like to see the final version of the scraping session you'll be creating in this tutorial you can download it below.
| Attachment | Size |
|---|---|
| Shopping Site (Scraping Session).sss | 12.37 KB |
1: Tutorial Details
How it Works
Before going on, take a minute to read over the Generating RSS and Atom Feeds page in our documentation. It will give you a basic overview of how we will proceed. When you have read it return here and proceed with the tutorial.
We're going to configure our Shopping Site scraping session so that it generates a feed of products based on a search parameter. That is, we'll give it a search keyword (e.g., bug or dvd), it will extract the product data, then create an XML feed out of the scraped data. For testing purposes we'll just access the XML feed from a web browser, though you could just as easily access it from an RSS/Atom reader.
2: Scrape Updates
Specify Feed Extractor Pattern
If you read over the Generating RSS and Atom Feeds page you can probably guess at how we'll need to modify the scraping session. Let's start by altering the name of the extractor pattern that grabs the product details.
In screen-scraper click on the Details page scrapeable file in the Shopping Site scraping session, then click the Extractor Patterns tab. Change the name of the extractor pattern from PRODUCTS to XML_FEED.
This pattern will extract out the DataSet that will hold our entire feed.
Each DataSet will only hold the results from one Details page, but we want a DataSet with all of the movies. There a a couple of ways to create this larger DataSet but we will use screen-scraper's built in ability to do this for us.
Click on the Details page scrapeable file. On the XML_FEED extractor pattern, select the Advanced tab and check the box next to Automatically save the data set generated by this extractor pattern in a session variable. Now screen-scraper will create our DataSet of movies.
Designate Feed Fields
Let's designate the fields for the individual items in the feed. To start, click on the Sub-Extractor Patterns tab for our feed.
There are several fields we're extracting, but for the sake of simplicity we'll just worry about two of them: TITLE and DESCRIPTION. For the TITLE portion of our feed we're in luck because we already have a TITLE token but for the DESCRIPTION part of the feed item we cannot use a full description from the product details page as there is not one. For the sake of providing an example let's use the MODEL as a substitute for a full description. Change the name of the MODEL sub-extractor token to DESCRIPTION so that it looks like this:
Scripting Link and Publish Date
There are two more elements we need for our XML feed: LINK and PUBLISHED_DATE. We're obviously not extracting either of these, so let's write a quick script to set them for us.
Create a new script by clicking on (Add a new script) icon in the button bar. Give the script the name Set URL and published date then copy and paste the provided code snippet into the Script Text:
dataRecord.put( "LINK", scrapeableFile.getCurrentURL() );
// Create a formatted date representing the current date.
dataRecord.put( "PUBLISHED_DATE", new Date() );
Once you've created the script associate it with the XML_FEED extractor pattern by clicking on the Details page scrapeable file, then on the Extractor Patterns tab. In the Scripts section (on the Main tab of the XML_FEED extractor pattern) click on the Add Script button. Select Set URL and published date under the Script Name column, and After each pattern match under the When to Run column.
Script Description
The script is fairly straightforward. We first set the LINK element to the URL of the product details page we're currently on. You'll notice that we're setting the value via the put method on the current DataRecord object. Because this script will get invoked for each pattern application the dataRecord object will be in scope.
Remember that the "dataRecord" object can be thought of as the current row on the spreadsheet of extracted data. Here we're simply adding a cell to the current row of the spreadsheet for the LINK element of the feed.
The second element we set is the PUBLISHED_DATE. For those unfamiliar with Java, passing it new Date() simply indicates that the feed item was published on the current date.
Disable Initialization Script
If you haven't done so previously, disable the Shopping Site--initialize session script (on the Shopping Site scraping session). We'll be passing values in externally, and this script would otherwise overwrite those values.
To disable the script, click on the Shopping Site" scraping session in the objects tree, then on the . Un-check the box in the table under the Enabled column.
Moving On
That's it for setting up the scraping session. We're now going to generate the feed.
Take a minute now to save your work.
3: Generating the XML Feed
Test Run
Let's make sure the scraping session works before we add a few more bells and whistles.
Close the workbench and start up screen-scraper in server mode. Once that's up, assuming you haven't altered the default Web/SOAP Server port (which is also the web server port), and that you're running screen-scraper on your local machine, try entering this URL in to your browser:
http://localhost:8779/ss/xmlfeed?scraping_session=Shopping+Site&SEARCH=bug
If you are running screen-scraper on a machine that is not your local machine or on a different SOAP port then make the required changes to the URL.
If all goes well the browser should take a little bit to load, then you should see an XML document appear containing the extracted information. If you got an error message or the document didn't appear as you expected it to, check screen-scraper's log.
Just as with scraping sessions run remotely, screen-scraper will create a log file in its log folder corresponding to each RSS/Atom scraping session.
RSS/Atom Feed Creation Form
Dealing with the URL directly can be a bit cryptic, what with the encoding and all. As such, let's make use of a little HTML file that will allow us to generate feeds using different search parameters and formats. You can access it at http://www.screen-scraper.com/support/tutorials/tutorial6/xml_feed_generator.htm.
This HTML file assumes that you're running screen-scraper as a server on your local machine on port 8779. If any of that isn't the case you'll want to download the HTML file to your local machine, alter it with your settings, then open it back up in your browser.
Explain, Experiment, Explore
Try experimenting with the form a bit. It gives you control over most all of the features that are available, including the format of the feed. Also take a close look at the URL. screen-scraper simply converts the GET parameters in the URL to session variables in the scraping session. If you'd like, you can even open the feed in your favorite RSS/Atom reader to ensure that the format is valid.
4: Where to Go From Here
Suggestions
Once again, congratulations on completing the tutorial. The ability to generate RSS/Atom feeds open up a world of possibilities to you. The best way to proceed, from here, would probably be to try this on your own project. If you run into any glitches don't hesitate to post to our forum so that we can lend a hand.
You are as always welcome to continue through the Tutorials or to read the existing documentation.
Still a Little Lost?
If you don't feel comfortable with the process, we invite you to recreate the scrape using the tutorial only for reference. This can be done using only the screen-shots while you work on it. If you are still struggling you can search our forums for others like yourself and ask specific questions to the screen-scraper community.
Tutorial 7: Scraping a Site Multiple Times Based on Search Terms
Overview
It's often the case in screen-scraping that you want to submit a form multiple times using different parameters each time. For example, you may be extracting locations from the store locator service on a site, and need to submit the form for a series of zip codes. In this tutorial we'll provide an example on how to go about that. We will continue from where the second tutorial left off.
If you haven't already gone through Tutorial 2, we would encourage you to do so now. If you don't still have the scraping session you created in Tutorial 2, you can download it and import it into screen-scraper.
Tutorial Requirements
This tutorial doesn't require anything beyond an instance of screen-scraper. You can go through it with any of the editions.
Finished Project
If you'd like to see the final version of the scraping session you'll be creating in this tutorial you can download it below.
| Attachment | Size |
|---|---|
| Shopping Site (Scraping Session).sss | 13.06 KB |
1: Tutorial Details
How it Works
Our Shopping Site is pretty limited in that it can only handle one search term. What if we want to extract products for multiple search terms? For example, we may want to scrape various DVD titles that would fit with the other titles in our collection. We could search for the new DVD's using a series of keywords.
We're going to alter the existing Shopping Site scraping session so that it reads in a file containing search terms, and performs a search for each one. Just as before, as it performs a search it will follow the details links and extract out information for each product. Once the information is extracted it will write it out to a file.
2: Scrape Updates
New Piece: Iterator Script
The changes we'll be making to our Shopping Site scraping session in order to add this new functionality are actually pretty minor. First, let's deal with the trickiest part (which really isn't all that tricky): creating the script that will read in the file containing our search terms, and run each search.
Create a new script by clicking the (Add a new script) icon in the button bar. Give the script the name Read search terms. Leave the Language drop-down list with the value Interpreted Java. Paste in the following for the content of the script text:
// the search terms.
File inputFile = new File( "search_terms.txt" );
// These two objects are needed to read the file.
FileReader in = new FileReader( inputFile );
BufferedReader buffRead = new BufferedReader( in );
// Read the file in line-by-line. Each line in the text file
// will contain a search term.
while( ( searchTerm = buffRead.readLine() )!=null)
{
// Set a session variable corresponding to the search term.
session.setVariable( "SEARCH", searchTerm );
// Remember we need to initialize the PAGE session variable, just
// in case we need to iterate through multiple pages of search results.
// We begin at page 1 for each search.
session.setVariable( "PAGE", "1" );
// Get search results for this particular search term.
session.scrapeFile( "Search results" );
}
// Close up the objects to indicate we're done reading the file.
in.close();
buffRead.close();
First off we create a few objects that are going to allow us to read in search terms from a file called search_terms.txt. We then read the search terms in line-by-line in a while loop. For each search term we're going to invoke the Search results scrapeable file.
Remember that the Search results scrapeable file is the one that handles issuing the search to the e-commerce web site, and walks through all of the product detail pages.
Minor Modifications
Please do each of the following:
- Disable the Shopping Site--initialize session script: we'll get the search terms from our external file.
To disable the script, click on the Shopping Site scraping session in the objects tree, then on the General tab. Un-check the box in the table under the Enabled column.
- Stop the Search results from running automatically (in sequence): we will be telling it when to run instead.
Click on the Search results scrapeable file, then check the box labeled This scrapeable file will be invoked manually from a script. You might notice that the icon will loose the pound sign (#) when it is taken out of sequence and be grouped with other scrapeable files that are not sequenced.
- Make sure the Write data to a file script is enabled: if you have been doing multiple tutorials you might have disabled it.
Click on the Details page scrapeable file, then on the Extractor Patterns tab. For the PRODUCTS extractor pattern, in its Scripts section (below the box for the pattern text), ensure that the Write data to a file script's Enabled box is checked.
- Add Read search terms script to the Login scrapeable file: after logging in we want to do our searches.
Click on the Login scrapeable file, then on the Add Script button (on the Properties tab). In the Script Name select Read search terms and in the When to Run make sure that After file is scraped is selected.
3: Running the Scrape
The Search Terms
The last item we need to take care of is creating the text file that will contain our search terms. Let's keep it simple. Fire up your favorite text editor and create a file called search_terms.txt inside of screen-scraper's installation folder (e.g., C:\Program Files\screen-scraper professional edition\search_terms.txt). Add the following three lines to the text file:
speed
blade
Those search terms should yield at least a few DVD's we can add to our collection.
Run the Scrape
All right, now's the moment of truth. Run the updated scraping session by clicking on it in screen-scraper and clicking the Run Scraping Session button, then watch the Log tab to see it do its thing. If all goes well, once it's done, you should have a dvds.txt file in screen-scraper's install folder containing scraped data for all of the search terms.
Scrape Process
Take a look carefully through the log. If it all seems to make sense, you're done. If not, read on so that we can walk through it a bit more carefully.
The flow of events goes like this, once you hit the Run Scraping Session button:
- The scraping session starts up, goes through the process of logging in.
- The Read search terms script is invoked.
- The Read search terms script creates a few objects, then reads in the first line of the search_terms.txt file: "bug".
- The Read search terms script sets the SEARCH session variable with the value "bug", then invokes the Search results scrapeable file.
You'll remember from the earlier tutorial that the SEARCH session variable is used to perform each search. Check the Parameters tab of the Search results scrapeable file for a reminder on where its used.
- The Read search terms script initializes the PAGE session variable to "1".
It turns out, because none of our results pages are more than one page, that this is unnecessary in this particular case. You will, however, want to remember it for future projects where that is not the case. For each search term we're performing a completely separate search, so we need to make sure we start on the first page.
- The Read search terms script invokes the Search results scrapeable file. This is essentially the same thing as clicking the Search button on the search form with the current search term (e.g., "bug", in this case).
- The Search results scrapeable file makes the HTTP request, then applies the PRODUCT extractor pattern to the HTML in order to get all of the details links.
- For each match by the PRODUCT extractor pattern the script Scrape details page gets invoked.
- At this point screen-scraper will loop zero or more times. It will scrape the Details page scrapeable file for each link found on the search results page.
- Each time the Details page scrapeable file is invoked it requests the page, extracts out the data we want, then invokes the
Write data to a file script, which writes out the extracted data to the dvds.txt file. - Once screen-scraper has finished performing the search for "bug" control flows back to our original Read search terms script, where it moves on to the next search term in the file: "speed". From there you can go back to step 3, where it begins the search process again.
Remember that the Log tab is key to understanding the flow of events in screen-scraper. If you're still a bit fuzzy on how things are working, try looking more carefully through the log to piece together how the site is being scraped.
4: Where to Go From Here
Suggestions
Once again, congratulations on completing the tutorial. At this point feel free to experiment a bit. You may want to try adding a few more search terms to the search_terms.txt file. The best way to proceed, from here, would probably be to try this on your own project. If you run into any glitches don't hesitate to post to our forum so that we can lend a hand.
You are as always welcome to continue through the Tutorials or to read the existing documentation.
Still a Little Lost?
If you don't feel comfortable with the process, we invite you to recreate the scrape using the tutorial only for reference. This can be done using only the screen-shots while you work on it. If you are still struggling you can search our forums for others like yourself and ask specific questions to the screen-scraper community.