5: Link Extractor Patterns
Warning!
This particular part of the tutorial is one that covers important principles that often seem confusing to people at first. If you've been speeding through the tutorial up to this point, it would probably be a good idea to slow down a bit and read more carefully.
Extractor Pattern Review
We're now going to create a couple of extractor patterns to extract information for the next and the product details links.
Remember that an extractor pattern is a block of text (usually HTML) that contains special tokens that will match pieces of data you're interested in gathering.
When creating extractor patterns it is recommend that you always use the HTML from the Last Response tab in screen-scraper. By default, after screen-scraper requests a page it tidies the HTML found in it. This causes it to differ slightly from the HTML that you would get by viewing the source in your web browser.
Identifying the Details URL
Click on the Search results scrapeable file in the objects tree, then on the Last Response tab. The textarea contains HTML because we just ran the scraping session.
If you are not seeing any HTML then re-run the scraping session so that the scrapeable file will have a last response.
We're going to extract a portion of each of the product details links so that we can subsequently request each details page and extract information from them. The first details link corresponds to the A Bug's Life DVD.
To find the text, you can click the Find button, then type A Bug's Life into the Find what textbox, and click the Find button. Let's start by looking at all of the table row (<tr> tag). You might not be able to easily see all of the text so we have extracted it and placed it here for you to examine:
<td align="center" class="productListing-data"> <a href="http://www.screen-scraper.com/shop/index.php?main_page=product_info&products_id=8"><img src="images/dvd/a_bugs_life.gif" border="0" alt="A Bug's Life" title=" A Bug's Life " width="100" height="80" /></a> </td>
<td class="productListing-data"> <a href="http://www.screen-scraper.com/shop/index.php?main_page=product_info&products_id=8">A Bug's Life</a> </td>
<td align="right" class="productListing-data"> $35.99 </td>
<td align="center" class="productListing-data"><a href="http://www.screen-scraper.com/shop/index.php?main_page=advanced_search_result&keyword=dvd&sort=2a&page=1&action=buy_now&products_id=8"><img src="includes/templates/template_default/buttons/english/button_buy_now.gif" border="0" alt="Buy Now" title=" Buy Now " width="60" height="30" /></a> </td>
</tr>
This may seem like a bit of a mess, but if we look closely we can pick out the table cell that the details link is in:
Breaking it down a bit more we get the URL:
You might notice that the typical & symbols in the URL have been replaced with &. Don't be alarmed, it's just part of the tidying process screen-scraper applies to the HTML.
If we examine the parameters in the URL, we can guess that the important one is products_id, which likely identifies the product whose details we're interested in. We'll start by assuming that the products_id is the only one we'll need to extract.
Creating the Product Details Link Extractor Pattern
At this point, click on the Search results scrapeable file in the objects tree, then click on the Extractor Patterns tab. We'll create an extractor pattern to grab out the product ID and DVD title for each link. It will look like the one shown below:
Create the extractor pattern by clicking on the Add Extractor Pattern button, then copying and pasting the text above into the Pattern text box.
Give the extractor pattern the name Product details link. Remember that extractor tokens (delineated by the ~@ @~ markers) indicate data points we're interested in gathering. In this case, we want to extract the ID of the product (embedded in the URL), and the title of the product.
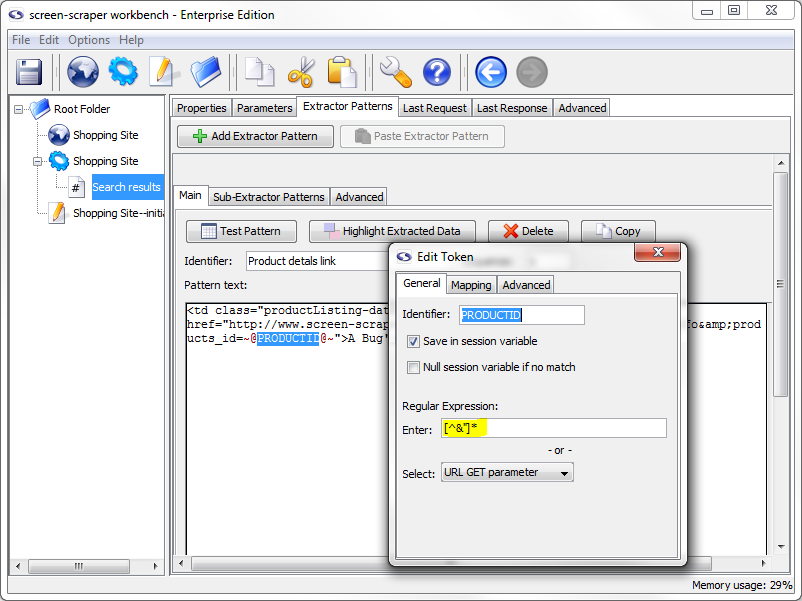
PRODUCTID Token Properties
Double-click the PRODUCTID token (or select the text between the ~@ @~ delimiters, right-click it and select Edit token), and, in the box that appears, click the Save in session variable checkbox. Under the Regular Expression section, select URL GET parameter. You'll notice that when you do that the text [^&"]* shows up in the text box just above the drop-down list. This is the regular expression that we'll be using. You could also edit it manually, but generally that won't be needed.
PRODUCTID Properties Set
Quick Explanation
Let's slow down at this point and go over what we just did to the PRODUCTID extractor token.
In the first tutorial we checked the Save in session variable box telling screen-scraper to preserve the value for us so that we could use it at a later point. This time we also selected a regular expression for it to use. This will filter out the results that don't meet the expectations of the token.
If you're not very familiar with regular expressions, don't worry. In the vast majority of cases you can simply use the regular expressions found in that drop-down list.
By indicating the URL GET parameter regular expression we're saying that we want the token to match any character except a double-quote or an ampersand (i.e., the " and & characters). You'll notice in our extractor pattern that a double-quote character just follows our PRODUCTID extractor token. By using a regular expression we limit what the token will match so that we can ensure we get only what we want. You might think of it as putting a little fence around the token. We want it to match any characters underneath the PRODUCTID extractor token, up to (but not including) the double-quote character.
You will, most of the time, want to designate a regular expression for extractor tokens. It will help ensure that you only retrieve the desired information.
In most cases you'll want to designate a regular expression for extractor tokens. Using regular expressions also makes extractor patterns more resilient to changes in the web site. That is, if the web site makes minor changes to its HTML (e.g., altering a font style or color) and you've been using regular expressions your extractor patterns are more likely to still match. Also, by using regular expressions we can often decrease the amount of HTML we need to use in our extractor patterns. That is, by using regular expressions we indicate more precisely what the data will look like that our tokens will match. By doing this, we can often reduce the amount of HTML we include at the beginning and end of our extractor patterns. In general, if you can reduce the amount of HTML in your extractor patterns, and increase the number of regular expressions you use in tokens, your extractor patterns will be more resilient to changes that get made in the HTML of the pages.
Now close the Edit Token box (which saves our settings automatically).
PRODUCT_TITLE Token Properties
Now let's alter the settings for the PRODUCT_TITLE token. We're not interested in saving the value for this token in a session variable, but we include it since it will differ for each section of HTML we want to match.
Double-click the PRODUCT_TITLE extractor token to bring up the Edit token dialogue box and, under the Regular expression section, select Non-HTML tags. If you take a look at the characters on the left and right sides of our PRODUCT_TITLE extractor token, you will see that they are less than (<) and greater than (>) symbols. By using this regular expression we tell the extractor token not to include either symbol. This way we create a boundary for the token so that we can ensure it matches only what we want it to.
Why even include an extractor token for data we don't want to save? By using extractor tokens for data we don't necessarily want to save, we make the extractor pattern more resilient to changes in the HTML. These extra tokens can help "future proof" our extractor patterns against changes the site owners might make down the road. There are also often situations (such as the present one) where data points adjacent to data we want to extract will differ for each pattern match. Here we only want the product ID, but we also include the product title because of its proximity to the data we want to extract, and because its value will differ each time the extractor pattern matches.
If that strikes you as a little bit confusing, don't worry. As you get more experience using screen-scraper you'll see why they're important. For now just take our word for it that you'll generally want to use regular expressions with extractor pattern tokens, and that it's often a good idea to use extractor tokens to match data points you don't necessarily want to save. As you get more experience it will become more apparent when to use extractor tokens for data you don't want to save.
Extractor Pattern Test
Let's give our new extractor pattern a try. Click the Test Pattern button. You should see a window come up that shows the extracted data.
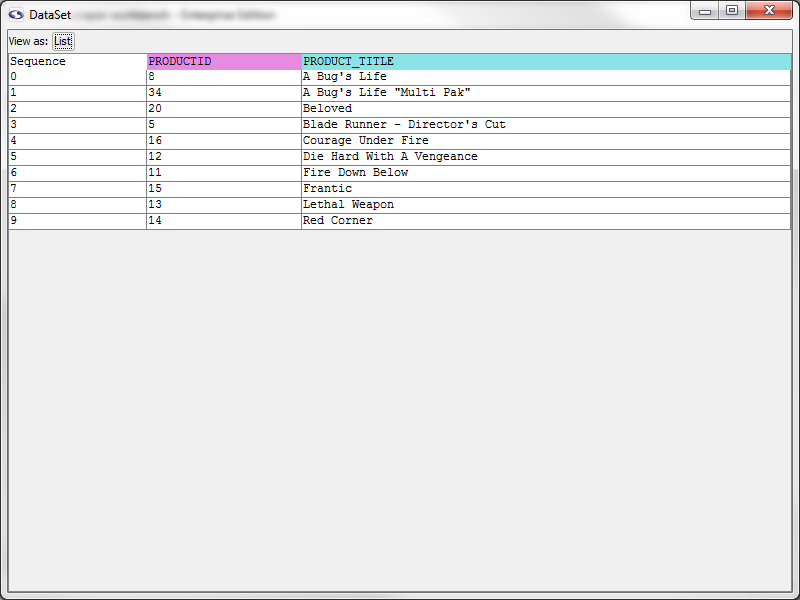
Data Set for Product details link Pattern
Again, let's slow down a moment and review what this window contains. When an extractor pattern matches, it produces a DataSet. You can think of a DataSet like a spreadsheet--it contains rows, columns, and cells. Each row in a DataSet is called a DataRecord. A DataRecord can be thought of as being analogous to a row in a spreadsheet. In this particular case our DataSet has three columns. Two of them should be familiar--they correspond to the PRODUCT_TITLE and PRODUCTID extractor tokens. The Sequence column indicates the order in which each row was extracted. You'll notice that the sequence is zero-based, meaning the first DataRecord in the DataSet is referenced with an index of 0. You'll also notice that the DataSet has 10 records--one for each product found in the search results page.
Later, when we start talking more about DataSets and DataRecords, just remember the spreadsheet analogy: a DataSet is like the entire spreadsheet, and a DataRecord is like a single row in the spreadsheet.
Another good habit to get into is applying your extractor patterns frequently to ensure they correctly match the text you want extracted.
Go ahead and close the DataSet window now.
Creating the Next Link Extractor Pattern
Back in the last Response tab, search for the text "Next". Around the area you'll find HTML for the link:
Fortunately, because of our work with the initialize script, we are already familiar with the URL and know that the only parameters we need to worry about are keyword and page.
Create a new extractor pattern, call it Next link, and use the following extractor pattern to grab the values of those parameters out:
PAGE Token Properties
As with the previous extractor pattern, double-click the PAGE token, and, in the box that appears, click Save in session variable checkbox.
Under the Regular Expression section, select Number from the Select drop-down list.
Close the "Edit Token" box to save your settings.
The Number regular expression ([\d,]+) simply indicates that we only want the PAGE token to match numbers (the regular expression essentially says, "match anything that contains either numbers or commas, and has at least one of either of those types of characters in it.").
KEYWORD Token Properties
Next, double-click the KEYWORD extractor pattern token to edit it. Under the Regular Expression section, select URL GET parameter from the Select drop-down list.
This indicates that the KEYWORD extractor pattern should match only characters that would be found in a GET parameter of a URL. You'll notice that we didn't check the box to save the KEYWORD extractor pattern token in a session variable. We already have that value in a session variable, so we don't need to bother with getting it again.
Extractor Pattern Test
Try out the extractor pattern by clicking the Test Pattern button. Excellent! We have two matches: one for each next link on the page (the top and bottom of the page).

Save
Now would be a good time to save your work. Do that by selecting Save from the or by clicking the (Save) icon.
Test Run
OK, let's try out the whole thing once more. Click on the Shopping Site scraping session in the objects tree, then on the Log tab. Click the Clear Log button, we're going to run it again and we don't want to get confused by the log text from the last run, then click the Run Scraping Session button to start it.
You should see a bit more text in the log this time, as opposed to last time. Take a minute to look through it to ensure you understand what's going on.
- Printer-friendly version
- Login or register to post comments