Workbench
To launch the Workbench, double-click the screen-scraper icon
Overview
The workbench provides an intuitive and convenient way to interact with screen-scraper's scraping engine. This section of our documentation covers the interfaces provided in the workbench to develop and manage scrapes. If you're interested in learning to use screen-scraper, the best approach is to go through at least our first few tutorials.
Introduction
To ensure clarity, the first thing that you need to know about the workbench is the names for the various regions of the window. This will help to keep us oriented correctly during the documentation of the workbench.
Workbench Layout
- Menu Bar: Options available at the very top of the page (just below the title bar) starting with File on the far left.
- Buttons Bar: Just below the File Menu this area contains buttons for such common tasks as saving, creating new objects, cut, copy, and paste.
- Objects Tree: Located on the left side of the window, this pane lists all of the screen-scraper objects that are currently available to this instillation of screen-scraper.
If this is your first time opening screen-scraper the only item listed will be the root folder.
- Main Pane: This is the largest pane in the workbench and usually takes up at least two-thirds of the window. It changes to reflect the content of the object that is selected in the assets pane. Because of this feature, it is most commonly referred to by the name of the screen being displayed in it.
- Status Bar: Strip at the bottom of the window that reports on the current memory usage of screen-scraper. Occasional messages will also show up, such as when screen-scraper has saved your work.
The size of the two panes can be adjusted to your liking by clicking on the vertical bar that divides the two panes and dragging it to the left or right.
Settings
Overview
This section contains a description of each of the screens found in the Settings window, which can be displayed by selecting Settings from the menu, or by clicking the wrench icon in the button bar.
General Settings

General Settings
- Connection timeout: At times remote web servers will experience problems after screen-scraper has made a connection. When this happens the server will often hold on to the connection to screen-scraper, causing it to appear to freeze. Designating a connection timeout avoids this situation. Generally around 30 seconds is sufficient.
- Data extractor timeout: In certain cases complex extractor patterns can take an abnormally long time when being applied. You'll likely want to designate a timeout so that screen-scraper doesn't get stuck while applying a pattern. Typically it should not take longer than 2 or 3 seconds to apply a pattern.
- Maximum number of concurrent running scraping sessions (professional and enterprise editions only): When screen-scraper is running as a server you'll often want to limit the number of scraping sessions that can be run simultaneously, so as to avoid consuming too many resources on a machine. This setting controls how many will be allowed to run at a time. Note that this only applies when a lazy scrape is being performed.
- Maximum application memory allocation in megabytes: This setting controls the amount of memory screen-scraper will be allowed to consume on your computer. In cases where you notice sluggish behavior or OutOfMemoryError messages appearing in the error.log file (found in the log directory for your screen-scraper installation folder), you'll likely want to increase this number.
- Default proxy session to use when running in server mode (enterprise edition only): When screen-scraper is running as a server it can also run the proxy server. If you designate a proxy session in this drop-down box screen-scraper will make use of its scripts.
- Installation directory: In virtually all cases this setting can be left untouched. If you move the screen-scraper installation directory you may need to manually set this.
- Automatically check for updates on startup (professional and enterprise editions only): If this box is checked screen-scraper will automatically check for updates and notify you if one is available.
- Allow upgrading to unstable versions (professional and enterprise editions only): If this box is checked when you select Check for updates from the menu screen-scraper will give you the option to download alpha/unstable versions of the software.
- Default character set (professional and enterprise editions only): Indicates the character set that should be used when not designated by the remote server. When scraping sites that use a Roman character set you'll likely want to use ISO-8559-1; otherwise, UTF-8 is probably what you'll want to use. A comprehensive list of supported character sets can be found here. Your web browser will also generally be able to tell you what character set a particular site is using. Even with that, though, when scraping international character sets it can sometimes require trial and error to isolate what character set is best to use. For more information see
Server Settings
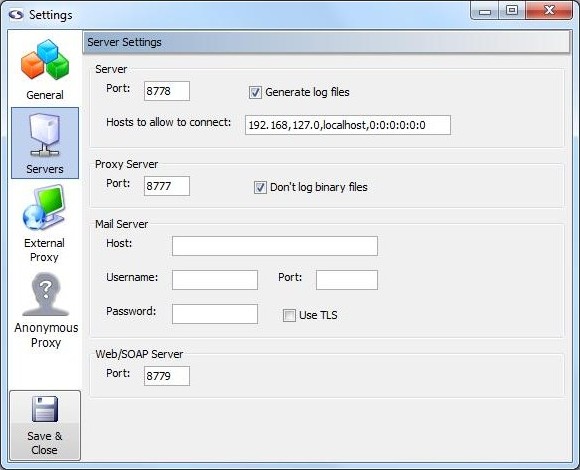
Server Settings (professional and enterprise editions only)
Server (professional and enterprise editions only)
These settings apply when screen-scraper is running in server mode.
- Port: Sets the port screen-scraper will listen on when running as a server.
- Generate log files: If checked, a log file will be generated in the log folder each time a scraping session is run.
- Hosts to allow to connect: Caution should be exercised whenever a network service is running on a computer. This is no exception with screen-scraper. If this box is blank screen-scraper will allow any machine to connect to it. This is not recommended unless the machine on which screen-scraper is running is protected by external firewalls. A comma-delimited list of host names and IP addresses that should be allowed to connect to screen-scraper should be entered into this box. For example, if localhost is designated screen-scraper will only allow connections from the local machine. Note also that portions of IP addresses can be designated. For example, if 192.168 were designated, the following IP addresses would be allowed to connect: 192.168.2.4, 192.168.4.93, etc. Note that this setting applies both to the proxy server as well as when screen-scraper is running in server mode.
Proxy Server (professional and enterprise editions only)
These settings apply only to the proxy server portion of screen-scraper.
- Port: Sets the port screen-scraper's proxy server should listen on.
- Don't log binary files: If this box is checked screen-scraper will not log any binary files (e.g., images and Flash files) in the HTTP Transactions table for proxy sessions.
Mail Server (professional and enterprise editions only)
These settings are used with the sutil.sendMail method in screen-scraper scripts.
- Host: The host the mail should be sent through.
- Username: The username required to authenticate to the mail server in order to send mail through it. Note that this may not be required by the mail server.
- Password: The password required to authenticate to the mail server in order to send mail through it. Note that this may not be required by the mail server.
- Port: The port that should be used when connecting to the host (corresponding setting in resource/conf/screen-scraper.properties file: MailServerPort=PortNumber).
- Use TLS/SSL: Whether or not TLS/SSL encryption should be used when communicating with the host (corresponding setting in resource/conf/screen-scraper.properties file: MailServerUsesTLS=true).
Web/SOAP Server (professional and enterprise editions only)
These settings apply only to the web interface and SOAP server features of screen-scraper.
- Port: Sets the port screen-scraper's web/SOAP server should listen on. When accessing the web interface, this number will determine what goes after the colon in the URL. For example, if this number is left at the default value (8779), you would access screen-scraper's web interface with this URL: http://localhost:8779/.
External Proxy Settings
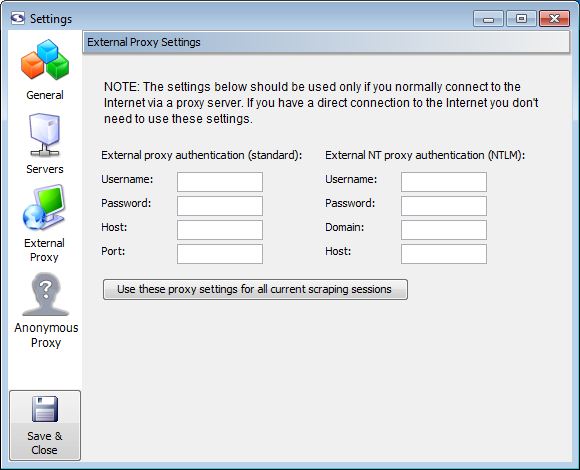
External Proxy Settings
Unless you normally connect to the Internet through an external proxy server, you don't need to modify these settings.
- External proxy authentication: These text boxes are used in cases where you need to connect to the Internet via an external proxy server.
- Username: Your username on the proxy server.
- Password: Your password on the proxy server.
- Host: The host/domain of the proxy server
- Port: The port that you use on the host server.
- External NT proxy authentication: These text boxes are used in cases where you need to connect to the Internet via an external NT proxy server.
If you are using NTLM (Windows NT) authentication you'll need to designate settings for both the standard proxy as well as the NTLM one.
- Username: Your username on the NT proxy server.
- Password: Your password on the NT proxy server.
- Domain: The domain/group name that the NT proxy server uses.
- Host: The host of the proxy server.
Anonymous Proxy Settings

Anonymous Proxy Settings (professional and enterprise editions only)
- Password: The password your received from screen-scraper when you setup your anonymazation account.
This setting is available in the screen-scraper.properties file as
AnonymousProxyPassword - Allowed IP addresses: The IP addresses of the machine(s) you wish to allow to connect to your screen-scraper server
In this field it expects a comma-delimited list of IP addresses that screen-scraper should accept connections from. You can also specify just the beginning portions of IP addresses. For example, if you enter 111.22.333 screen-scraper would accept connections from 111.22.333.1, 111.22.333.2, 111.22.333.3, etc.
If nothing is entered into this text box screen-scraper will accept connections from any IP address. This is not generally encouraged.
This setting is available in the screen-scraper.properties file as
AnonymousProxyAllowedIPs - Get the IP address for this computer: Retrieves the IP address of the computer that screen-scraper is running on. This is provided to help you specify the correct IP address for the Allowed IP addresses field.
- Max running servers: IP addresses that are blocked will be replaced with the maximum number of servers indicated. Greater than 5 & less than 10 are recommended.
This setting is available in the screen-scraper.properties file as
AnonymousProxyMaxRunning - Number of running instances: The total number of proxy servers running anonymous scrapes.
- Refresh: Retrieves the current number of running proxy servers.
- Terminate all running proxy servers: Shuts down all running proxy servers.
As you pay for proxy servers by the hour, if you don't have your scraping session set up to automatically shut them down at the end you will need to use this button to end the proxy servers.
Under certain circumstances you may want to anonymize your scraping so that the target site is unable to trace back your IP address. For example, this might be desirable if you're scraping a competitor's site, or if the web site is blocking too many requests from a given IP address.
There are a few different ways to go about this using screen-scraper. We will discuss how to setup anonymazation in screen-scraper later in the documentation.
Proxy Sessions
Overview
A proxy session in screen-scraper is a record of the requests and responses that go between a browser and a proxy server. It is useful in learning how to scrape a site and is used to configure screen-scraper's proxy server. For more information see our documentation about using the proxy server.
Managing Proxy Sessions
Adding
- Select New Proxy Session from the menu.
- Click on the globe in the button bar.
- Right click on a folder in teh objects tree and select New Proxy Session.
- Use the keyboard shortcut Ctrl-J
Removing
- Press the Delete key when it is selected in the objects tree
- Right-click on the proxy session in the objects tree and select Delete.
- Click the Delete button in the proxy session general tab.
Proxy Session: General Tab
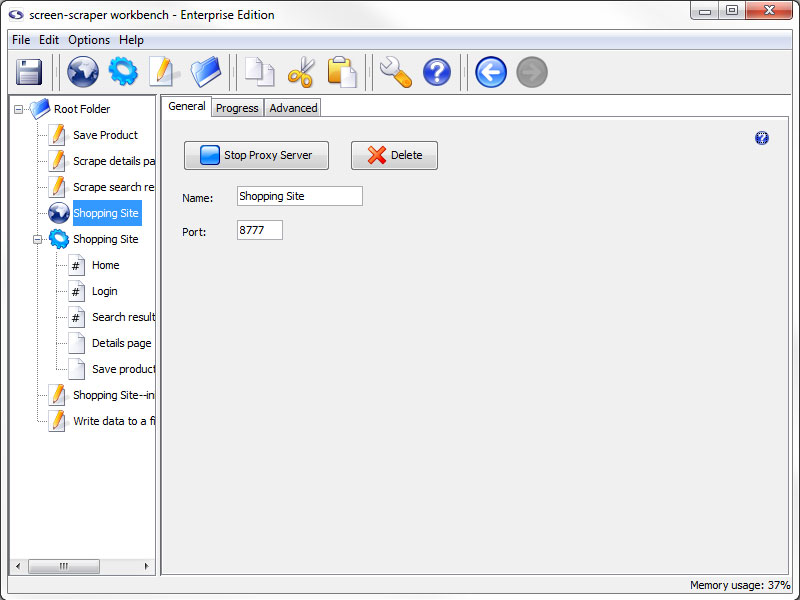
General Tab
- Start Proxy Server: Starts the proxy server and records the requests and responses that go through it.
- Delete: Removes the proxy session from screen-scraper
- Name: The name used to refer to the proxy session
- Port: The port that this proxy session should connect to in the proxy server
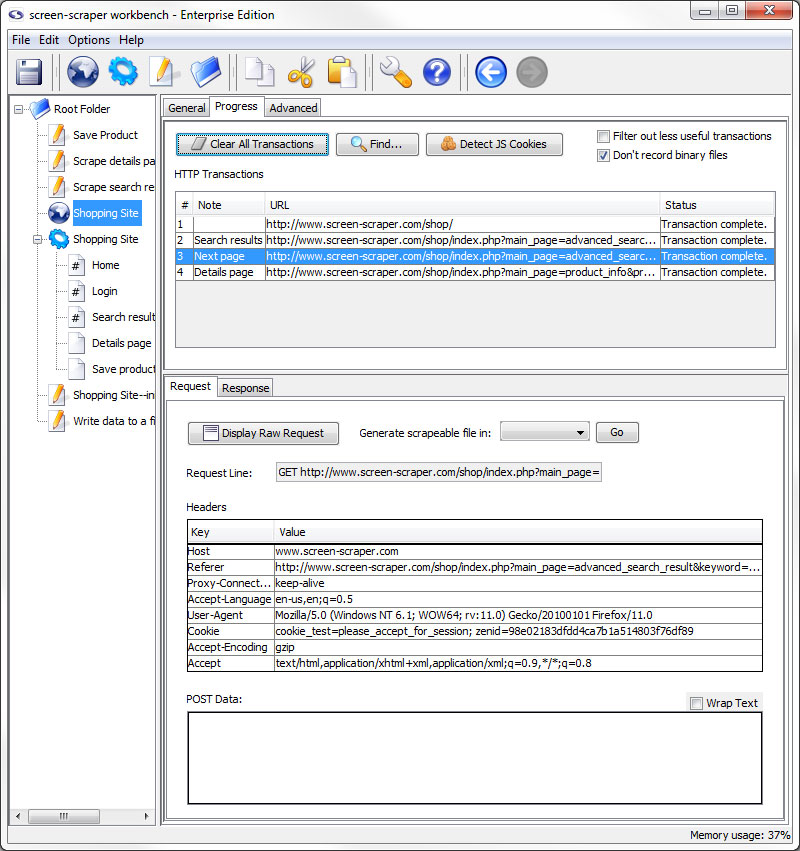
Proxy Session: Progress Tab
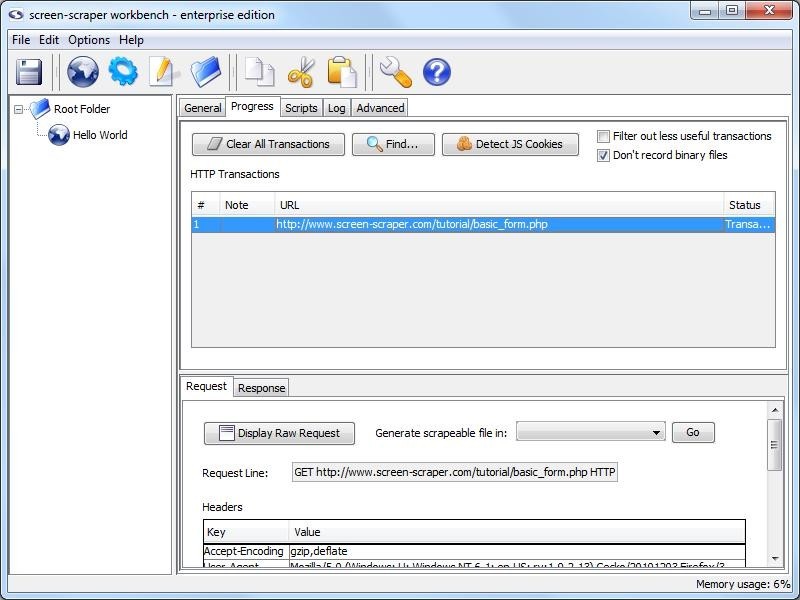
Progress Tab
- Clear All Transactions: Remove all of the transaction records currently in the list.
- Find (professional and enterprise editions only): Search transactions for text string.
- Detect JS Cookies: Show cookies that were not set by the server.
For the button to work correctly you will want to clear your browser cookies before having the proxy session record all transactions. This makes it so that cookies already in existence are not considered to be javascript cookies.
- Filter out less useful transactions (professional and enterprise editions only): When checked files that are unlikely to contain desired information do not show up in the transactions list. This includes such things as JavaScript and CSS files.
- Don't record binary files: When checked this option will cause screen-scraper to not display files such as images or other media files to the list of transactions under the progress tab. This will make it easier to find the files that you want without having to look through everything that goes through the server.
Transactions not included in the list are still recorded to the proxy session log.
- HTTP Transactions: A log of each of the transactions that has taken place (except for binary files if you have selected not to log them).
- #: The order in which the requests were initiated.
- Note: Editable field to help keep track of the transactions, when transactions are turned into scrapeable files the note becomes the initial name of the scrapeable file.
- URL: The requested URL of the transaction.
- Status: Indication of the current state of the transaction.
When a transaction is selected more information regarding the request and response is displayed.
Request Sub-tab
- Display Raw Request: Displays the whole request as it was sent to the server.
- Generate scrapeable file in: Creates scrapeable files in the specified scraping session for each of the selected transactions. The names of the scrapeable files are the text specified in the note section of each transaction.
- Request Line: The first line of the request.
- Headers: Any additional headers specified in the request.
- POST Data: All POST data that was sent along with the request.
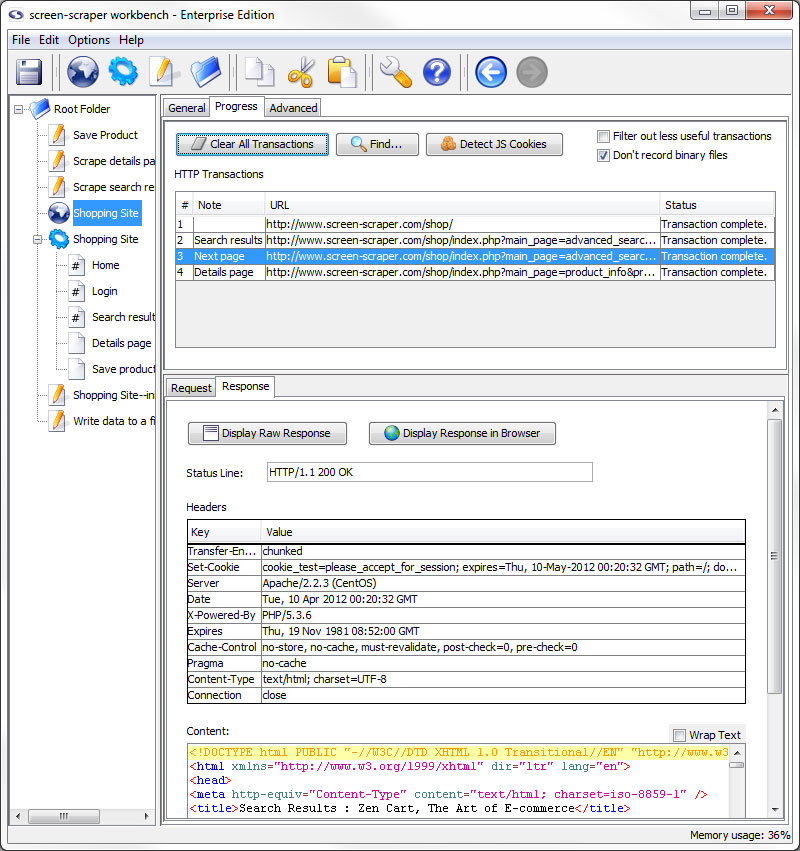
Response Sub-tab
- Display Raw Response: Displays the whole response as it came from the server.
- Display Response in Browser: Opens your system's default browser and displays the contents of the response as they would appear when passed through a browser.
- Status Line: HTTP status of the transaction.
- Headers: Headers sent along with the response from the server.
- Content: The content of the response with headers and such removed.
Detect JS Cookie
Overview
screen-scraper has always kept track of server set cookies and does that for you automatically; however, when the cookies are set by javascript screen-scraper does not catch them. This saves on the time lost having screen-scraper scrape every javascript file when most of the time there is nothing there that matters.
This mean that you have to set any javascript added cookies using the setCookie method. To help find where javascript cookies are being set we have added a button in the proxy session progress tab.
For the button to work correctly you will want to clear your browser cookies before having the proxy session record all transactions. This makes it so that cookies already in existence are not considered to be javascript cookies.
Proxy Session: Scripts Tab
This feature has been deprecated and by default is not available in the workbench interface. To enable proxy scripting please add AllowProxyScripting=true to your resource/conf/screen-scraper.properties file and restart screen-scraper.
You are unlikely to use this tab unless you are running screen-scraper as a proxy in server mode.

Scripts Tab (enterprise edition only)
- Add Script: Adds a script association to filter requests and/or responses on the Proxy Server.
- Script Name: Specifies which script should be run.
- Sequence: The order in which the scripts should be run.
- When to Run: When the proxy server should request to run the script.
- Enabled: A flag to determine which scripts should be run and which shouldn't be.
Proxy Session: Log Tab

Log Tab
- Clear Log: Erase the current contents of the proxy session log.
If you are trying to troubleshoot problems with scripts not working the way you expected the log can give you clues as to where problems might exists. Likewise, you can have your scripts write to the log to help identify what they are doing. If you have selected to filter out binary files and/or less useful transactions a log of those transactions will be available here.
The proxy session log is not saved in the workbench, if you close screen-scraper you will lose the current contents of the proxy session log.
Proxy Session: Advanced Tab
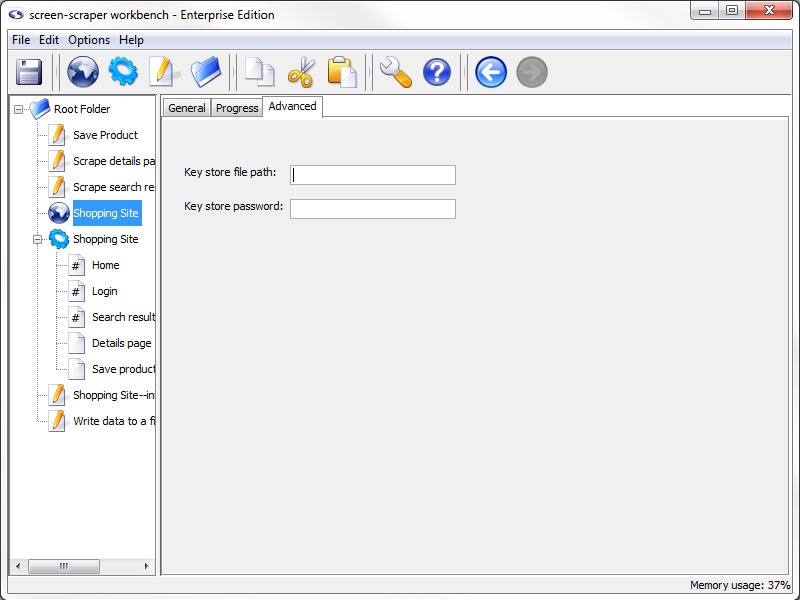
Advanced Tab
- Key store file path: The path to a JKS file that contains the certificates required for this scrape
- Key store password: The password used when generating the JKS file
Some web sites require that you supply a client certificate, that you would have previously been given, in order to access them. This feature allows you to access this type of site while using screen-scraper.
For more info see our blog entry on the topic.
Scraping Sessions
Overview
A scraping session is simply a way to collect together files that you want scraped. Typically you'll create a scraping session for each site from which you want to scrape information.
Managing Scraping Sessions
Adding
- Select New Scraping Session from the menu.
- Click the gear in the button bar.
- Right click on a folder in the objects tree and select New Scraping Session.
- Use the keyboard shortcut Ctrl-K
Removing
- Press the Delete key when it is selected in the objects tree
- Right-click on the scraping session in the objects tree and select Delete.
- Click the Delete button in the general tab of the scraping session.
Importing
- Right-click on the folder in the objects tree that you want to import the files into (other than the root folder) and select Import Into. In the window that opens, navigate to and select the scraping session you want to import.
- Select Import from the menu. In the window that opens, navigate to and select the scraping session you want to import.
- Add the scraping session to the import folder in screen-scraper's install directory
screen-scraper should not be running when you add the file into the folder. All files will be imported into the root folder the next time screen-scraper starts.
Exporting
When a scraping session is exported it will use the character set indicated under the advanced tab. If a value isn't indicated there it will use the character set indicated in the general settings.
- Right-click on the scraping session in the objects tree and select Export.
- Click the Export button in the general tab of the scraping session.
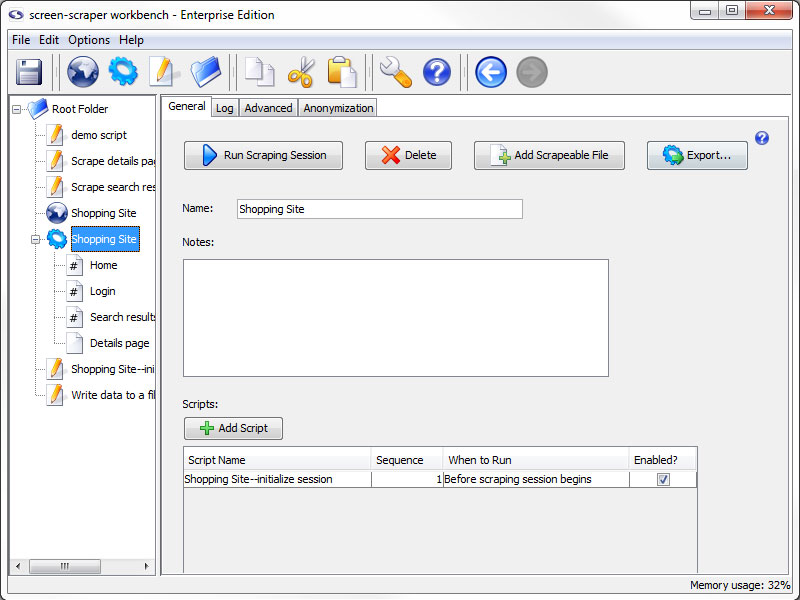
Scraping Session: General tab
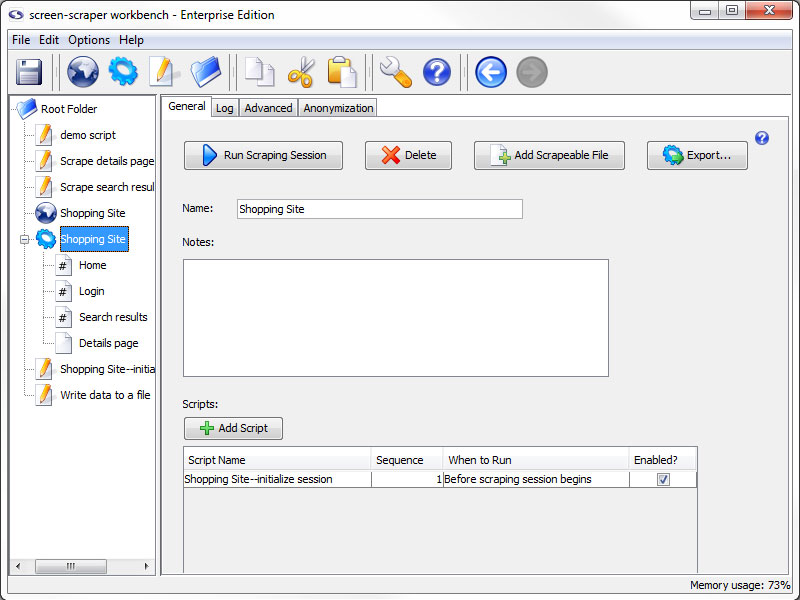
General Tab
- Run Scraping Session: Starts the scraping session. Once the scraping session begins running you can watch its progress under the Log tab.
- Delete: Deletes the scraping session.
- Add Scrapeable File: Adds a new scrapeable file to this scraping session.
- Export: Allows you to export the scraping session to an XML file. This might be useful for backing up your work or transferring information to a different screen-scraper installation.
- Name: Used to identify the scraping session. The name should be unique relative to other scraping sessions.
- Notes: Useful for keeping notes specific to the scraping session.
- Scripts: All of the scripts associated with the scraping session.
- Add Script: Adds a script association to direct and manipulate the flow of the scraping session.
- Script Name: Specifies which script should be run.
- Sequence: The order in which the scripts should be run.
- When to Run: When the scraping session should run the script.
- Enabled: A flag to determine which scripts should be run and which shouldn't be.
Each script can be designated to run either before or after the scraping session runs. This can be useful for functions like initializing session variables and performing clean-up after the scraping session is finished. It's often helpful to create debugging scripts in your scraping session, then disable them once you're ready to run your scraping session in a production environment.
Scraping Session: Log tab
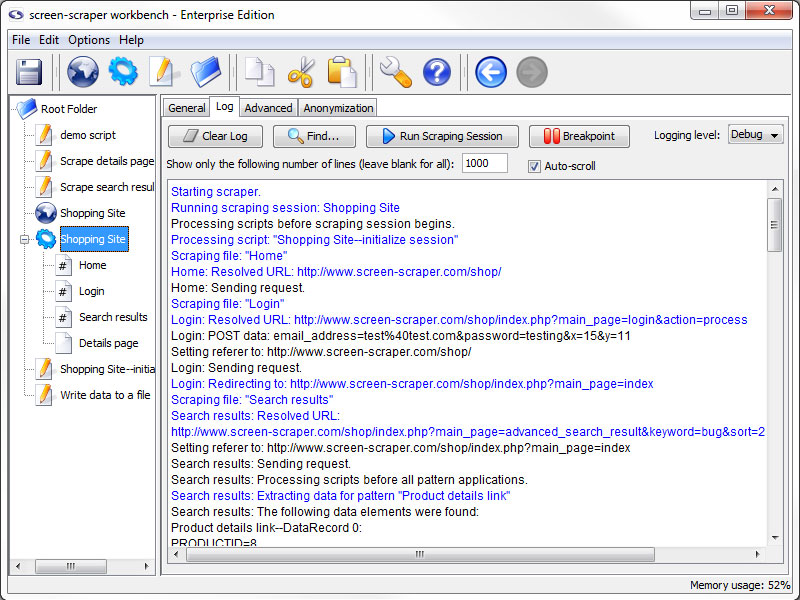
Log Tab
- Clear Log: Erase the current contents of the log.
- Find: Search the log for the specified text.
- Run Scraping Session / Stop Scraping Session: Start/Stop the scraping session.
- Breakpoint (professional and enterprise editions only): Pause the scrape and open a breakpoint window.
- Logging Level (professional and enterprise editions only): Determines what types of messages appear on the log. This is often referred to as the verbosity of the log. This effects the file system logs as well as the workbench log.
- Show only the following number of lines: The number of lines that the log should maintain as it runs. When it is left blank it will keep everything.
- Auto-scroll: When checked, the log will make sure that you can always see the most recent entries into the log on the screen.
If you are trying to troubleshoot problems with scripts not working the way you expected the log can give you clues as to where problems might exists. Likewise, you can have your scripts write to the log to help identify what they are doing.
This tab displays messages as the scraping session is running. This is one of the most valuable tools in working with and debugging scraping sessions. As you're creating your scraping session you'll want to run it frequently and check the log to ensure that it's doing what you expect it to.
Scraping Session: Advanced tab
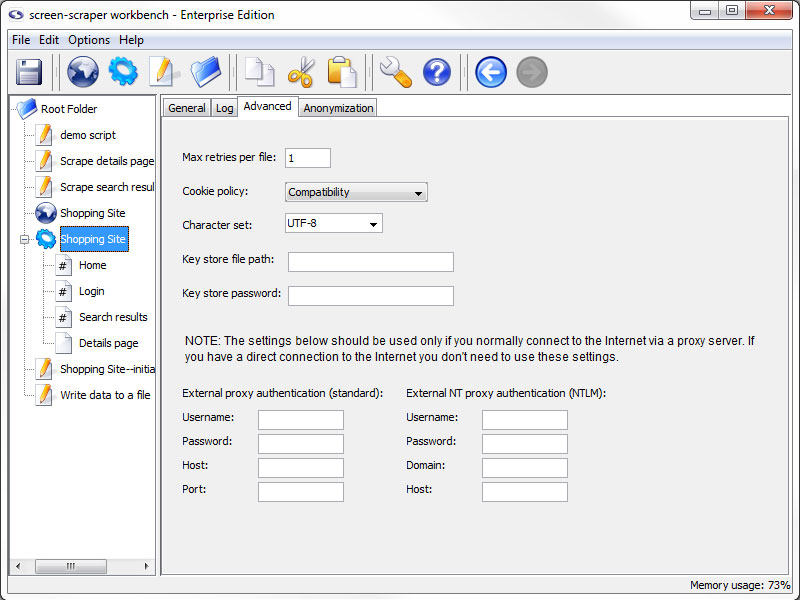
Advanced tab
- Max retries per file (professional and enterprise editions only): The number of times that screen-scraper should attempt to request a page, in the case that a request fails. In some cases web sites may not be completely reliable, which could necessitate making the request for a given page more than once.
- Cookie policy (professional and enterprise editions only): The way screen-scraper works with cookies. In most cases you won't need to modify this setting.
There may be instances where you find yourself unable to log in to a web site or advance through pages as you're expecting. If you've checked other settings, such as POST and GET parameters, you may need to adjust the cookie policy. Some web sites issue cookies in uncommon ways, and adjusting this setting will allow screen-scraper to work correctly with them.
- Character set (professional and enterprise editions only): Set the character set for the scraping session.
If pages are rendering with strange characters then you likely have the wrong character set. You should also try turning off tidying if international characters aren't being rendered properly.
- Key store file path: The path to a JKS file that contains the certificates required for this scrape
- Key store password: The password used when generating the JKS file
Some web sites require that you supply a client certificate, that you would have previously been given, in order to access them. This feature allows you to access this type of site while using screen-scraper.
- External proxy authentication: These text boxes are used in cases where you need to connect to the Internet via an external proxy server.
- Username: Your username on the proxy server.
- Password: Your password on the proxy server.
- Host: The host/domain of the proxy server
- Port: The port that you use on the host server.
- External NT proxy authentication: These text boxes are used in cases where you need to connect to the Internet via an external NT proxy server.
If you are using NTLM (Windows NT) authentication you'll need to designate settings for both the standard proxy as well as the NTLM one.
- Username: Your username on the NT proxy server.
- Password: Your password on the NT proxy server.
- Domain: The domain/group name that the NT proxy server uses.
- Host: The host of the proxy server.
Scraping Session: Anonymization tab
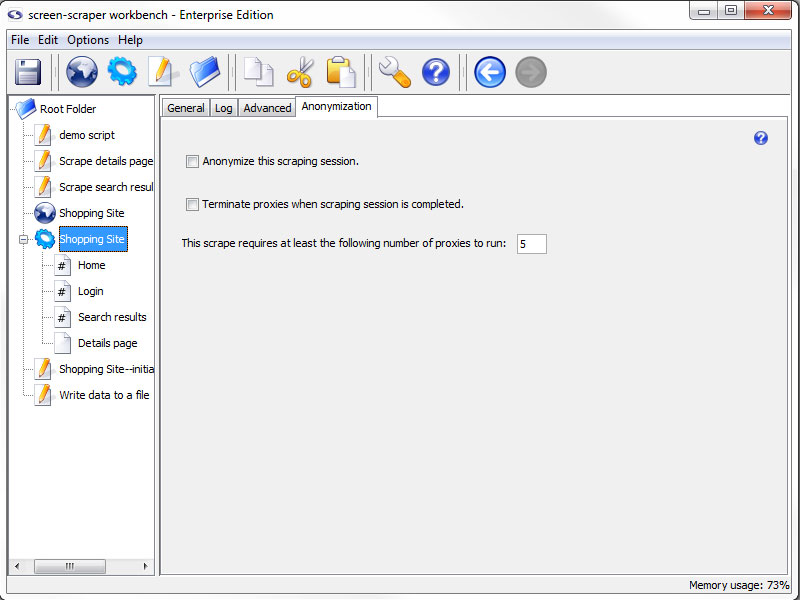
Anonymization Tab (professional and enterprise editions only)
- Anonymize this scraping session (professional and enterprise editions only): Specifies that this scraping session should make use of the anonymization settings of screen-scraper.
- Terminate proxies when scrapping session is completed (professional and enterprise editions only): Determines whether the scraping session should terminate proxies or leave them open.
- This scrape requires at least the following number of proxies to run (professional and enterprise editions only): The required number of proxies for the scrape to run.
Should proxy servers fail to spawn screen-scraper will proceed forward with the scraping session once at least 80% of the minimum required proxy servers are available.
This tab is specific for automatic anonymization For more information on anonymization, see our page on how to set it up anonymization in screen-scraper.
Scrapeable Files
Overview
A scrapeable file is a URL-accessible file that you want to have retrieved as part of a scraping session. These files are the core of screen-scraping as they determine what files will be available to extract data from.
In addition to working with files on remote servers, screen-scraper can also handle files on local file systems. For example, the following is a valid path to designate in the URL field: C:\wwwroot\myweb\my_file.htm.
Managing Scrapeable Files
Adding
- Click the Add Scrapeable File button on the general tab of the desired scraping session.
- Right click on the desired scraping session in the objects tree and select Add Scrapeable File.
Removing
- Press the Delete key when it is selected in the objects tree
- Right-click on the desired scrapeable file and select Delete.
- Click the Delete button in the properties tab of the scrapeable file.
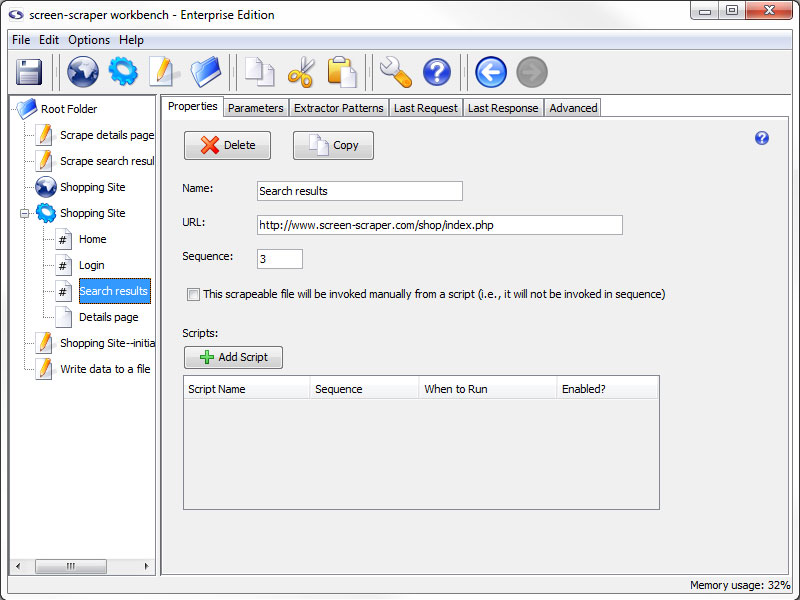
Scrapeable File: Properties tab
Properties Tab
- Delete: Deletes the scrapeable file.
- Copy (professional and enterprise editions only): Copies the scrapeable file.
- Name: Identifies the scrapeable file.
- URL: The URL of the file to be scraped. This is likely something like http://www.mysite.com/, but can also contain embedded session variables, like this: http://www.mysite.com/cgi-bin/test.cgi?param1=~#TEST#~. In the latter case the text ~#TEST#~ would get replaced with the value of the session variable TEST.
- Sequence: Indicates the order in which the scraping session will request this file.
- This scrapeable file will be invoked manually from a script: Indicates that this scrapeable file will be invoked within a script, so it should not be scraped in sequence. If this box is checked the Sequence text box becomes grayed out.
You can tell what files are being scraped manually and which are in sequence using the objects tree. Sequenced scrapeable files are displayed with a pound sign (#) on them.
- Scripts: All of the scripts associated with the scrapeable file.
- Add Script: Adds a script association to direct and manipulate the flow of the scrapeable file.
- Script Name: Specifies which script should be run.
- Sequence: The order in which the scripts should be run.
- When to Run: When the scrapeable file should run the script.
- Enabled: A flag to determine which scripts should be run and which shouldn't be.
Scrapeable File: Parameters tab
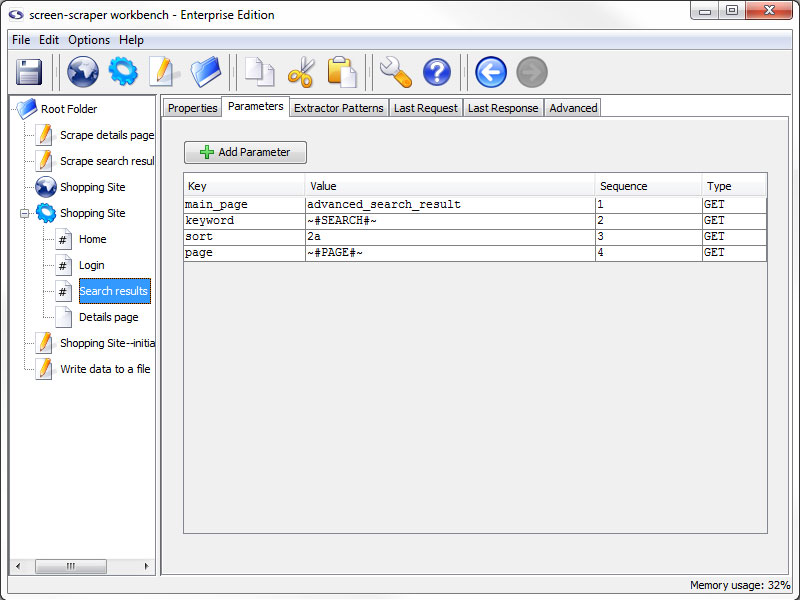
Parameters Tab
- Add Parameter: Adds a parameter to scrapeable file request.
- Key: The name of the parameter.
- Value: The value to be associated with the parameter.
- Sequence: Order in which the parameters appear on the request strings.
- Type: Indicates if the parameter should be sent using a GET or POST method when the file is requested.
GET parameters can also be embedded in the URL field under the Properties tab.
Parameters can be deleted by selecting them and either hitting the Delete key on the keyboard, or by right-clicking and selecting Delete.
Using Session Variables
Session variables can be used in the Key and Value fields. For example, if you have a POST parameter, username, you might embed a USERNAME session variable in the Value field with the token ~#USERNAME#~. This would cause the value of the USERNAME session variable to be substituted in place of the token at run time.
Upload a File (enterprise edition only)
In the enterprise edition of screen-scraper you can also designate files to be uploaded. This is done by designating FILE as the parameter type. The Key column would contain the name of the parameter (as found in the corresponding HTML form), and the value would be the local path to the file you'd like to upload (e.g., C:\myfiles\this_file.txt).
Scrapeable File: Extractor Patterns tab
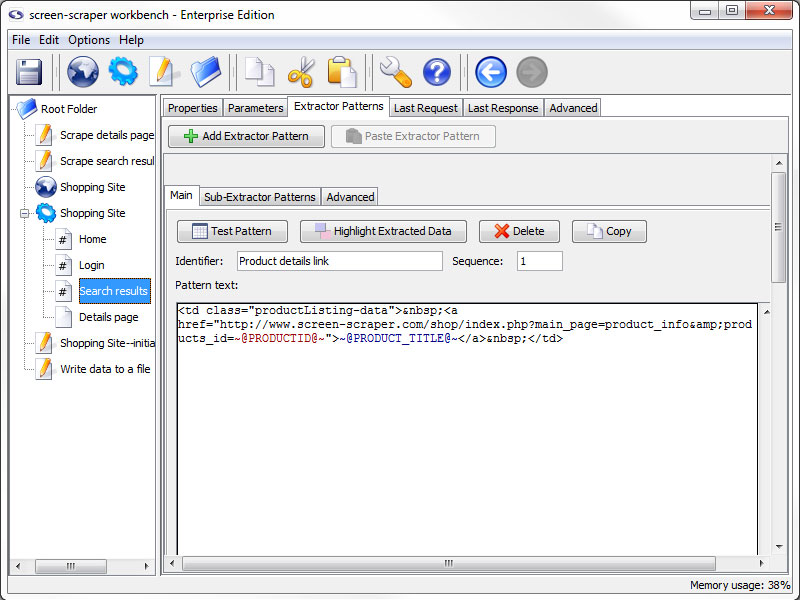
Extractor Patterns Tab
- Add Extractor Pattern: Add a blank extractor pattern to the scrapeable file.
- Paste Extractor Pattern (professional and enterprise editions only): Creates a new extractor pattern from a previously copied one.
This button is grayed out if there is not a extractor pattern currently copied.
This tab holds the various extractor patterns that will be applied to the HTML of this scrapeable file. The inner frame will be discussed in more detail when discussing them.
Scrapeable File: Last Request tab
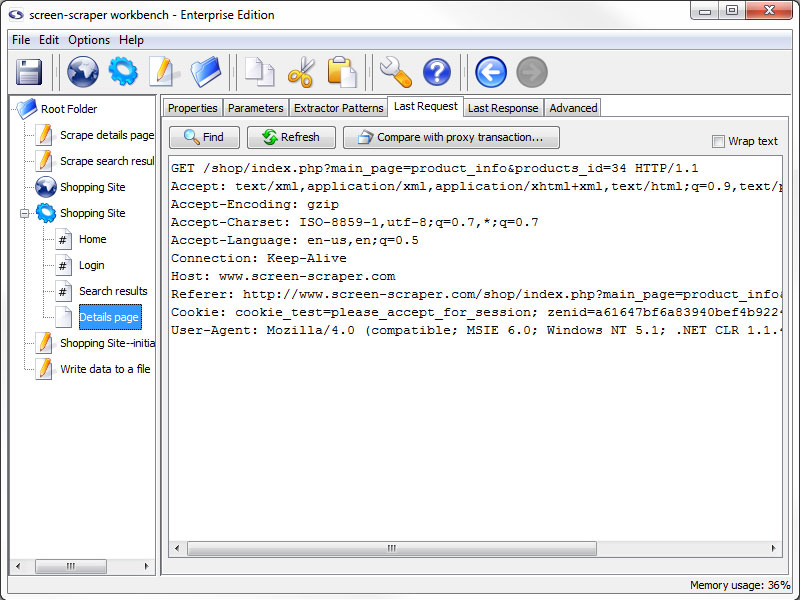
Last Request Tab
- Refresh: Requests the newest version of the last requested file.
- Compare with proxy transaction (professional and enterprise editions only): Open a Compare Last Request and Proxy Transaction window, allowing you to compare the last request of the scrapeable file with a proxy session HTTP Transaction request.
This can be very helpful for pages that are very specific on request settings or where you are getting unexpected results from the page. This is the best place to start when you experience this type of issue.
This tab will display the raw HTTP request for the last time this file was retrieved. This tab can be useful for debugging and looking at POST and GET parameters that were sent to the server.
Scrapeable File: Last Response tab
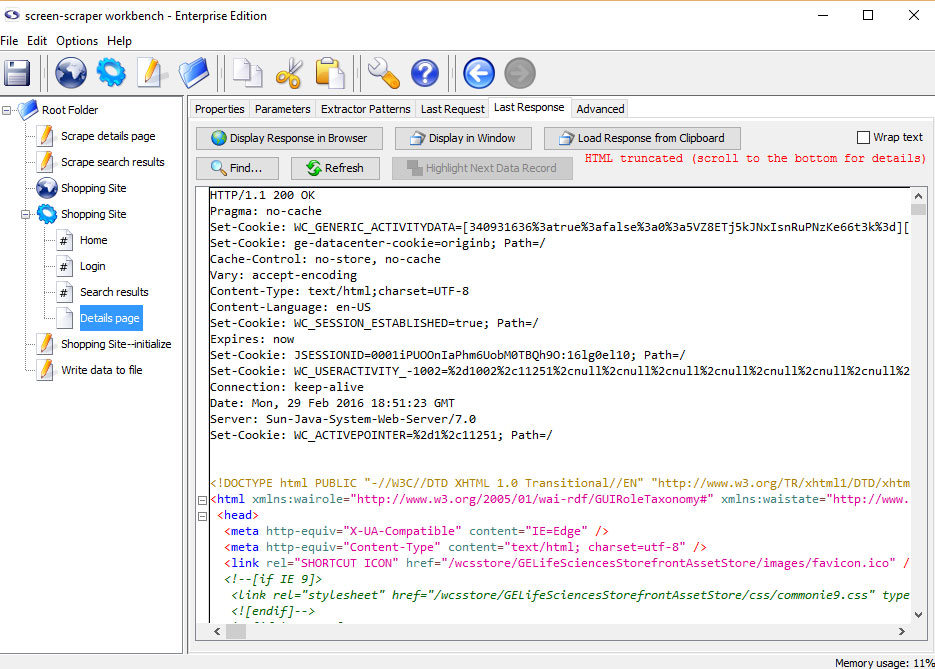
Last Response Tab
- Display Response in Browser: Displays the web page in your default web browser.
- Find: Search the source code for a string of text.
- Refresh: Reload display with the most recent response.
- Load Response from Clipboard: Loads an html response from the clipboard.
The contents shown under the this tab might appear differently from the original HTML of the page. screen-scraper has the
ability to tidy the HTML, which is done to facilitate data extraction. See using extractor patterns for more details.
Creating Extractor Patterns from Last Response
The most common use for this tab is in generating and testing extractor patterns. You can generate
an extractor patterns by highlighting a block of text or HTML, right-clicking and selecting
Generate extractor pattern from selected text.
Scrapeable File: Advanced tab

Advanced Tab (professional and enterprise editions only)
- Username and Password (professional and enterprise editions only): These two text fields are used with sites that make use of Basic, Digest, NTLM authentication.
You can generally recognize when a web site requires this type of authentication because, after requesting the page, a small box will pop up requesting a username and password.
- Tidy HTML (professional and enterprise editions only): Which tidier screen-scraper should use to tidy the HTML after requesting the file. This cleans up the HTML, which facilitates extracting data from it.
A minor performance hit is incurred, however, when tidying. In cases where performance is critical Don't Tidy HTML should be selected.
Extractor Patterns
Overview
Extractor patterns allow you to pinpoint snippets of data that you want extracted from a web page. They are made up of text (usually HTML), extractor tokens, and possibly even session variables. The text and session variables give context to the tokens that represent the data that you want to extract from the page.
Extractor patterns can be difficult to understand at first. We recommend that you read about using extractor patterns or go through our first tutorial before continuing.
Managing Extractor Patterns
When creating extractor patterns you should use the HTML that will be found under the last response tab associated with a scrapeable file. By default, screen-scraper will tidy the HTML once it's been scraped, meaning that it will format it in a consistent way that makes it easier to work with. If you use the HTML by viewing the source for a page in your web browser it will likely be different from the HTML that screen-scraper generates.
Adding
- Click the Add Extractor Pattern button in the extractor patterns tab of the scrapeable file
- Select desired text in the last response tab of the scrapeable file, right click and select Generate extractor pattern from selected text.
Removing
- Click the Delete on the desired extractor pattern.
Extractor Pattern: Main tab
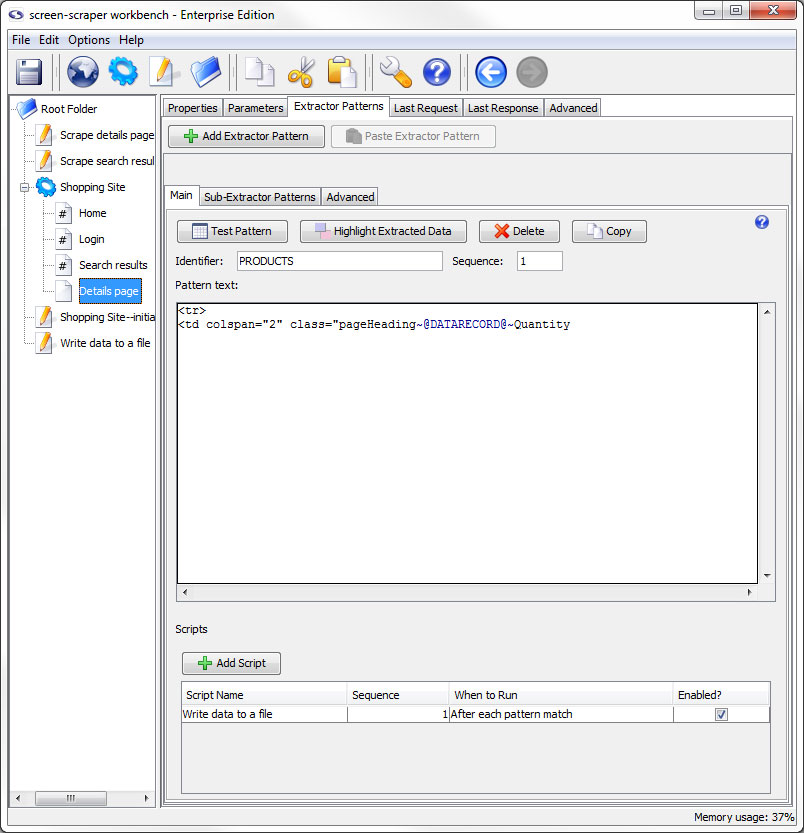
Main Tab
- Test Pattern: Opens a DataSet window with the results of the extractor pattern matches applied to the the HTML that appears in the last response tab.
- Highlight Extracted Data (professional and enterprise editions only): Opens the last response tab and places a colored background on all text that matches to the extractor tokens.
- Delete Extractor Pattern: Deletes the current extractor pattern.
- Copy Pattern (professional and enterprise editions only): Copies the extractor pattern so that it can be pasted into a different scrapeable file.
- Identifier: A name used to identify the pattern. You'll use this when invoking the extractData and extractOneValue methods.
- Sequence: Determines the order in which the extractor pattern will be applied to the HTML.
- Pattern text: Used to hold the text for the extractor pattern. This will also include the extractor pattern tokens that are analogous to the holes in the stencil.
- Scripts: This table allows you to indicate scripts that should be run in relationship to the extractor pattern's match results. Much like other programming languages, screen-scraper can invoke code based on specified events. In this case, you can invoke scripts before the pattern is applied, after each match it finds, after all matches have been made, once if a pattern matches, or once if a pattern doesn't match. For example, if your pattern finds 10 matches, and you designate a script to be run After each pattern match, that script will get invoked 10 separate times.
- Add Script: Adds a script association to the extractor pattern.
- Script Name: Specifies which script should be run.
- Sequence: The order in which the script should be run.
- When to Run: When the scrapeable file should request to run the script.
- Enabled: A flag to determine which scripts should be run and which shouldn't be.
Extractor Pattern: Sub-Extractor Patterns tab
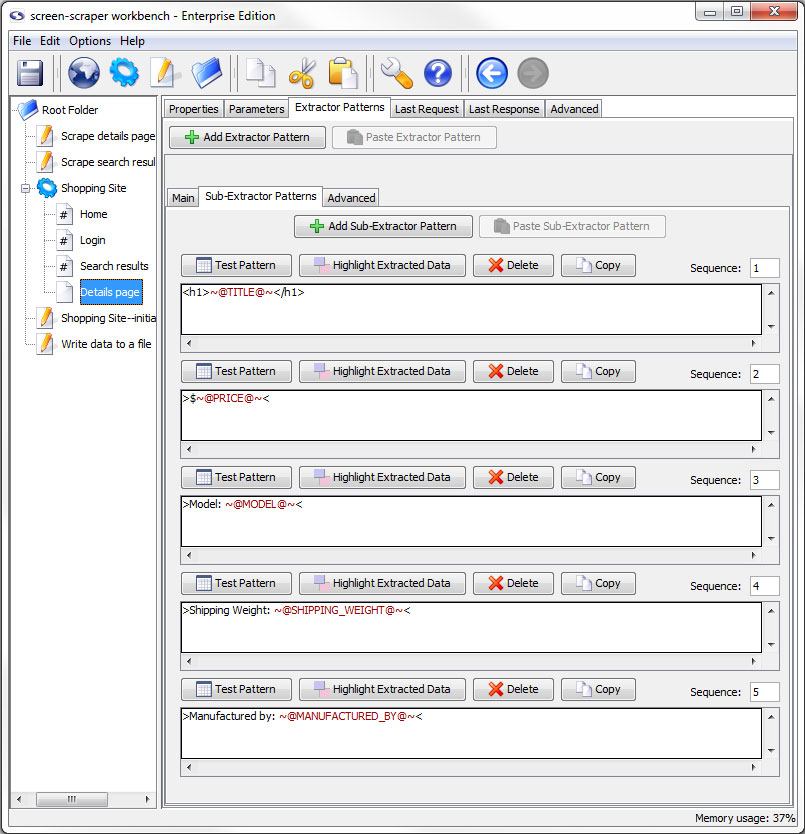
Sub-Extractor Patterns Tab
- Add Sub-Extractor Pattern: Adds a sub-extractor pattern.
- Paste Sub-Extractor Pattern (professional and enterprise editions only): Paste a previously copied sub-extractor pattern.
The buttons specific to the sub-extractor pattern are discussed in more detail later in this documentation.
Extractor Pattern: Advanced tab
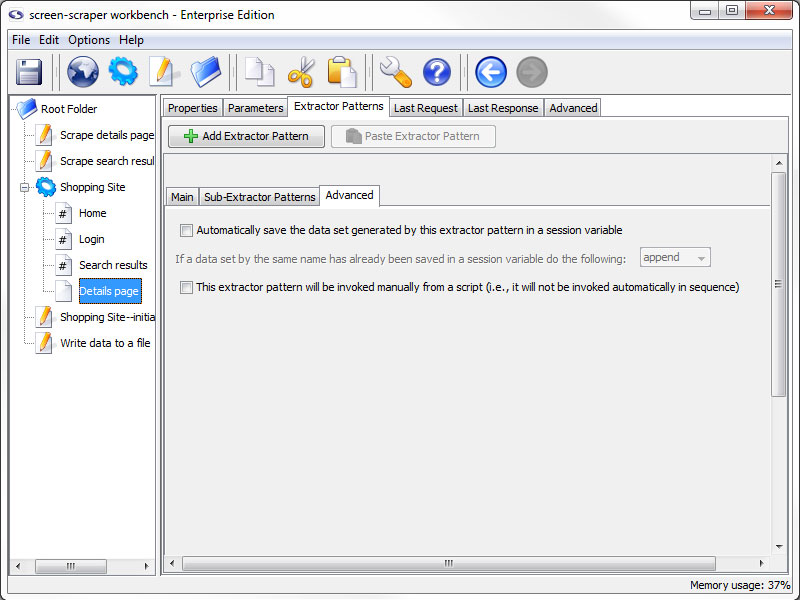
Advanced tab (professional and enterprise editions only)
- Automatically save the data set generated by this extractor pattern in a session variable (professional and enterprise editions only): If this box is checked screen-scraper will place the dataSet object generated when this extractor pattern is applied into a session variable using the identifier as the key (i.e. session variable name). For example, if your extractor pattern were named PRODUCTS, and you checked this box, screen-scraper would apply the pattern and place the resulting dataSet into a session variable named PRODUCTS.
It is recommend that you generally avoid checking this box unless it's absolutely needed because of memory issues it may cause. If this box is checked, screen-scraper will continue to append data to the dataSet, and all of that data will be kept in memory. The preferred method is to save data as it's being extracted, generally by invoking a script with a script association After each pattern match that pulls the data from dataRecord objects or session variables.
- If a data set by the same name has already been saved in a session variable do the following: The action that should be taken when conflicts occur. If this page is on an iterator you might want to append so that you don't loose previous data, but this makes your variable very large.
- Filter duplicate records (enterprise editions only): When this box and the Cache the data set box are checked screen-scraper will filter duplicates from extracted records. See the Filtering duplicate records section for more details.
- Cache the data set (enterprise editions only): In some cases you'll want to store extracted data in a session variable, but the dataSet will potentially grow to be very large. The Cache the data set checkbox will cause the extracted data to be written out to the file system as it's being extracted so that it doesn't consume RAM. When you attempt to access the data set from a script or external code it will be read from the disk into RAM temporarily so that it can be used. You'll also need to check this box if you want to filter duplicates.
- This extractor pattern will be invoked manually from a script (professional and enterprise editions only): If you check this box the extractor pattern will not be invoked automatically by screen-scraper. Instead, you'll invoke it in a script using the extractData and extractOneValue methods.
Sub-Extractor Patterns
Overview
Sub-extractor patterns allow you to extract data within the context of an extractor pattern, providing significantly more flexibility in pinpointing the specific pieces you're after. Please read our documentation on using sub-extractor patterns before deciding to use them.
Sub-extractor patterns only match the first element they can. To get multiple matches, you would use manual extractor patterns instead.
Managing Sub-Extractor Patterns
Adding
- Click the Add Sub-Extractor Pattern button in the sub-extractor patterns tab of the extractor pattern.
Removing
- Click the Delete Sub-Extractor Pattern button in the main pane of the sub-extractor pattern in the sub-extractor patterns tab of the extractor pattern.
Sub-Extractor Pattern: Main Pane
- Test Pattern: Opens a dataSet window with the information extracted from the last scrape of the file.
- Highlight Extracted Data (professional and enterprise editions only): Opens the last response tab and places a colored background on all text that matches to the extractor tokens.
- Delete: Removes the sub-extractor pattern from the extractor pattern.
- Copy (professional and enterprise editions only): Removes the sub-extractor pattern from the extractor pattern.
- Sequence: Order in which the sub-extractor patterns should be applied.
Extractor Tokens
Overview
Extractor tokens select the information from a file that you want to be able to access. The purpose of an extractor pattern is to give context to the extractor token(s) that it contains. This is to assist in getting the tokens to only return the information that you desire to have. Without extractor tokens you will not gather any information from the site.
Extractor tokens become available to dataRecord, dataSet, and session objects depending on their settings and the scope of the scripts invoked. All extractor tokens are surrounded by the delimiters ~@ and @~ (one for each side of the token). Between the two delimiters is where the name/identifier of the token is specified.
Managing Extractor Tokens
Adding
- Type ~@TOKEN_NAME@~ in the appropriate location in the Pattern text of the extractor or sub-extractor pattern.
Make appropriate changes to the TOKEN_NAME text to reflect the desired name of the token.
- Select a portion of the extractor pattern, right click, and select Generate extractor pattern token from selected text
Removing
- Remove the token and delimiters from the Pattern text of the extractor pattern like you would with any text editor
Editing
- Double-click on the desired extractor token's name
- Select the extractor token's name, right click, and choose Edit token
Extractor Token: General tab
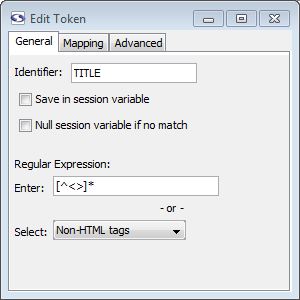
General Tab
- Identifier: This is a string that will be used to identify the piece of data that gets extracted as a result of this token. You can use only alphanumeric characters and underscores here.
- Save in session variable: Checking this box causes the value extracted by the token to be saved in a session variable using the token's identifier.
- Null session variable if no match (enterprise edition only): When checked, if a session variable was matched previously but not this time, the value will be set to null. If unchecked the unmatched token would do nothing to the session variable so that the old session variable persists.
- Regular Expression: Here you can designate a regular expression that will be used to match the text covered by this token. In most cases you should designate a regular expression for tokens. This makes the extraction more efficient and helps to guard against future changes that might be made to the target web site.
- Enter: Type in your own regular expression.
- Select: Select a predefined regular expression by name.
The regular expressions that appear in the drop-down list can be edited by selecting Edit regular expressions from the menu.
Extractor Token: Mapping tab

Mapping Tab (enterprise edition only)
We would encourage you to read our documentation on mapping extracted data before you start using mappings.
- Set (enterprise edition only): Name of the mapping group.
To create a new set, select the text in the Set textbox and start typing the name of the new set.
- Delete Set (enterprise edition only): Deletes the currently selected set.
- Add Mapping (enterprise edition only): Adds a mapping to the currently selected set.
- From: The value screen-scraper should match.
- To: Once a match is found, indicates the new value the extracted data will assume.
- Type: Determines the type of match that should be made in working with the value in the From field. The Equals option will match if an exact match is found, the Contains value will match if the value contains the text in the From field, and the regular expression type uses the From value as a regular expression to attempt to find a match (see regular expression help for more information on regular expressions).
- Case Sensitive: Indicates whether or not the match should be case sensitive.
- Sequence: Determines the sequence in which the particular mapping should be analyzed.
Mappings can be deleted by pressing the Delete key on your keyboard after selecting them.
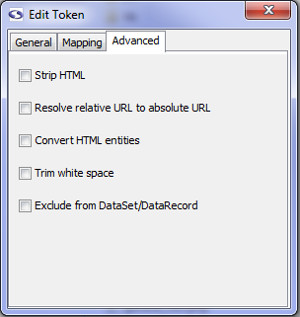
Extractor Token: Advanced tab
Advanced Tab (enterprise edition only)
- Strip HTML (enterprise edition only): Check this box if you'd like screen-scraper to pull out HTML tags from the extracted value.
- Resolve relatively URL to absolute URL (enterprise edition only): If checked, this will resolve a relative URL (e.g., /myimage.gif) into an absolute URL (e.g., http://www.mysite.com/myimage.gif).
- Convert HTML entities (enterprise edition only): This will cause any html entities to be converted into plain text (e.g., it will convert & into &).
- Trim white space (enterprise edition only): This will cause any white space characters (e.g., space, tab, return) to be removed from the start and end of the matched string.
- Exclude from DataSet/DataRecord (enterprise edition only): This will cause this token to not be saved in the DataRecord from each match of the extractor pattern
Scripts
Overview
screen-scraper has a built-in scripting engine to facilitate dynamically scraping sites and working with data once it's been extracted. Scripts can be helpful for such things as interacting with databases and dynamically determining which files get scraped at when.
Invoking scripts in screen-scraper is similar to other programming languages in that they're tied to events. Just as you might designate a block of code to be run when a button is clicked in Visual Basic, in screen-scraper you might run a script after an HTML file has been downloaded or data has been extracted from a page. For more information see our documentation on scripting triggers.
Depending on your preferences, there are a number of languages that scripts can be written in. You can learn more in the scripting in screen-scraper section of the documentation.
If you haven't done so already, we'd highly recommend taking some time to go through our tutorials in order to get more familiar with how scripts are used.
Managing Scripts
Adding
- Select New Script from the menu.
- Click on the pencil and paper icon in the button bar.
- Right click on a folder in the objects tree and select New Script.
- Use the keyboard shortcut Ctrl-L.
Removing
- Press the Delete key when it is selected in the objects tree.
- Right-click on the script in the objects tree and select Delete.
- Click the Delete button in the main pane of the script.
Importing
- Right-click on the folder in the objects tree that you want to import the script into (other than the root folder) and select Import Into. In the window that opens, navigate to and select the script you want to import.
- Select Import from the menu. In the window that opens, navigate to and select the script you want to import.
- Add the script to the import folder in screen-scraper's install directory
If screen-scraper is running when you copy the files into the import folder they will be imported and hot-swapped in the next time a scraping session is invoked. They will also be imported if you start or stop screen-scraper.
Exporting
- Right-click on the script in the objects tree and select Export.
- Click the Export button in main pane of the script.
Scripts: Main Pane
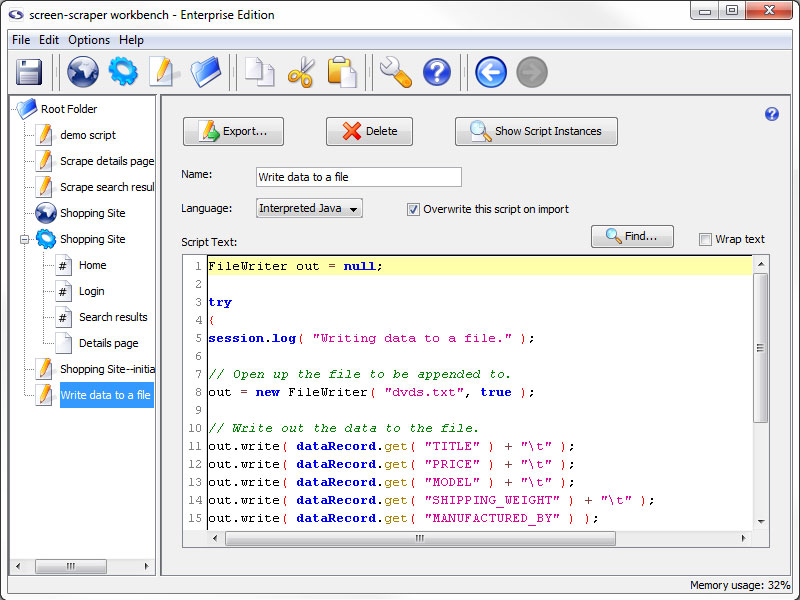
- Export: Export the script to a file so that it can be backed up or transferred to other instances of screen-scraper.
- Delete: Delete the script.
- Show Script Instances: Display any locations where this script is invoked in the format scraping session: scrapeable file: extractor pattern (opens in a new window).
- Name: A unique name so that you can easily indicate when it should be invoked.
- Language: Select the language in which the script is written.
- Overwrite this script on import (professional and enterprise editions only): Determines whether or not the current script can be overwritten by another that gets imported.
For example, scripts attached to a scraping session are exported along with it. When you subsequently import that scraping session into another instance of screen-scraper it might overwrite existing scripts in that instance. For more information read our documentation on script overwriting.
- Script Text: A text box in which to write your script.
- Find: Opens a search window to help locate text in your script.
- Wrap text: Determines whether single lines of code should be displayed on multiple lines when they are wider than the Script Text area.
Script Triggers
Overview
You designate a script to be executed by associating it with some event. For example, if you click on a scraping session, you'll notice that you can designate scripts to be invoked either before a scraping session begins or after it completes. Other events that can be used to invoke scripts relate to scrapeable files and extractor patterns.
Available associations (based on object location) are listed with a brief description of how they can be useful.
- Scraping Session
- Before scraping session begins - Script to initialize or debug work well here.
- After scraping session ends - This association is good for closing any open processes or finishing data processes.
- Always at the end - Forces scripts to run at the end of a scraping session, even if the scraping session is stopped prematurely.
- Scrapeable File
- Before file is scraped - Helpful for files used with iterators to get product lists and such.
- After file is scraped - Good for processing the information scraped in the file.
- Extractor Pattern
- Before pattern is applied - Good for giving default values to variables, in case they don't match.
- After pattern is applied - Good if you want to work with the data set as a whole and it's methods.
- Once if pattern matches - Simplifies the issue of matching the same link multiple times but only wanting to follow it once.
- Once if no matches - Helpful in catching and reporting possible errors.
- After each pattern match - Gives access to data records and their associated methods.
Managing Associations
Adding
All objects that can have scripts associated with them have buttons to add the script association with the exception of scripts. To create a association between scripts you would use the executeScript method of the session object.
Locations to specify script associations are listed below.
Removing
- Press the Delete key when the association is selected.
- Right-click the association and select Delete.
Ordering
Script associations are ordered automatically in a natural order based on their relation to the object they are connected to: scripts called after the file is scraped cannot be ordered before associations the are called before the file is scraped. Beyond the natural ordering you can specify the order of the scripts using the Sequence number.
Enable/Disable
You can selectively enable and disable scripts using the Enabled checkbox in the rightmost column. It's often a good practice to create scripts used for debugging that you'll disable once you run scraping sessions in a production environment.
Other Windows
Overview
So far we have explained each of the windows in the workbench of screen-scraper. Here we would like to make you aware of a few other windows that you will likely come across in your work with screen-scraper.
Breakpoint Window
Overview
The breakpoint window opens when the scraping session runs into a session.breakpoint method call in a script. It is a very effective tool when trouble shooting your scrapes.

Breakpoint Window
- (run): Instructs the scrape to continue from the stop point.
- (stop): Ends the scrape (as soon as it can).
- Session variables: Lists all of the session variables that are currently available.
The value of any variable can be edited here by double clicking on it, changing it, and deselecting or hitting enter.
- Current script: The script that initiated the breakpoint as well as a count of currently active scripts.
- Current scrapeable file: The scrapeable file that called the script that initiated the breakpoint.
- Current data set: Opens a dataset window with the contents of the active data set.
- Current data record: Lists all of the data record variables that are currently available.
The value of any variable can be edited here by double clicking on it, changing it, and deselecting or hitting enter.
Compare Last Request and Proxy Transaction
Overview
This feature is only available to Professional and Enterprise editions of screen-scraper.
At times in developing a scraping session a particular scrapeable file may not be giving you the results you're expecting. Even if you generated it from a proxy session parameters or cookies may be different enough that the response from the server is very different than what you were anticipating, including even errors. Generally in cases like this the best approach is to compare the request produced by the scrapeable file in the running scraping session with the request produced by your browser in the proxy session. That is, ideally your scraping session mimics as closely as possible what your web browser does.
The Compare Last Request and Proxy Transaction window facilitates just such a comparison. I can be accessed in the last request tab of the scrapreable file. After clicking the Compare Last Request and Proxy Transaction button, you will be prompted to select the proxy transaction to which the request should be compared. Simply navigate to the proxy session that it is connected to and select the desired transaction and the window will open.
![]()
The screen has four tabs to aid in comparing transaction and request: URL, POST data, Cookies, and Headers. Parameters in any of these areas can be controlled using the scrapeableFile object and its methods.
DataSet Window
Overview
The DataSet window displays the values matched by the extractor tokens. It can be view in two basic ways:
- Clicking the Apply Pattern to Last Scraped Data button on an extractor pattern or sub-extractor pattern.
- Selecting a DataSet or clicking the Current data set button in a breakpoint window.
The DataSet window has two rendering styles. The default is grid view, but you can switch between views using the button at the top of the screen (after view as:).
Grid View

The names of the columns correspond to the tokens that matched data in the most recent scrapeable file's response. The one addition is the Sequence column that is used by screen-scraper to identify the order in which the matches occurred on the page.
If a column is not showing up for an extractor token it is because that token does not match anything in any of the data records.
List View

This view can be a little easier for viewing the matched data in data record groups.
Regular Expressions Editor
Overview
The regular expressions that you can select for extractor tokens are stored in screen-scraper and can be edited in the Regular Expressions Editor window. The window is accessed by selecting Edit Regular Expressions from the menu.
This can be helpful if you have a regular expression that you use regularly. You can also edit the provided regular expressions though we encourage you not to do so without good reason. These regular expressions have been tested over time and updated when required; they are very stable expressions.

- Add Regular Expression: Adds a new regular expression to the list.
- (list of regular expressions)
- Identifier: Name for the pattern. This is what will be selected when adding a regular expression to the extractor token.
- Expression: The regular expression.
- Description: A brief description of the regular expression. This is primarily to help you remember when you come back to it later.
Listed regular expressions can be edited by double clicking in the field that you would like to edit.