Tutorial 5: Saving Scraped Data to a Database
Overview
We continue on with our shopping site in this tutorial by inserting the data we scrape into a database. Generally once you've extracted data from a web site you want to save it out either to a file or a database. We already went over saving the data to a file in Tutorial 2, so here we'll cover inserting the information into a database.
If you haven't gone through Tutorial 2, or don't still have the scraping session you created in it, you can download it and import it into screen-scraper.
Tutorial Requirements
As we will not be inserting the data into a database, but rather sending it to an external script, all you need is a web server on which to run the PHP script. If you do not have access to a PHP server don't worry, you can run the script using the PHP script sitting on one of our servers to see how it will work. In other words, you don't really need anything except a few minutes and screen-scraper.
Finished Project
If you'd like to see the final version of the scraping session you'll be creating in this tutorial you can download it below.
| Attachment | Size |
|---|---|
| Shopping Site (Scraping Session).sss | 13.18 KB |
1: Tutorial Details
How it Works
There are a number of ways to insert scraped data into a database, of the ones outlined in this FAQ we will be using the last one: POST's extracted data to a local web-enabled script that accepts the data and inserts it into a database.
The Enterprise edition of screen-scraper has the ability to handle scraped data in real time. As of right now, this has been implemented in the Java and PHP drivers for screen-scraper. If you're running the Enterprise Edition, and want to interact with screen-scraper using either of those languages, read over the Handling Scraped Data in Real Time section of either our Invoking screen-scraper from Java or Invoking screen-scraper from PHP pages for details on this. This tutorial doesn't cover this approach, but it's quite a bit easier and cleaner to implement than the method that will be described here.
The basic idea in this tutorial is that we'll have a special scrapeable file that will POST data to a PHP file, which will handle inserting the data into a database. The flow of events will look like this:
- Extract the data from the site, saving each value (product title, price, etc.) in session variables.
- Invoke a Save product scrapeable file, which will POST the extracted data to a PHP file.
- The PHP file accepts and validates the data. If the data was incomplete it will return an error message and then attempt to insert the data into the database itself. If everything went well it will return a success message.
- In screen-scraper we use an extractor pattern to check the success/failure status of the error message.
2: Scrape Updates
Session Variables
We'll modify our existing scraping session a bit to get it ready to save the scraped data to our database. First, click on the Details page scrapeable file in the objects tree, then on the Extractor Patterns tab, then click the Sub-Extractor Patterns tab for our PRODUCTS extractor pattern.
We're going to update each of our extractor pattern tokens so that they save their extracted values in a session variable. Do this by double-clicking each of them (e.g., on TITLE) or right-clicking (control-clicking on Mac OS X) and selecting Edit token. In the Edit Token window click the Save in session variable check box, then close the window. Do this for each extractor token (TITLE, PRICE, etc.).
We save the values in session variables so that we can use them as POST parameters in the scrapeable file that will POSTS to our PHP file.
New Scrapeable File
Let's create that scrapeable file now. Click on the Shopping Site scrapeable file in the objects tree, then the Add Scrapeable File button, found on the General tab. Once the scrapeable file appears give it the name Save product. In the URL field enter:
This is an example of the completed file. We will discuss the file in more detail later.
Check the box labeled This scrapeable file will be invoked manually from a script so that it will not run in sequence.
Now add the required parameters. Click on the Parameters tab for the new scrapeable file, and give it five POST parameters:
| Key | Value |
|---|---|
| title | ~#TITLE#~ |
| price | ~#PRICE#~ |
| manufactured_by | ~#MANUFACTURED_BY#~ |
| model | ~#MODEL#~ |
| shipping_weight | ~#SHIPPING_WEIGHT#~ |

Remember that the ~# #~ delimiters indicate that the value of the corresponding session variable should be substituted in. For example, in our case the value of the TITLE session variable (e.g., "A Bug's Life") will be substituted in for the TITLE token. This value will be the one that gets submitted to the PHP file so that it can be inserted into the database.
New Script
Finally, we need to create a simple script that will invoke our new scrapeable file. Click on the (Add a new script) button. Give the script the name Save product, and give it the Script Text:
The script simply tells screen-scraper to invoke the Save product scrapeable file.
New Script Association
We need invoke the Save product scrapeable file for each product, so that they all get saved to the database. As such, we'll invoke the script after the Details page is requested. Do this by clicking on the Details page scrapeable file in the objects tree, on the Properties tab, and then on the Add Script button. In the Script Name column select Save product. Under the When to Run column select After file is scraped.
Test Run
Okay, we're done setting up screen-scraper, so we're ready give our scraping session a run. Before we invoke it, let's make one minor tweak so that the session doesn't take quite so long to run.
In the Shopping Site--initialize session script, change the value of the SEARCH session variable from dvd to bug.
This way we'll get the two "Bug's Life" DVD's rather than every DVD in the system.
Once you've done that click on the Shopping Site scraping session in the objects tree, then on the Run Scraping Session button.
Check the Results
Once the scraping session has run it's course click on the Save product scrapeable file, then on the Last Response tab. You should see something like this for the response:
<result>
<status>Success</status>
<product>
<title>A Bug\'s Life \"Multi Pak\"</title>
<price>35.99</price>
<manufactured_by>Warner</manufactured_by>
<model>DVD-ABUG</model>
<shipping_weight>7.00 lbs.</shipping_weight>
</product>
</result>
This indicates that the last product was successfully inserted.
3: The PHP File
The Scrapeable File
Hopefully this is obvious, but we could just as easily use a web script written in ASP, Cold Fusion, or anything else that can be accessed via HTTP. In this tutorial we use PHP as an example simply because it's one of the most commonly used languages. Don't worry if you're not familiar with PHP, though, most of what we'll be going through is simple pseudo-code.
The best part of this approach is that you can interact with your database using your favorite web scripting language.
How the Script Works
To understand the script we need to know what the page looks like normally. Open the file in you web browser: http://www.screen-scraper.com/support/tutorials/tutorial5/db/save_product.php. You will get a form similar to the figure below.
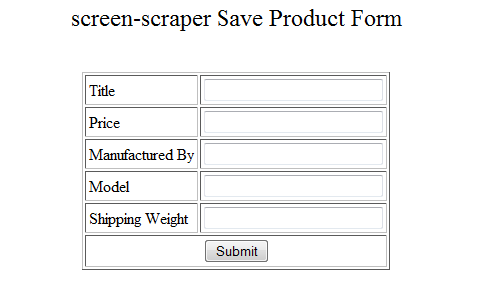
You'll notice that, when the PHP script is accessed directly (i.e., not via a POST request), it simply displays a form that you can use to insert products. Go ahead and try that now. Enter in some bogus information, then submit the form.
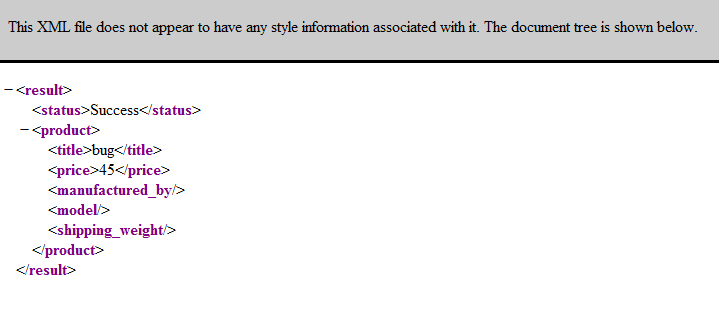
If you entered in at least a title and a price you should get a small XML document that resembles the one you saw in screen-scraper.
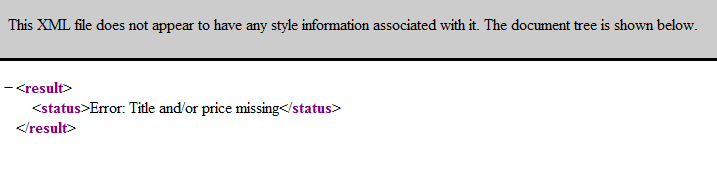
Go back to the form, leave the Price field blank, then re-submit the form. This time you get a message indicating that the data is incomplete.
The Connection
When you submit the form you're taking exactly the same action that screen-scraper does when it invokes its Save product scrapeable file. The data is submitted to the PHP file via a POST request, validated, then inserted into the database.
The Code
We have used general terms to reference what is happening in the script so far. Now we would like to invite you to look over the code of the PHP file found in this zip file: http://community.screen-scraper.com/files/media/tutorials/tutorial5/db/save_product.php.zip. It's pretty heavily commented, so hopefully you can follow it even if you don't know PHP. Your code will obviously vary depending on the database you're using and any data validation you want to perform.
You might notice that we are not actually saving anything in this file. This is primarily to avoid the load of all the bogus information being stored. You can lookup how to interact with your desired database in the documentation of the scripting language that you choose.
The Error Message
Having your web application return some kind of status message allows you to handle error conditions and such within screen-scraper. In this case you would probably want to set up an extractor pattern for the Save product scrapeable file that might look something like this:
You could then write a script that does something special, like write an error log, in the case of an error.
4: Where to Go From Here
Suggestions
Once again, congratulations on completing the tutorial. The best way to proceed would probably be to try this on your own project. If you run into any glitches don't hesitate to post to our forum so that we can lend a hand.
You are as always welcome to continue through the Tutorials or to read the existing documentation.
Still a Little Lost?
If you don't feel comfortable with the process, we invite you to recreate the scrape using the tutorial only for reference. This can be done using only the screen-shots while you work on it. If you are still struggling you can search our forums for others like yourself and ask specific questions to the screen-scraper community.
Other documentation and examples
The SqlDataManager object simplifies your interactions with a JDBC-compliant SQL database.
Example of a traditional approach to working with MySQL databases.